Durable and aesthetic, powder coating is one of the best finishing processes for laser cut parts. During post processing, the part is deburred and prepared for the coating, but there are a few things you can do before sending us your design to optimize parts for powder coating.
From preparing your part file for powder coating to the best geometry and materials to use, here’s how you can optimize your order for powder coating with SendCutSend.
Preparing your file for powder coating
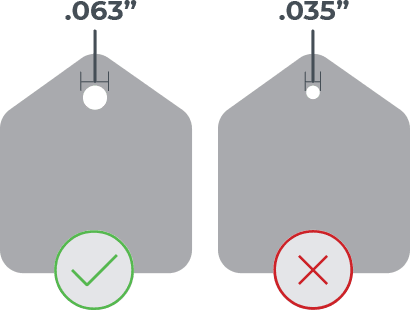
One of the most important things you should do to prepare your file for powder coating is ensure there is a hole in your part that is .063” or larger. We’re unable to accept parts that do not have a hole of this size or larger because this hole allows us to hang your part during the powder coating process.
Powder coating will cover no-kerf lines and etching, so be sure to remove them from your design.
Additional file requirements for powder coated parts with SendCutSend are the same as for all other files:
- File is a two-dimensional vector format file
- All holes and cutouts are at least 50% material thickness
- File is built at a 1:1 scale, preferably in inch units
- All objects are on the same layer
- All stray points, duplicate lines, empty objects and text areas have been removed
- No shapes have open contours
- All shapes have been united, combined or merged
- All text has been converted to outlines or paths
- Cut-out text (reversed text) has bridges or has been stencilized
Best geometry for powder coating
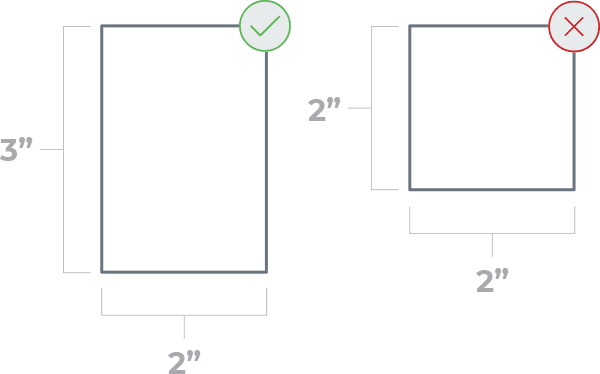
The nature of powder coating makes it difficult to fully coat parts with small geometry, so we need every single cutout on your part to be larger than .040”. Additionally, your part needs to be at least 3” long on one axis and no smaller than 3 square inches. In general, if you’re looking at your design and wondering, “Is that hole too small?”, then it probably is. It’s good practice to slightly oversize any holes being powder coated as well, so add 0.010”-0.015” of additional clearance to each hole.
There are a couple tolerances that you should be aware of with powder coating, especially if your parts will be particularly tight fitting. Powder can add anywhere from .007”-.010” to the surface of your part. Though the added thickness from powder coating is small, it can be problematic when it comes to tight tolerances that your design was not prepared for.
Tab and slot designs in particular need to be properly prepared for powder coating. You should add .015”-.020” of clearance on all mating surfaces to ensure they fit exactly as needed. Once again, preparing your design before you send it to us is valuable to avoiding any surprises when you begin assembly.
Best materials for powder coating
Theoretically, powder coating can be applied to any conductive material, but there are a few that are best. Here at SendCutSend, we offer several high quality powder coated materials. We highly suggest that you use Aluminium 5052 and 6061, or any of our Mild Steels.

Powder coating aluminum provides durability that aluminum doesn’t have on its own, and powder coating steel provides a weather-resistant, rust-free surface which is a weakness for most steels. Many powder coated laser cut projects, whether for indoor or outdoor use, can be machined out of either of these metals.
Adjusting your powder coated design to be machined out of Aluminum or Mild Steel will give you a beautiful finish and a high quality, durable part that will last for years to come. Reach out to our support team to ask about using one of these materials for your next powder coated project.
Quick note: at this time, we do not offer tab removal on powder coated parts. This means that micro joints and tabs may be visible through the powder coating, especially on parts made of thicker metals. Tabs are typically 0.015-0.030″ in width (depending on the material) and about 0.010″ in height.
Tapping and bending powder coated parts
In addition to our laser and waterjet cutting services, we also offer tapping and bending. Our tapping and bending services can be used in conjunction with our powder coating service, and there are a few things to keep in mind when utilizing all three services.
We will bend your parts before they are powder coated, but the die witness marks from the press brake will still be present and visible through the final coating. This doesn’t affect the functionality of the part in any way, but it’s something to keep in mind when you’re designing bent parts for the aesthetics. If you need to, optimize your powder coated design so the witness marks from the press brake are hidden after final assembly.
At this time, we are unable to plug tapped holes prior to processing for powder coating. As we stated earlier, you should add 0.010”-0.015” of additional clearance in each hole during the design process, but be aware that you will have to chase each tapped hole with a hand tap to clear the threads of the built up powder coating.
Optimizing your order for powder coating
Pricing for powder coated parts is dependent upon the overall size of your parts, but keep in mind that there is a $19 minimum for all powder coated colors to cover all processing costs. For example, if you order only one part in Gloss Black that costs $7, the total price of your order will be adjusted to reach $19. You can optimize your order costs by ordering enough parts to exceed this $19 minimum, at which point the fee will be dropped and your price per part will drop dramatically.
While powder coating is superior to paint on nearly all fronts as a finishing process, it takes a bit more time to prepare and apply. Because powder coating currently adds a 7-10 day lead time to your order, you can optimize your turnaround time by splitting up powder coated and non-powder coated parts into two separate orders. This way we can ship your non-powder coated parts as soon as they’re finished (standard orders are produced within 2-4 business days) while your other parts are being powder coated.
Ready, set, powder coat!
Now that you know how to best optimize parts for powder coating, you’re ready to place your next powder coated order with SendCutSend! Just be sure to review our general powder coating design guidelines first. Making sure your parts are in line with these guidelines before you send them to us will make the laser cutting and powder coating process faster, simpler, and higher quality.
Upload your design and get an instant quote for powder coating, and you’ll be well on your way to having sleek, high-quality powder coated parts sent straight to your door.