
There are hundreds of ways to design successfully for 2D manufacturing, but narrowing down all the best information would take weeks. We’re all about precision and speed here at SendCutSend, so we talked to some of our company experts for you and gathered their top four laser cut and waterjet cut design tips. Following these tips along with our laser cutting and waterjet cutting guidelines will make sure your final parts are as precise and successful as possible.
1. View your design in Outline Mode
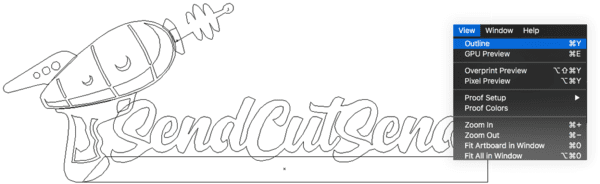
One of the most recommended tips for laser cut and waterjet cut designs is viewing your part in the Outline mode for your design software before completing the final export. SendCutSend experts recommend doing this because it’s easier to find any intersecting or disconnected lines, loose geometry, or other potential issues with your design that could interfere with the laser or waterjet’s path.
Most design software have some version of an “Outline Mode” and it can usually be found by going to the “View” dropdown with your file open and selecting the “Outline” option. In Illustrator, you can accomplish this by pressing Ctrl+Y. In Inkscape, you can accomplish this by going to “View > Display Mode > Outline.”
Check out some of our 3D CAD tutorials for software such as Autodesk Fusion and SolidWorks to see the best way to do this with non-vector based software.
2. Select a machining-friendly font
We talk a lot about fonts in our resources because it’s one of the most important things to keep in mind when designing for machining. Any calligraphic or spindly fonts will obviously not cut well, and all text will need to have bridging to ensure nothing is lost to the machining process. Some fonts that have bridging can still be difficult to cut due to small serif details, ligatures between lettering, and other features that can burn out.
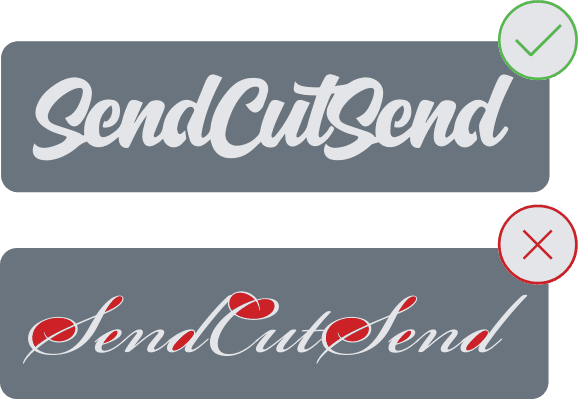
Examples of good fonts for laser cutting or waterjet cutting include:
- Gotham
- Helvetica
- Futura
- Generally fonts with mono-weight lines and no ligatures
Examples of bad fonts for laser cutting or waterjet cutting include:
- Clarendon/slab serifs (these contain thin areas between thick serifs which will not produce good results)
- Comic Sans (contains lots of anchor points which will be difficult to process or cut correctly)
- Gill Sans (contains sharp points with thin connections between letter elements)
- Impact/condensed fonts (not enough space between features)
3. Use QCAD for design and node checks
Having too many nodes can ruin an otherwise perfectly good design. Each node in the cutting path represents a “stopping point” for the laser or waterjet, so a high number of nodes can result in a choppy, uneven edge quality. Deleting these nodes and smoothing out the cutting path is vital to a successful end result.
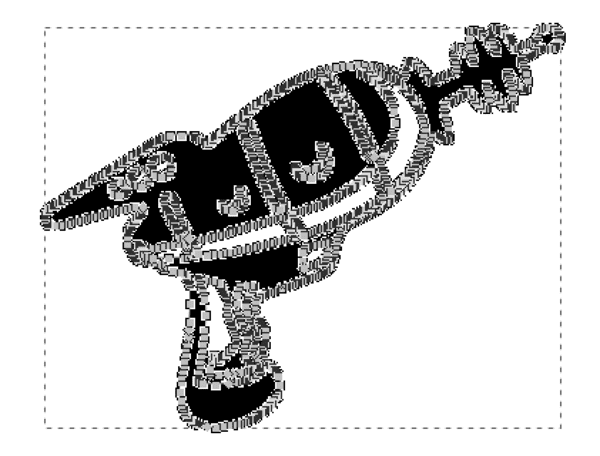
One of the ways we suggest doing that is by importing your design to QCAD, a free, open source DXF/DWG editor program that many of us here at SendCutSend use and support for our own designs. It includes precise measurement tools and duplicate/zero length path detection tools to ensure your cut pattern is free of duplicates and intersecting geometry.
If you choose not to use QCAD, there are other ways to check your design for nodes. If you’re working in Illustrator, you can see all the nodes by selecting the whole design (Ctrl+A) and choosing the Direct Selection tool (A). If there are many clustered anchor points, you can use the Simplify tool (Object > Path > Simplify) to reduce them. Inkscape has a similar feature that you can use by clicking Ctrl+A to select the whole design and then clicking Ctrl+L to simplify. If utilizing the Simplify tool, keep in mind that it can negatively affect the dimensions of your part if used too many times.

4. Utilize our bending calculator
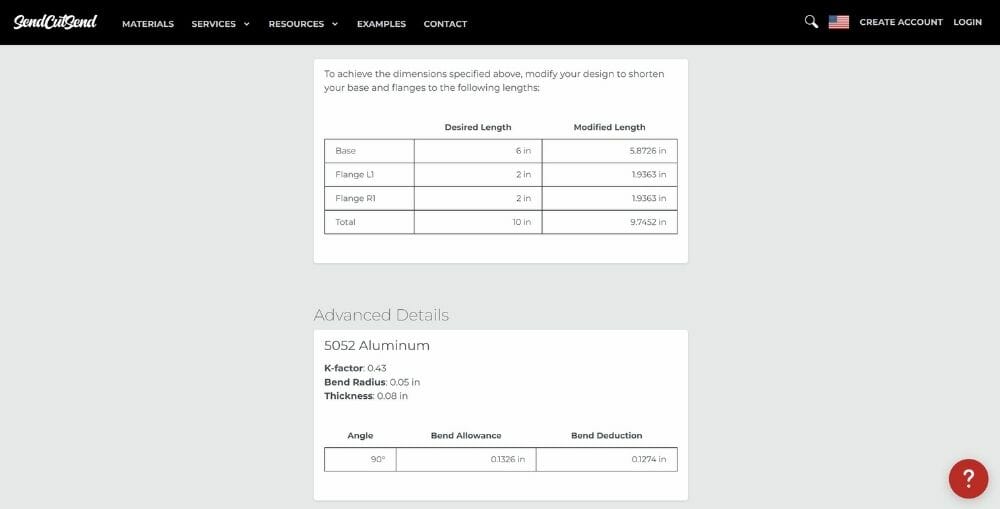
The final design tip from our experts here at SendCutSend is to utilize the bending calculator available on our website. A simple but vitally important tool, the bending calculator can save you a few headaches when doing the math to process your design for bending.
To use the bending calculator, simply input your chosen material and thickness, as well as the units (inches or mm) you’re using for your design. Then input your desired base length, and flange length, location, bend direction, and angle. Repeat for however many bends your part will have. After you’ve done this, scroll down to “Advanced Details” where you’ll see the K-Factor, Bend Radius, Bend Allowance, and Bend Deduction. These values are important to know to ensure your bends and final part fits within your needed tolerances. (Check out our other bending resources on our blog and YouTube Channel to learn more about the bending calculator and how to use it.)
Resources for design practices in manufacturing
These four design tips are some of SendCutSend experts’ most recommended for laser cutting and waterjet cutting, but they’re not the only tips you should follow for a successful manufacturing experience. Our blog is full of helpful tricks and best practices, and as always, be sure to read the design guidelines before uploading your design to our website.
We are also building a platform of video tutorials and resources on the SendCutSend YouTube channel, so be sure to subscribe to us there to see our best advice and educational content.


