Designing for tapping and countersinking takes some additional considerations prior to uploading your part for online laser cutting. We’ve put together some tips for designing for the strongest thread engagement when tapping laser cut holes and accurately defining your countersunk diameter.
Tapping Laser Cut Holes and How It’s Used
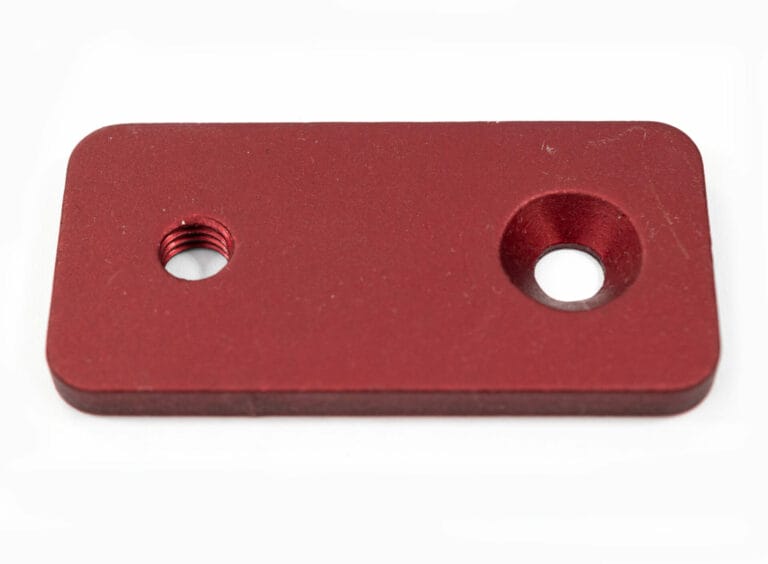
Tapping laser cut holes is easy with SendCutSend. Tapping is the process of forming threads in a hole to prepare it for hardware. Tapping laser cut holes allows you to fully customize your design, and makes assembly simple.
Designing for Tapping
Let’s go over a couple definitions for tapping laser cut holes before getting into designing for SendCutSend’s online tapping service:
- Thread engagement: the percentage of threads in the hardware that’s used in the tapped hole
- Thread pitch: a measurement that tells you how many threads there are on your hardware in a given amount of space.
You can read more on these definitions in our Tapping Guidelines.
Keep in mind that all tapped parts must be at least 1.5”x1.5”, and we can only tap exactly perpendicular to the part surface. The smallest or largest tap available changes depending on the material and its thickness, so be sure to review our Processing Min/Max chart to make sure your part fits within those limitations.

Tapping laser cut holes for ideal thread engagement
In general, soft materials like laser cut aluminum and plastics benefit from more thread engagement, around 75%. Harder materials benefit from 50%-70% thread engagement.
You will need to decide the length of the hardware you use, but for the strongest application, aim for 1-1.5x the bolt diameter to depth ratio. Taking the diameter to depth ratio and ideal thread engagement into account may change what material thickness you choose for your project.
If you’re designing with a specific material thickness in mind, you’ll want to make sure the thickness can handle the necessary thread engagement before sending your files to us.
For example, an 8-32 bolt should have roughly (0.136”-204”) thread depth, so your material needs to be at least that thick.
Choosing the correct hole size for a tapped hole
Besides thread engagement, the other major thing to consider when designing for tapping is the hole size. Too large, and the hole can cause the tap to strip and fail part way through tapping, as well as creating an environment for improper fastener engagement. Too small, and the tap will bind and break, resulting in excessive heat and wear on the part while causing the tap to remove more material than it can reasonably handle.
After you’ve determined what tap size your part and hardware require, review our thread sizing chart to make sure you have designed the correct hole size for the necessary tap. The units are given in both imperial and metric.
Want to know more about tapping with SendCutSend? Check out this quick video!
What is Countersinking and When to Use It?
Countersinking is just the process of widening the diameter of a hole and creating a sinking angle to allow hardware to sit flush with the surface of the material. Countersinking is used in a variety of applications, from creating a simple cosmetic finish to making sure your hardware doesn’t get in the way of the rest of your assembly.
Designing for Countersinking
The success of countersinking is heavily dependent upon the material thickness and the size of the part, so we’ve implemented sizing minimums and maximums your part will need to adhere to in order to be countersunk. Please reference our Countersinking Guidelines for the most thorough information regarding the following key points.
Laser cut countersunk holes
The biggest issue most people face with countersinking parts that are machined through laser cutting or waterjet cutting is leaving lines in their file that indicate both the outer (countersunk) circumference of the hole, and the inner circumference. While this is helpful for you to reference when you’re countersinking your parts, sending a file to the laser cutter with both these hole sizes indicated will cause the laser cutter to only cut the outer circumference and the inner circumference will fall out, leaving the hole to be too large to countersink. So make sure that in the file you upload to us, only the inner circumference is indicated.

Choosing the right hole size for countersinking
The diameter of the countersink is important for ideal hardware contact. Since the point of countersinking is to ensure that the hardware sits flush with the material surface, an incorrect countersink diameter could leave gaps between the hardware and the material, or cause the hardware to sit above the material surface.
So the diameter of the countersink should be the same size as or larger than the diameter of the hardware head. In general, you can achieve this by making the countersink 50% larger than the hole diameter. Or you can measure the hardware head with calipers and choose the corresponding countersinking diameter. When selecting your hole operations for the desired hole in your design, we will automatically resize the hole to the required size as long as the starting hole is less than 4.00” in diameter. Please keep in mind that because they will resize, you will need to verify you have adequate clearance to other features and edges of the material.
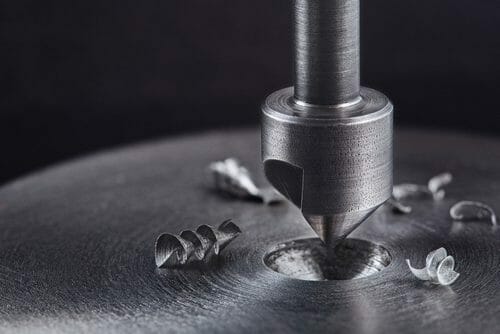
Countersinking depth and angle
Countersinking depth and angle are the two other important things to remember in countersinking. If your countersink is too deep and at the incorrect angle, the hardware won’t be flush with the surface of the material. Countersinking can also risk the structural integrity of your part, creating stress and wear where it’s avoidable.

Laser cut sheet metal has to push the limits of countersinking so you will often need to countersink the full thickness of the material. If possible, the countersink should not be deeper than 60% of the material thickness, but this can’t always be the case. It depends on the individual needs of your project, but if you do need to countersink the full thickness of the material, make sure the holes are spaced far enough apart to prevent stress.
This brings us to the angle of the countersink. The standard angle for most screw heads if they follow the Unified Thread Standards is 82°, so the countersink should match this. Because this is the standard angle, it’s easy to get countersinking drill bits or drill press tooling that will create the ideal fit. And ideally, hardware has at least 50% contact with the countersink when it’s assembled, so for projects where the tolerances are flexible, the angle does not have to be an exact match.
Tapping Made Easy With Our Online Tapping Service
Tapping laser cut holes and countersinking can be confusing, these tips should make it much easier the next time you are working on a tapped or countersunk project. We aim to make manufacturing and machining simple.
And starting at only $3 per tapping operation, we’re also making it affordable. The best part is, the more you order, the more you save! You can get up to 59% off your order if you increase the quantity of tapping operations. So get your custom tapped parts designed, uploaded to our instant pricing tool, and have custom laser cut and tapped parts at your door in days.


