
Countersinking is a great way to make the fasteners in your design flush with the parts they’re connecting. It can give a more professional and polished look, making screws look integrated rather than an afterthought. They’re also functional, keeping bolt heads out of the way.
In this article we’re going to discuss countersinking and why you might want to include them in your projects.
What is a Countersink?
A countersink, sometimes referred to as a countersunk hole to differentiate it from the tool of the same name used to cut it, is nothing more than a conical-shaped hole. The term “countersink” is also the name of the tool used to cut the countersunk hole. To add to the confusion a little more, countersink can also be a verb, meaning to cut the countersunk hole using the countersink tool. You may also see countersink abbreviated CSK or C’SINK.
Countersunk holes can technically be any angle, but there are a few angles that are much more common. Inch-size fasteners most often use an 82-degree angle, while metric fasteners usually use a 90-degree angle. There are a few other common angles, but 82 and 90 degrees are the most common. We’ll go over that in more detail in this article.
Countersink vs. Counterbore Holes
Countersunk holes are often confused with counterbored holes. Where a countersunk hole is conical, a counterbored hole is cylindrical. There is also the slightly less common counter-drilled hole, which is basically a combination of a countersink and a counterbore. You may see the term flat-bottom countersink, which is confusing and is likely referring to a counterbore.

Anatomy of a Countersunk Hole
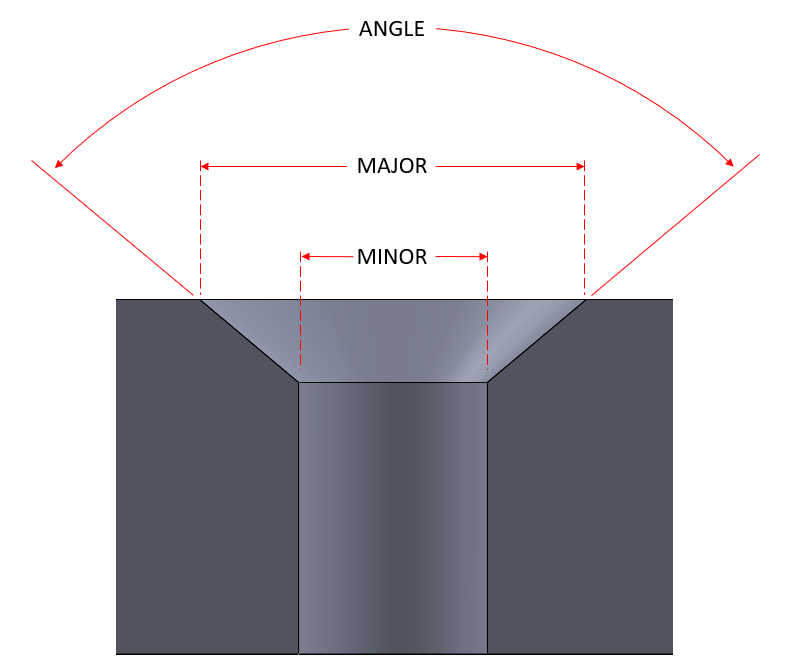
A countersunk hole is defined by three parameters, the MAJOR diameter, the MINOR diameter and the ANGLE.
Major Diameter
As shown above, the major diameter defines the diameter at the top of the hole, at the surface of the part. This is the diameter you’ll want to match the head of the fastener that will be used in the countersunk hole. If the major diameter is larger than the fastener head diameter, the fastener will sit below the surface. If the major diameter is smaller than the head of the fastener, the fastener will sit above the surface.
Minor Diameter
The minor diameter defines the diameter of the cylindrical hole below the conical taper. This is commonly a clearance hole for the shank or threaded body of the fastener. A smaller minor diameter will increase the height or depth of the tapered portion of the hole, while a larger minor diameter will reduce the height or depth of the tapered portion.
Angle
The angle defines the conical taper. You’ll want to match the fastener you intend to use in the countersunk hole. Common angles are 82 degrees for inch-sized fasteners and 90 degrees for metric fasteners. 100 degrees is also a common option with metric hardware. Currently, SendCutSend offers 82-degree and 90-degree options.
Why Should You Use a Countersunk Hole?
- Clearance – Countersunk fasteners are often called flat head or flush mount fasteners because they can be installed flush with the material surface. A counterbored hole allows for a similar fastener position, but a countersink can be done in much thinner material.
- Self-centering – Another feature to countersinking a hole is that the conical shape makes it self-centering. That can be either a benefit or a drawback, depending on how you look at it. If your hole positions aren’t very precise, you may want the extra clearance a standard hole grants you. If your holes are laser cut or waterjet cut, you can expect very precise placement and can take advantage of the countersinks self-centering.
- Aesthetics – Countersinking fasteners can give a design a more integrated look and feel.
- Aerodynamics – If you take a look at a lot of aircraft, you can see the skin is most likely held on using thousands of countersunk rivets to make the surface smooth. It may not look like a dramatic difference, but there are aerodynamic benefits to having flush-mounted rivets rather than small dome-headed rivets protruding from the surface.
- Deburring – While it may not technically be a countersunk hole, countersinking tools are often used to deburr the leading edges of holes. This has the benefit of cleaning up parts, as well as allowing taps to start easier when threading a hole.
How to Countersink?
Countersinking is a service you can get directly from SendCutSend on your parts, but what about parts you don’t order from us? Let’s go over some tips for DIY countersinking whether the parts are your own design or you’re building customer parts from a technical drawing.
Things to Consider When Countersinking
How to Correctly Interpret a Countersink Symbol on a Drawing
You may be in a position where you’re building parts from an existing technical drawing OR you may be creating a technical drawing for a part that needs countersinks. Either way, it’s important to know how to correctly interpret a countersink symbol on a drawing. Here’s an example of how to callout countersinks, counterbores and even counterdrilled holes.

You may also see the countersink symbol replaced with an abbreviation similar to CSINK or C’SINK. The same can be true of counterbores, CBORE, C’BORE or some similar variation. The most common method however, is to use the symbols shown above.
Types of Materials
Nearly any solid material can be countersunk. If it can be drilled, there’s a good chance it can be countersunk. Countersinking can often be done on thinner materials than counterbored holes, however some materials aren’t thick enough for a full countersink. We suggest using caution when using larger countersinks in thinner materials. Using a countersink depth that’s more than about 60% of the material thickness can start to weaken the material. For that reason, 60% is what we recommend in our design guidelines.
Wood is a particularly forgiving material when countersinking. This is more true in softwoods like pine and fir plywood, less so for very hard woods like hard maple. You can often get away with driving a flat screw into the wood and compressing the wood fibers to make the screw flush. This may not result in the most attractive finish, but it can work. If aesthetics are important, we’d avoid this method in plywoods and woods that have a thin veneer. The actual angle of the countersink vs the screw angle is less important in wood because it will compress easily.
To confirm which materials SendCutSend countersinks, check the materials processing page!
Types of Countersink Screws
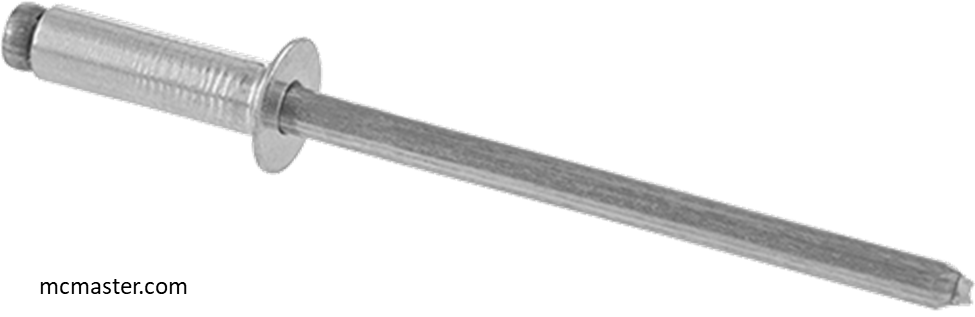
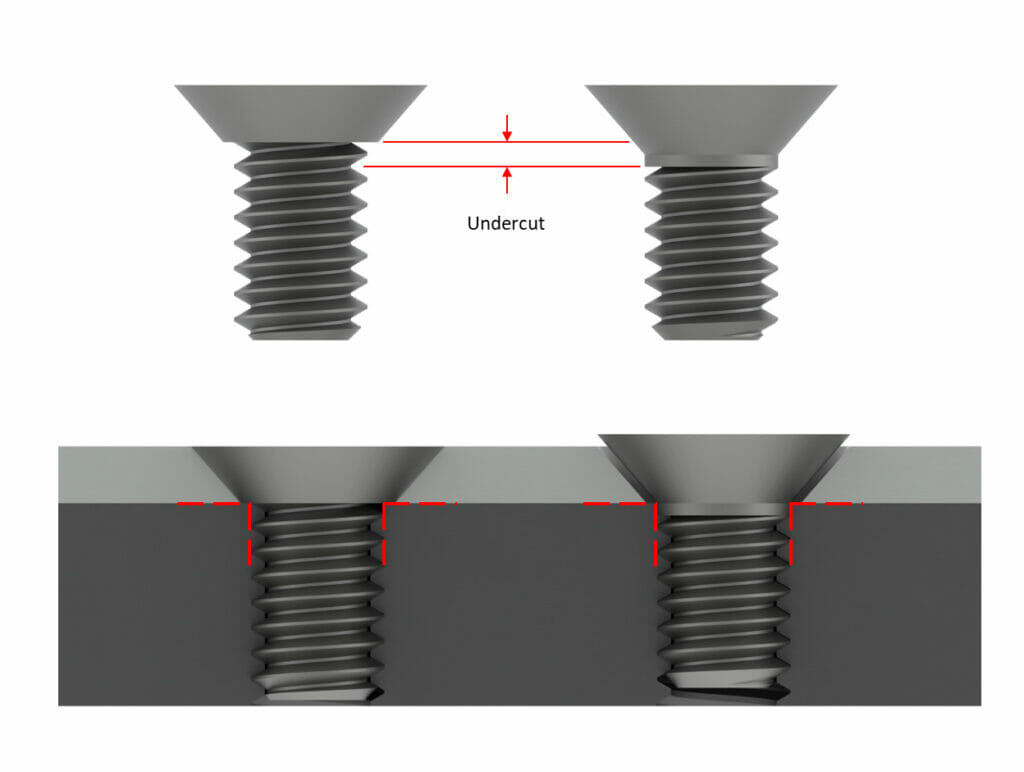
Typically called flat head, flush mount or even just countersunk fasteners, you can find both screws and rivets made for countersunk holes. With counterbored holes, if the bore is large enough, almost any fastener can be used. Socket head fasteners are more common because the tool to install them is smaller than the fastener head, but a hex head fastener can be used if the counterbore is large enough for a socket to fit around it. Some fasteners are undercut to fit in thinner materials.
Types of Countersink Tools and Bits
There are multiple ways to physically cut a countersink into a part. The most common type of countersink tool is a rotating bit. Depending on the material, it can be cut using a handheld drill. This is especially common with wood. More often, to get a cleaner result, a countersink is cut using a drill press or even a milling machine or lathe. Some specialty tools are made to cut both the minor and major in a single operation to save time. Below are some examples of countersink bits and tools.
| A standard, single flute countersink. Can be used in a variety of materials. Also available in a similar design with multiple flutes. | |
| Called a zero-flute countersink. Useful for resisting vibrations when cutting. | |
| A carbide insert countersink. Has a replaceable cutting edge. | |
| A counterbore tool with an integrated guide to fit in a pilot hole. You’ll want to match your pilot hole diameter to this tool for the best results. | |
| A combination drill and adjustable countersink. The location of the countersink can be moved to control depth relative to the drill. These are common in woodworking. |
This only scratches the surface of the tooling available. Everything shown here and more can be seen at McMaster-Carr.
Because of its flat bottom, counterboring can be done with a variety of more general tools. An endmill works great. In soft materials, router bits, spade bits and Forstner bits can all create counterbores.
Steps to Countersink a Screw in Your Parts
- Check the size and shape of the screw you intend to use. Is it a flat head for a countersunk hole or is it a socket head for a counterbored hole? If you’ll be using a countersink you’ll also want to verify the angle. 82 degrees for inch fasteners and 90 or 100 degrees for metric fasteners are most common, but it’s best to check. The last thing to measure is the diameter of the head of your fastener.
- Pick the appropriate tool. It will need to be the correct angle (less critical in soft woods as we mentioned above). For countersinking, the tool should be at least as large, slightly larger in diameter than the fastener head diameter. You can control the final diameter with the plunge depth. For counterboring, the tool diameter should match the hole you want to create. Ideally this is slightly larger than the head of the fastener. Make sure the tool you’re using is appropriate for the material. Most tooling for wood won’t cut metal very well.
- Drill an appropriate size pilot hole for the body of your fastener.
- Set your tools at an appropriate speed. This is more important in metals. Some materials machine better at slower speeds while some require faster speeds. You can find charts for all kinds of materials online to point you in the right direction.
- If you’re new to cutting countersinks, practice a few in a scrap piece of material. This can help you get a feel for the speed and pressure that gives the best finish.
- When cutting your countersink, take shallow cuts and stop and check the fastener in the hole as you go. It’s better to slowly approach the correct depth than to overshoot it. You can always cut more in multiple passes, but once your hole is too deep it’s harder to add material back.
- If you have multiple matching holes to countersink, a marking on the bit to indicate depth can help you be consistent. If you’re using a drill press, a depth stop is useful.
Final Tips on How to Finish Your Countersink
- If you’re using a spade bit or Forstner bit to counterbore a hole in soft material, it may be easier to create the counterbore first since these types of bits rely on a sharp point in the middle to stay centered. If you drill the pilot hole first there won’t be any material in the center for these types of bits. If your tool needs material right at the center, drill your pilot hole AFTER counterboring. Countersinks are tapered and don’t have this problem.
- If you’re seeing chatter or vibration, you can try adjusting your speed and pressure. If nothing you do seems to help, you may need to switch tools. Zero flute tools are known to be good for resisting vibration.
- If you’re worried about quality, or don’t have the tools, you’re in luck, SendCutSend can countersink holes for you. It’s one of the many services we offer beyond just cutting material.
FAQs Around Countersinks
A pilot hole is a small straight hole used to guide a tool when making a larger hole. In countersinking, the smaller hole does guide the countersink, but the pilot hole is also needed for the fastener to pass through the material (or grab it if the hole is threaded).
That depends on two things. The first is your design. There’s no hard rule that says your fastener has to sit perfectly flush, you may want to recess it below the surface slightly. That said, flush is the norm. The second factor is the size of the fastener. You want the depth of the hole so that your fastener sits at the depth you want it. This is usually based on diameter, but you can also use the fastener itself to check periodically while you cut the countersink.
For countersinking, you want to match the angle of the taper exactly, but otherwise the size only needs to be large enough to reach the depth/diameter of the hole you want to make. Some larger bits won’t have a tip small enough to do small holes, so that’s worth checking also.
That’s a challenge. In softer materials where matching the angle is less critical, you can use a larger drill bit to create a countersink. A small sharp blade can sometimes be used to shave the edges of the hole down. Neither of those options are great. The best countersink is going to be cut with the right tool. Alternatively, if you need a quality countersink, but you don’t have the tools, SendCutSend can cut the countersinks for you. Check out our services page to find countersinking along with all the other add-on services to level up your parts.


