In the past we’ve covered the basics of threaded holes, what a threaded hole is, how they’re sized, etc. There’s a lot of vague information and misused terms surrounding threaded holes, so in this article we’re going to go a little deeper to try and clear some of that up.
Thread is a fairly generic term. It can be used as a noun to describe the physical helix shaped feature as a whole or as a single peak of that helix. You may see terms like threads per inch or number of threads. Thread can also be a verb, describing the action of creating a thread.
What is a Threaded Hole?
A threaded hole, not to be confused with a clearance hole, refers to a hole that has threads in it. That’s it, simple as that. It doesn’t necessarily matter how the threads are created (we’ll cover some of the ways a little later in this article). A threaded hole is often used to accept a similarly (but opposite) threaded shaft, like a bolt or screw. The hole in a hex nut that accepts a bolt, is a threaded hole. A tapped hole in a plate that accepts a screw, is a threaded hole. The hole in the middle of a donut, that one is not a threaded hole.
Blind Holes and Through Holes
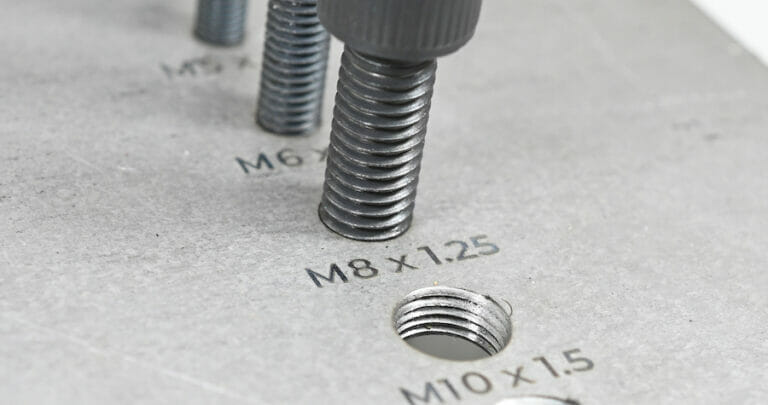
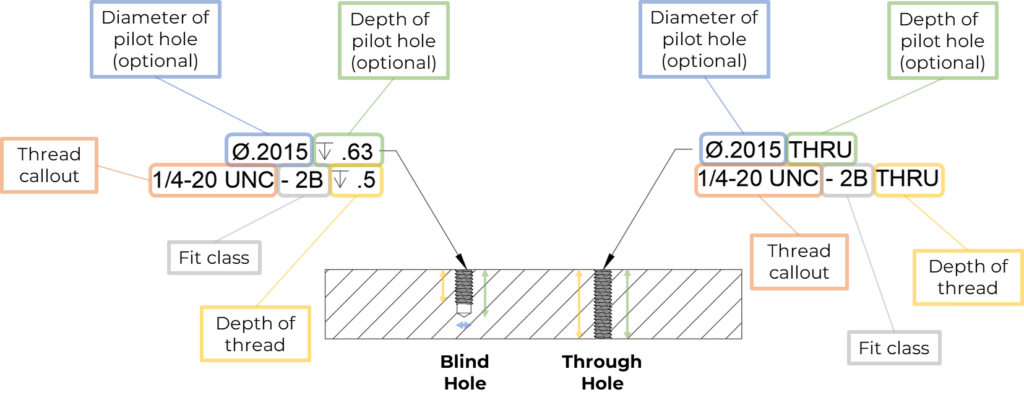
Both blind and through holes may be threaded or not (just smooth round holes), the difference is whether or not the hole goes completely through the part to the other side. A blind hole is defined by both hole depth and thread size. In fact, it’s often defined by a drill depth AND a thread depth. A through hole is exactly what it sounds like, it passes completely through the part, breaking out the other side. It’s defined by only thread size. Through holes that are threaded can usually accept a screw from either side, but not always.
Threaded Holes vs. Tapped Holes
Searching tapped holes vs threaded holes you can find a lot of misinformation, or maybe just misused terminology. As we mentioned, the general term threaded hole refers to a hole with threads inside. It’s pretty common to find the term “threaded hole” used interchangeably with the term “tapped hole”. In a lot of cases, that’s not necessarily wrong. A tapped hole, however, refers specifically to a threaded hole that has been created using a tap, whether that’s a cutting tap or a forming tap. The term tap typically refers to a cutting tap rather than the less common forming tap.
A cutting tap is frequently the tool to use when creating a threaded hole. That’s even how our tapping services work on parts ordered with threaded holes. A cutting tap isn’t the only way to create threads in a hole. Threads can be formed or rolled instead of cut. They can also be cut using different tools. Let’s look a little closer at those three options.
Formed Threads
This is where the threaded feature is created by pressing a form, often while the part or form are rotating, to force the material into the shape of the thread. Forming threads has the advantage of creating stronger threads, but it requires more complicated tools to create so it’s used more in production environments rather than at a machinist or home fabricator level. Most production fasteners that you can purchase are created using this method. Forming taps exist that move material rather than cut it, but are usually reserved for softer materials.
Tapping
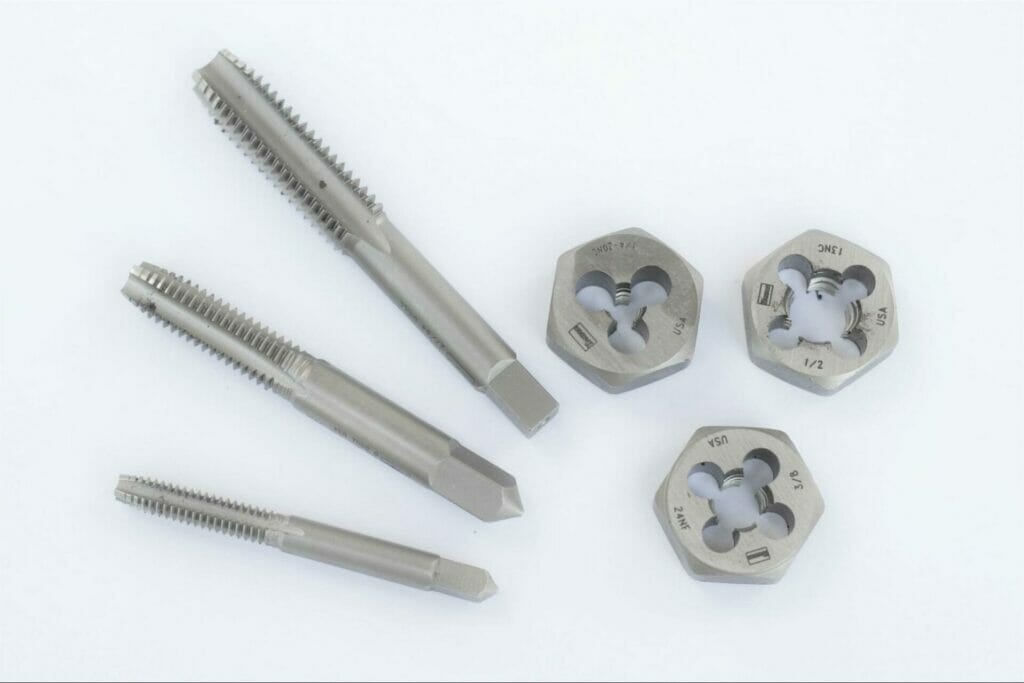
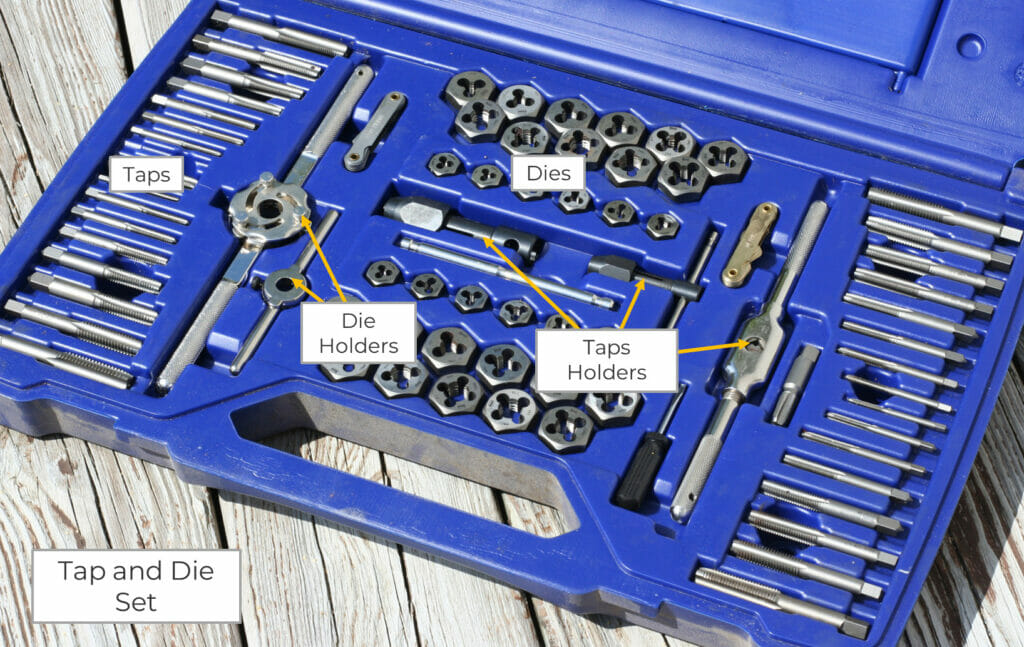
Tapping is the method of creating internal threads most people are familiar with. And probably the method of choice for prototyping or tapping holes at home and even in a lot of professional shops. A cutting tap is a tool designed to be rotated into an existing hole. It looks a lot like a screw, and in fact you can buy self-tapping (not the same as self-drilling) screws that will cut threads into the base material as you twist them. Taps are sized for the specific hole you want to create. If you want to create a ¼-20 right hand thread, you need a ¼-20 right hand tap. Taps can be purchased individually, or in sets containing a range of thread sizes. Sets often include corresponding dies to cut the matching external threads.
Let’s discuss dies briefly, since a lot of people misuse the terms tap and die. In this context, a tap is the tool that looks like a screw, it twists into a hole to cut the internal threads. A die is the tool that looks like a nut, it twists around a shaft to cut an external thread. If you were using a tap and die to create threads for a nut and bolt, you’d use the tap to create the nut threads and a die to create the bolt threads.
Now back to the taps. Taps come in different styles. The most common are the taper tap, plug tap and bottoming tap. A taper tap has a gradual taper at the starting end so the tool isn’t trying to cut a full depth thread initially. This makes it a little easier to start the tap at the cost of not being able to create full threads all the way to the bottom of blind holes. If you need the threads to be fully cut closer to the bottom of the blind hole, that’s where a bottoming tap is useful. A bottoming tap isn’t great for starting the threads, and is usually used after the threads have been started using a taper or plug tap. The lack of taper on the bottoming tap allows it to cut full threads much closer to the bottom of blind holes. Finally, the plug tap is similar to the taper tap, but has a much steeper starting angle, so fewer of the threads are partially formed at the end. This has the advantage of being a little more general purpose. It can be used to start threads, but not as easily as the taper tap, but it can also cut threads closer to the bottom of blind holes.
If you’re cutting threads in through holes only, then a taper tap is a great choice. You get all the benefits of easy starting with no drawbacks. If you need to tap blind holes, you might be able to get away with a plug tap. If you need threads closer to the bottom than the plug tap will allow, a combination of taper tap and bottoming tap work great together.
Threading
This one causes quite a bit of confusion. Threading in this case refers to the process of creating a thread, but not necessarily using a tap. Threads can also be cut using a single point cutting tool in a lathe or using CNC machining, or with a multipoint cutting tool like a thread mill (also requires a CNC machine). You can think of a thread mill as a combination between a tap and an end mill. These are admittedly more complicated than using a tap, but they also offer a lot more flexibility, not to mention higher quality threads than you get with a cutting tap.
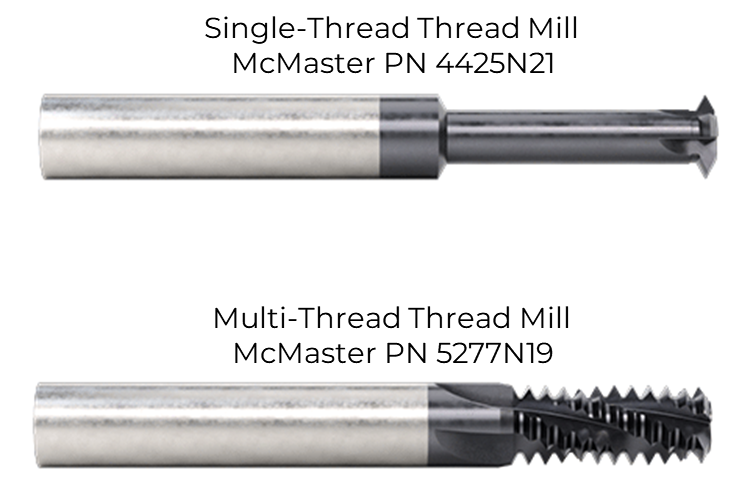
With a tap, if you want to create a ¼-20 right hand thread and a ¼-20 left hand thread you’ll need two different tools. With other types of threading you can get away with a single tool to do both. Similarly, multiple thread pitches require multiple taps, but single-point and single-thread threading tools can cut multiple pitches using a single tool. A multi-thread thread mill will have a fixed pitch.

Comparing the Forming, Tapping and Threading Process
Speed
When it comes to speed, there are two ways to look at it. The initial setup time and the time it takes to create the thread once everything is set up. Initial setup time is definitely fastest with a tap. The setup is finding the right size drill bit and tap. Next would most likely be threading. With threading you also need to drill or machine the pilot hole, but the machine being used will need to be set up to cut the correct size and pitch. That could even involve CNC programming. Worst for setup time is the formed or rolled threads. Depending on the material, the appropriate size base hole or shaft needs to be used so that when the peaks and valleys of the thread are formed, they are the appropriate size. That could potentially involve a little trial and error to get dialed in.
When it comes to the speed to do multiple threaded parts in a more production-like environment, things are a bit different. Thread forming/rolling is insanely fast. A part can easily be threaded in under a second. Next in terms of speed could go either way. Both tapping and threading can be similarly quick depending on how they’re done. If tapping by hand, it’s going to take much longer than if a machine is used.
Flexibility
Taps and dies are the least flexible option. One tool gets you one size. Thread milling and other forms of thread cutting are probably the most flexible as they can cut threads to a range of sizes, but also allow more control over the class of thread. Class of thread is something we haven’t really discussed here, but it defines how tightly the internal and external threads fit together. This exists for both imperial and metric (ANSI, SAE and ISO are the specifications used for the more familiar thread forms), but they are defined slightly differently.
Cost
Cost, like speed, can be considered from a setup and production point of view. A quality tap and die set is relatively inexpensive and can cut a range of common threads. Thread forming and thread cutting by other means require more specialized equipment and end up being much more expensive. That higher initial cost can be offset by the savings in production runs.
Quality
Formed threads offer the best quality, in terms of both finish and strength. Threading offers an advantage over tapping because the tool is smaller than the final thread so chips (material that has been cut away) aren’t caught between the tool and material. An up close look at a tapped hole will show a rougher finish than the machined surface from a thread mill or single point cutter.
How to Make Threaded Holes in 8 Easy Steps
Tips to Create Perfect Threaded Holes
If you need to create a threaded hole, we of course recommend looking into our tapping services, but we’ve put together a few simple steps you can follow to get the best threads during the tapping process if you’re doing it yourself.
Select the right size drilled hole
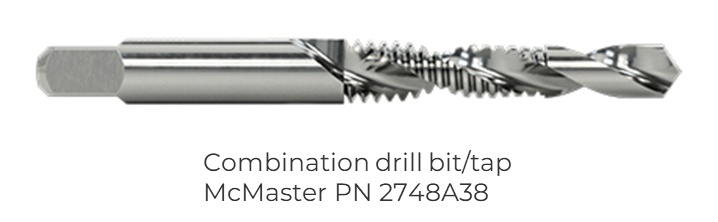
Start with the right size drilled hole. A pilot hole diameter that’s too big will be easier to tap, but the threads won’t be as strong. Standard tap and drill charts are easy to find to make sure you have the right size hole for your tap. You can even purchase specialized taps called tap drills, which are drill bits and taps all in one.
Chamfer or deburr
A slight chamfer or deburr of the top of the hole will help the tap start easier and will help any fasteners thread into the finished hole.
Lubricate for easier processing
Cutting oil will make the process smoother and easier. This is true for both drilling and tapping. It helps lubricate the tool and carry away the chips.
Bonus tip: Denatured alcohol can be used to lubricate the cut and dries quickly and cleanly. Especially convenient if your parts will get painted later.
Align the hole
Keep the tap straight and aligned to the hole especially at the very beginning where it’s easiest to get out of alignment. Tools exist specifically to hold a tap straight while you focus on turning, but chucking a tap into a drill press without turning it on can help keep the tap straight. In a pinch, even a block of wood with a straight hole in it the size of your tap can help with alignment. Once the tap has cut the first few threads, it should hold itself pretty straight for the rest of the hole.
Apply even pressure
Keep pressure on the tap evenly as you twist slowly. Most tap handles have a handle on each side for this reason. Push both sides equally so the tap rotates but doesn’t lean to one side.
Slow and steady
When turning the tap, if you feel resistance build up, stop and back off a half turn to let the cut chip break off. Then you can continue the cut. If you try to push through you’re likely to break the tap, especially smaller taps. It’s not unusual to have to back off half a turn for every full turn you make. It doesn’t hurt to have spare taps on hand. The better you get at using a tap, the less breakage you’ll see, but small taps in hard materials can break fairly often.
Clean the hole
Clean the chips out of the hole after tapping. Compressed air does this well, just have some eye protection nearby.
Check the hole
Check your threaded hole with an appropriate sized bolt. It should thread in smoothly depending on the class of fit you’re using.
Closing Remarks on the Art of Threaded Holes
As you can see, threaded and tapped holes have many differences and it’s easy to get confused. If you’re planning your next project, it’s important to understand these differences and the services available to help. Of course you can tap your own holes, but it’s also worth looking to a third-party to take care of this for you, especially if you’re already using a laser cutting manufacturer. Tapping holes is a service we offer on many materials. If your material is too thin to tap, we also offer threaded inserts. Check out our services and guidelines pages to learn more about what SendCutSend has to offer.
FAQs Around Threaded Holes
Definitely, just be careful. The risk of stripping the threads or breaking the tap is higher with a power drill. Softer materials like aluminum are a little easier, but you can tap steel using a power drill too.
Yep, this is called “chasing”. There are special taps made specifically for chasing, but a regular tap can also do the job with just a little more risk of loosening the fit.
Almost any material can be tapped, but there are things to watch out for. Soft materials like wood and parts from 3d printing can be tapped, but the threads can be delicate. Even threads in aluminum need to be used carefully to avoid damage. Thinner materials like sheet metal aren’t typically good choices for threads. Usually the softer the material, the more threads (deeper hole) you’ll want.


