Today we want to discuss deburring parts. It may seem like a relatively minor step, but can make a big difference in the quality of a fabricated part. We use a couple different methods for removing burrs, but we’re going to focus mostly on tumbling and its benefits as we’ve recently added tumbling deburr services to our list of options for your laser cut parts.
What Causes Burrs on Parts?
If you’ve made any of your own parts, you’re probably already familiar with having to deal with burrs. You make a cut in a part and you’re left with a burr. It’s almost impossible to avoid. The type of tool usually doesn’t even matter. A hacksaw, a cold saw, an abrasive disc, even a plasma cutter or a sheet metal shear, all leave burrs. With a plasma cutter it’s often called dross, or maybe slag. Precision machines like mills and lathes leave burrs on edges. Drills and punches aren’t immune, you’ll rarely drill a hole in metal without producing a burr. Even laser cutters, with their fine kerf and super powerful light beams can leave burrs, it’s just the nature of removing material.
Why do all these cutting operations leave burrs? They aren’t all the same. Mechanical cutting, like bladed tools, shears and punches leave burrs because at a very small scale the tool is pushing the material until it fails. That failure usually occurs after some amount of plastic deformation (that’s where the material starts to permanently stretch and compress, but hasn’t broken yet). When the part finally gives up and separates, that small bit of deformation is still there, usually along the edge at the end of the cut. There are different “types” of burrs depending on where and how that material is moved, but at the end of the day, they’re all formed in a similar way.
With thermal processes like laser cutting, plasma cutting and oxy-acetylene cutting, it’s a little different. The material is actually melted or evaporated in the kerf of the cut and forced out using pressurized gas (air or some other gas like nitrogen or oxygen). Sometimes a small amount of that melted material cools just enough before it completely clears the base material to hang on and resolidify. This is why you typically see more dross on the back side of a thermal cut than the top, although you can sometimes get it on the top side too.
Why Bother Removing Burrs?
However your burr got there, there are plenty of reasons to get rid of it.
- Aesthetics – It simply looks unfinished. Nothing says “I ran out of time” like a part that still has burrs along the edges. Remove burrs and break sharp edges for the best looking parts.
- Finishing – A sharp burr, or any sharp edge for that matter, is a place where coatings and finishes will be especially thin. It’s also where they’re most likely to rub against other things and wear through. Burrs and sharp edges are a good place for chips in your finish to happen. Remove burrs and break sharp edges for the best possible finishes.
- Stress – A burr is a very thin, fragile piece of the material and is very likely to chip, split or crack. In material science, this is known as crack initiation, a place for a tiny micro-failure to start, which then propagates further into a bigger crack. Remove burrs and break sharp edges to reduce the risk of premature failures.
- Fitment – Close fitting parts can get hung up if there are burrs. Have you ever cut the end off of a bolt or threaded rod and then tried to thread it into a hole or nut? Replace that burr with a chamfered edge and threads together nice and smooth. Remove burrs to maintain your designed clearances and fits.
- Safety – For a lot of people, their introduction to burrs comes in the form of a cut. Sometimes it’s a minor cut, sometimes it requires stitches (or worse). Either way it’s not pleasant. Remove burrs and sharp edges to avoid unwanted injuries.
What is the tumble deburr process?
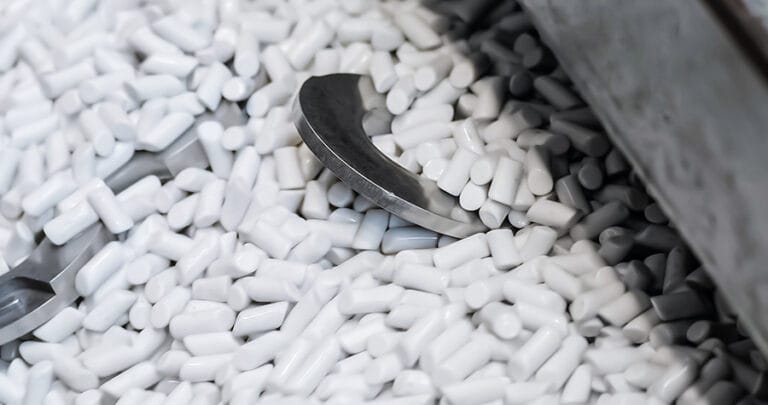
Enough of that, let’s get on with removing those burrs. There are plenty of methods to remove a burr, both manual and automated, but few as quick and easy as tumbling. Tumbling is a mostly automated way to deburr all the edges of multiple parts at once. Tumbling involves tumbling (shocking, right?) the part in a container along with some kind of abrasive media. Sometimes there are other materials such as abrasive compounds or lubricant added to help the process. The media can range from very soft like plastic pellets, walnut shells and even rice, to harder materials like ceramics. A range of results can be achieved by varying the tumbling media, from aggressive grits to finer polishing grits. The method of tumbling can also vary.
One of the most common types of tumblers is a vibratory tumbler. A vibratory tumbler will vibrate the container which creates motion between the media and parts. Vibratory tumbling is automated, but can be slow to remove burrs since it’s a gentler process.
Alternatively, there are centrifugal tumblers. A centrifugal tumbler uses faster spinning to create motion between the media and parts. Because of the speeds, more force and pressure are generated which helps centrifugal tumblers to clean up parts quicker than vibratory tumblers. Centrifugal tumbling is a more aggressive process though, so not great for delicate parts or thin geometry.
What are the Benefits of Tumble Deburring Your Parts?
- Consistent Deburring – Tumbling covers parts in abrasive media and then evenly rubs everything together which helps with consistent deburring.
- Time Efficiency – Tumbling is basically automated, the machine is running its cycle rather than a person having to guide a tool along all the edges of the part. Centrifugal tumblers are even faster thanks to their significantly higher forces.
- Cost-Effective – Many parts can be tumbled at the same time, with little to no human intervention. Media in a tumbler can last longer than manual abrasives like grinding discs and sandpaper.
- Improved Safety – There’s no slipping and cutting your hand like manual deburring processes. There’s very little dust created.
- Enhanced Aesthetics – Tumbling is often used as a method to create a nice consistent finish. Especially popular with knife makers, tumblers can be used to get the stonewashed finish.
- Surface Smoothing – Tumbling doesn’t just remove burrs, it also breaks sharp edges and helps reduce other mechanical surface imperfections.
- Edge Radiusing – Yep, see Surface Smoothing.
- Batch Processing – Tumbling cuts down on cost and time by being able to process multiple parts at the same time.
- Versatility – Tumblers can be used with different media to produce different results, from rough deburring to polishing.
- Cleaning and Degreasing – In addition to deburring, the tumble deburring process can effectively clean and degrease components, ensuring they meet cleanliness standards before further processing.
- Process Standardization – Tumble deburring using advanced equipment allows for the standardization of finishing processes, reducing variability and ensuring consistent quality across batches.
- Stress reduction – Maybe not exclusive to tumble deburring, but it is one of the benefits of removing burrs. Other automated deburring processes like linear deburring can remove burrs but leave sharp edges, which are more likely to cause stress risers.
Things to Keep in Mind When Designing Parts That Will Be Tumbled
We have two options when it comes to deburring your parts, linear deburring and tumbling which can be added to your order for an additional fee. But what makes a part a good candidate for tumbling?
- Parts should be smaller than 4” x 7” and larger than ½” x 1.5”
- The minimum material thickness for tumbling services is 0.125″
- The minimum slot width for all parts needs to be 0.030″ or greater. The poly beads we use to keep parts from sticking together will get wedged in smaller slots.
How Will Tumbling Affect Other Finishing Services?
- Tumble deburring will not remove all burrs from previous operations such as countersinking or tapping.
- Tumble deburring will change the final look of the part, especially with other finishes such as anodizing, plating, and powder coating.
- Anodized parts will have a duller, satin finish.
- As mentioned above, tumbled parts with softened edges not only changes the look, but makes the final finish more durable as well. The sharper the edge, the easier it is to chip and flake off a finish. The slight edge rounding helps it stick better, providing more durability and longevity of the part.
- For mild steel parts or parts cut with oxygen, it removes the oxidation from the cut, so it’s clean bare metal when it’s done. A big plus for fabricators because it will be more weldable without having to grind that edge off. Just get straight to welding!
Should You Use SendCutSend or DIY Tumble Your Parts?
If you’re getting your parts laser cut at SendCutSend and the parts fit the guidelines for tumbling, then it’s a no brainer. That said, there are plenty of situations where you may want to tumble parts at home. It can be a great way to clean up older parts, remove corrosion or dirt. Vibratory tumblers are popular with knife makers and reloaders to clean up casings.
It’s relatively easy to throw some abrasive media into a container (a 5 gallon bucket), spray in some water or WD-40 and roll the container around. We’ve even seen folks use a drill and some casters to automate the process so you can leave your parts tumbling while you work on something else.
Choosing Between Tumbling and Linear Deburring
We’ve dedicated an entire article to comparing linear deburring versus tumbling, which can help you decide the best route for your parts.
If you’d like to read more about our deburring services and even see examples of how your parts finish looks after each, visit our deburring services page and our tumbling services page. While you’re there, take a look at all the other services SendCutSend has to offer.
If you’re ready to place your order you can get instant pricing in five minutes or less.


