
The questions our support team sees most often are in relation to tolerances and cut-feature relationships. While we have almost every tolerance imaginable listed either in our guidelines or materials pages, we understand that interpreting and applying them to your laser cut design can oftentimes be frustrating and confusing. With this article, we aim to solve that by working our way through the most common tolerance questions we receive.
Article Contents:
- Cut Features from Edges
- Screws holes, tapping, countersinking, and hardware
- Interconnecting parts
- T-slots for nuts
- Bridging (feature-to-feature distances)
How Far From the Edge Cut Features Should Be In Sheet Metal Parts
The issue we see most often in our pre-flight review process with even our most experienced designers and engineers is the distance of design features from the edge of the part. Whether it be a hole, slot, or aesthetic feature, we are often tempted to push cut features right to the edge of the part to keep its footprint as small as possible. While this can save space and weight, it can substantially affect the rigidity of the part in addition to creating features that are too small to cut, even with lasers!
This is especially important to consider with features like screw holes or slots that connect structural elements, as they could be ripped out of the material if they are too close to the edges or other cut features. With this in mind, we generally recommend keeping your holes at least 1X their diameter from an edge and slots at least 1.5X their width away from edges or other cut features. Please note, material type and thickness considerations can override this, so always check the material specifications to confirm minimum bridging/webbing requirements.
Adhering to these design considerations will aid in keeping your finished parts from unanticipated tearing or bending when force is applied to them.
Sheet Metal Part Design Considerations for Holes, Tapping, Countersinking, and Hardware
You may need holes for screws to pass through, be threaded into, set into, or for our press-in hardware to be installed into. There are some important design considerations for each one of these features.
How to Design Screw Holes in Sheet Metal Parts
There are a few different ways to approach holes that screws will pass through in your design. The relationship between the diameter of the hole in your part and the diameter of the threaded portion of your screw or bolt is very important. If it’s too tight, you may need to thread the fastener into your part, and if it’s too loose, your part may not have the relationship to its mating part or surface that you’d planned for.
Generally speaking, holes for threaded fasteners to pass through are either clearance fit or interference fit. Without getting into a lesson in engineering terminology or discussing the different classes of fits, let’s look at some generalities for each.
Clearance fits mean that the fastener will pass through the part without engaging the sides of the hole. This is often times classified as “close fit” or “free fit” where close fit is closer to the actual diameter of your fastener and free fit is looser. An interference fit means that the fastener will engage the sides of the hole and will potentially need to be installed with a tool rather than simply falling into place. An interference fit is not a replacement for a tapped hole, but certainly won’t run the risk of being too loose, either!
Which fit you use will be determined by the individual use-case for your part.
How to Specify Tapping in Your File for Laser Cutting
A tapped hole is one where threads have been added to the part after the cutting process. These threads make your parts act as a nut and are a great addition to a lot of parts, particularly those made from thicker materials. You can read more details about our threading service here. We will automatically resize the holes in your parts if you choose to add tapping to them, but it is good practice to use the threading chart found on our tapping guidelines page to draw the correct size holes on your part. This will allow you to use the following formula for keeping your holes the appropriate distance from an edge, cut features, or other holes:
Tapped hole diameter/2 + the minimum tap hole-to-edge distance for the chosen material. The minimum hole-to-edge distance for each material can be found on our Materials Page under the “Design Considerations” heading.
Sheet Metal Countersinking Design Specs
If you are planning on having the holes in your part countersunk, you’ll want to make sure that you have adequate space between the major (larger diameter of the countersink) and the edge of the part, cut features, or other countersunk holes. Similar to the method used for determining the placement of tapped holes, you can use the “Countersink Min Hole Center to Material Edge” dimension found on individual material pages to determine how far away from an edge you can place your hole. Just like with tapping, we’ll resize your holes automatically, but best practice would be to draw your major diameter holes to the correct diameter during the design process to be sure that you won’t be countersinking over an edge or other cut feature. Keep in mind that Major diameters need to be removed from your design prior to uploading them to the Instant Quote tool.
Spec’ing Press-In Hardware for Sheet Metal
Press-in Hardware is a great addition to any design! In the same manner as we do for Tapping and Countersinking, we’ll automatically resize the holes in your part to match your hardware selection. The two additional things that are important to consider with hardware are the hole center-to-edge dimensions for each hardware option (found in the hardware catalog) and the “Minimum distance from center of bend to center of hardware insertion hole(measured from flat pattern)” dimension listed on the Materials Pages for each applicable material. The hydraulic pressure used to insert the hardware into your parts differs between hardware options, so the hole center-to-edge considerations vary between them.
How to Design T-slot Tolerances
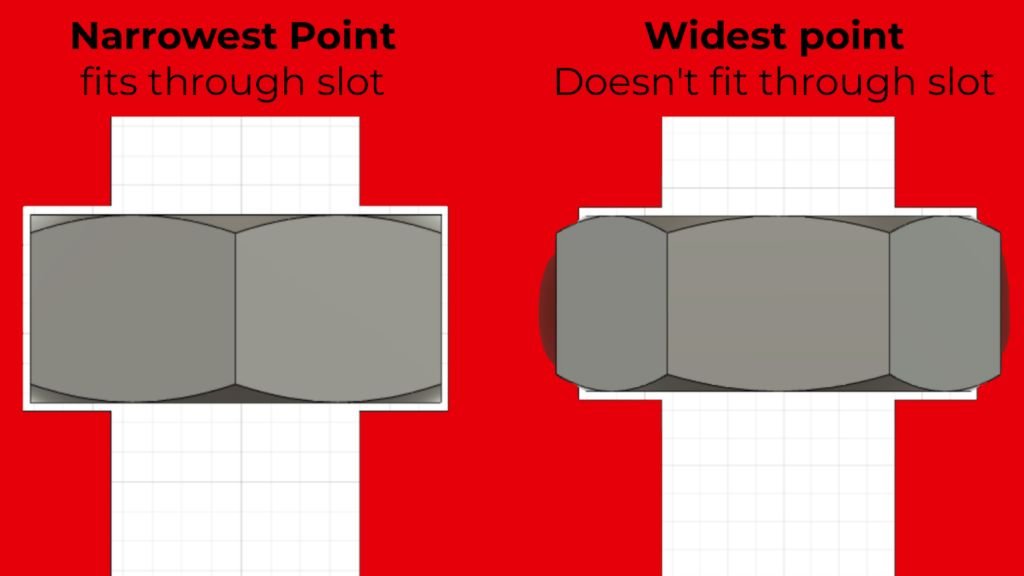
T-slots are something that we get asked about quite often in regard to tolerances. When designing t-slots, the goal is to create an opening that a nut can be slid into when clocked to it’s narrowest point. When the nut is turned, it will engage the sides of the slot. This nut-to-edge engagement will “lock” the nut in place and allow you to insert a fastener without using a tool to hold the nut in place. In our experience, the easiest route to a good T-slot width is to add .01” to the nut’s width at its narrowest point. That way, there will always be enough space to ensure that the nut can freely slide in and out when not under tension. This will also make sure the slot is narrow enough so that when you tighten the screw, the nut will engage the walls of the slot,which will keepit in place. We recommend adding the same .01” to the nut’s height to allow for a little wiggle room to make it easier to take the nuts in and out.
What to know about bridging/pocketing for sheet metal parts
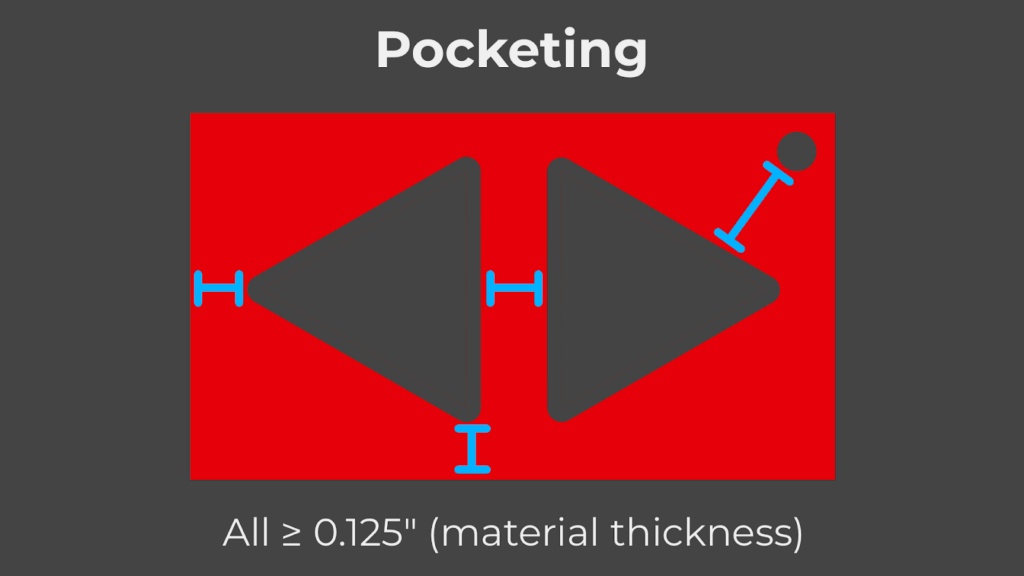
Pocketing and bridging are two other aspects of design that we frequently get questions about. Pockets are cut features within your part, and bridging is the distance between those features and either other cut features, or the edge of the part itself.
While adding pockets to your design is a great way to reduce the weight of a part while also adding aestetic qualities, we recommend staying on the conservative side to ensure that they don’t create any unnecessary weakpoints in your part. Undersized bridging can also cause the small features in your desig to be burned away by the laser.
We recommend that hole diameters and bridging widths be no less than 50% of the material thickness. For example, on a 0.125” thick part, this would mean having 0.0625” between all of your cut features, or cut features and the edge of your part. For strength and cut quality reasons, we would prefer that wall thickness or bridging be closer to 1X – 1.5X the material thickness. A bridging thickness of 50% of the material’s thickness may achieve the look you are after, but it won’t necessarily produce a strong part.
How to Factor Cut Tolerances into Part Designs
We do our absolute best to cut your parts exactly how you drew them, but we have a posted margin of error for each of our materials called “cut tolerances”. These tolerances are listed for each material and thickness in our Materials Pages. Cut tolerance consideration is an extremely important part of proper design practice.
When considering a tight-tolerance design for a slot (for instance), it is incredibly important to consider the worst-case scenario if the finished part ends up being on the negative end of our posted tolerance. For the majority of our materials, our tolerance is +/- .005″. This means that any given cut feature or perimeter geometry may be +/-.005″, or whatever the cut tolerance for that material and thickness is, in either the X or Y axis. Planning ahead and knowing the cut tolerances for your chosen material will speed up the design process and ensure that your parts are ready for action as soon as they come out of the box.
Conclusion
That just about wraps up all of the tolerances we are commonly asked about on flat parts. If you have any questions, be sure to check out our guidelines, and blog posts. We’re always happy to talk to you about your project, so reach out to Support@SendCutSend if you have any additional questions.


