You like to build stuff on your own, and you enjoy biking, who wouldn’t? Maybe you even have a couple different bikes suited to different riding conditions: There’s the mountain bike for that occasional weekend out on the trails. The road bike, which is much more efficient on the smooth stuff, but in the back of your mind there’s always the issue of traffic. Then there’s the trendy gravel bike, which promises efficiency, comfort, and the ability to ride in places that come pretty close to single track without putting you in the ER.
What if you could pair that with frame geometry and materials that suit your preferred riding style and will truly outlast your ability to ride it–where do I sign up? Sure, you could buy such a bike, but it may well end up costing more than a decent used car.
In this article, let’s take a look at what it takes to build a complete bike from scratch; from the design decisions, parts and materials, to the ways SendCutSend and laser cutting can help make that dream of building your own bike a reality. Not only will you learn a new skill, you’ll save some change to use for another laser cut project down the road.
What You Need to Build Your Own Bike
More than anything, to build a bike completely from scratch you need the want to: everything else just kind of falls into place. This might be a slight oversimplification, but between the interest, a few hard skills, and some materials, this just might work.
The Skills
If you’re reading articles at SendCutSend, you likely already possess general mechanical know-how. On top of that, knowing how to TIG weld or being skilled at silver or bronze brazing are necessary skills for this project. Barring previous experience fiddling with bikes (this should be an obvious benefit), having some experience with either automotive or small engine repair is also a big advantage.
The Lists
Like any other project, it’s best to start with a bill of materials. Fabricating a bicycle from scratch requires a lot of decision making, but that also means you get to tailor the individual components to suit the task at hand. In this case, we’ll break it down into three main categories:
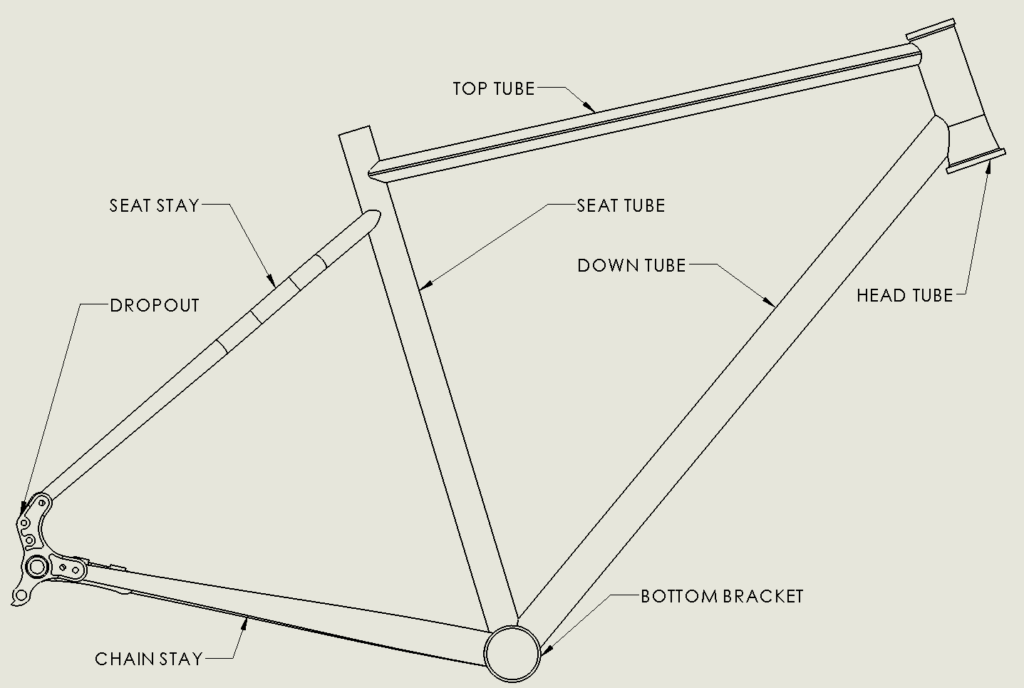
Framebuilding Parts List
The skeleton of the bike, the frame holds you the proper distance from all the other components. Each tube must be chosen based on compliance, rigidity, loading and many other factors. This list is for a “rigid” or “hardtail” frame, if a full suspension machine is on your wishlist, there will be more steps.
This list is often known as the “tubeset”:
- Head tube
- Seat tube
- Top tube
- Down tube
- Chain stays
- Seat stays
- Dropouts
- Bottom bracket shell
Components Parts List
After selecting the tubeset, the next step is specifying the supporting cast of components. Do you need a dropper post? Disc brakes for powerful stopping or do you keep it simple with rim brakes? Will you run a single speed setup, 1x or a full 2x setup for maximum selection? These factors will affect key design criteria, so choosing them before starting assembly saves headaches later.
- Fork: Suspension or rigid, steel or carbon
- Wheels & tires: Tubes or tubeless.
- Drivetrain: Shifters/brake levers, crankset, chainring, cassette, bottom bracket, derailleurs, chain. Best practice says choose one manufacturer, such as Shimano, SRAM, or Campagnolo and stick with that throughout.
- Brakes: Hydraulic or mechanical, brake pads for rim or rotors for disc brakes
- Cables and housing and hydraulic hoses
- Seatpost & saddle
- Cockpit: Stem, handlebars & grips/bar tape
- Headset
- Pedals
Tools Required
This list is tricky because bike builders use tool setups ranging from simple, (hacksaw, metal file and acetylene torch) to full-blow machine shop. Here’s a good middle-of-the-road.
- Welder or torch
- Frame fixture
- Mill or drill press & hole saws
- Bike stand
- Hex & torx wrench sets
- Bottom bracket tool
- Cable routing tool & cable housing cutter
- Hacksaw or angle grinder
- Star nut and crown race install tool
- Cassette installation tool\
- Torque wrench
- General hand tools
How to Choose The Right Frame Material
Aside from correct sizing of your frame, (which we’ll get to in a minute), the most critical decision in terms of ride quality is frame material.
Steel
Loved by bike builders everywhere not only because it’s easy to fabricate with, but also because steel bikes can have a smooth ride quality unmatched by almost any other material. There’s also a huge selection of different custom-made steel tubesets which allows the builder to pick the exact length, profile, diameter and wall thickness for the application. Then there are the alloys, each with individual advantages over one another based on end use.
Aluminum
Aluminum is the most common material used for bike frames today due to its light weight, corrosion resistance, and ability to be formed easily and inexpensively. For custom builds, however, it’s much less common because it’s relatively difficult to weld compared to steel and the benefits of hydroformed monocoque frames are lost using conventional welding methods. Still, it’s a solid choice and will yield an amazing bike if you know what you’re doing.
Titanium
Not for the faint of heart (or wallet), titanium frames are difficult to weld and the tubing alone can cost almost as much as an entire bike that has a frame made of other materials. So why does it maintain such a large segment of the custom bike market? Some say it’s because it combines the ride quality of the best steel frames with better corrosion resistance and weight characteristics than an aluminum frame, all while being nearly indestructible.
Bike frame standards
Regardless of which material you choose, there are some important numbers to remember to ensure that the frame you build fits the parts you want to put on it.
- Rear dropout spacing: this will vary depending on riding style. Make sure to match the spacing of your rear wheel.
- Frame brake mounts: Flat? ISO? Post mount? Canti? Rim? Do your homework! The most common standard right now is flat mount disc brake calipers, which are compact and do an excellent job.
- Front derailleur: This can be a braze-on, clamp-on or maybe not even there in a 1x setup.
- Seatpost diameter: If you’re building a MTB, or even a gravel bike plan to include a dropper post, note its diameter because they’re often non-standard.
- Steerer tube diameter: This will depend on your fork of choice. The most common standard currently is a tapered steer tube that will fit a headset spec such as IS42-52.
Steps to Build a Bike Using CAD and Sheet Metal
The frameset tubing has been specified and all the components to make that bucket of parts into something resembling a bicycle have been painstakingly collected.
Now it’s time to get to the fun stuff; let’s look at the layout and build process that will make this bike something that isn’t just rideable, but can be enjoyed for years to come.
Geometry
Fear not, there is some addition and subtraction involved in selecting frame geometry, but it’s minimal. The basic objective here is to make sure that when you’re seated in the saddle that your feet reach the pedals, and your hands don’t fall asleep when you’re in riding position for more than a few minutes. Let’s go over a few ways to get these numbers.
- Professional bike fitment.
An expert analyzes your riding position based on desired riding style (aggressive for racing, or laid back for cruising) by putting you on a stationary bike and that allows them to measure your exact geometry in real time as you pedal along. The only downside here is cost.
- Copying the geometry of your favorite bike.
This method has the obvious advantage of being fool-proof if you can accurately take the dimensions and translate them to the new frame. The downside is that you have to have a bike already built for the specific style of riding, so unless you’re already an avid cyclist, this may not be the best route.
- Making it up.
Not recommended! If you can’t get a fitment, and don’t have a reference bike available, then find a friend or a nice local bike shop that will let you set up a bike for the same riding that you want to do and get your measurements there.
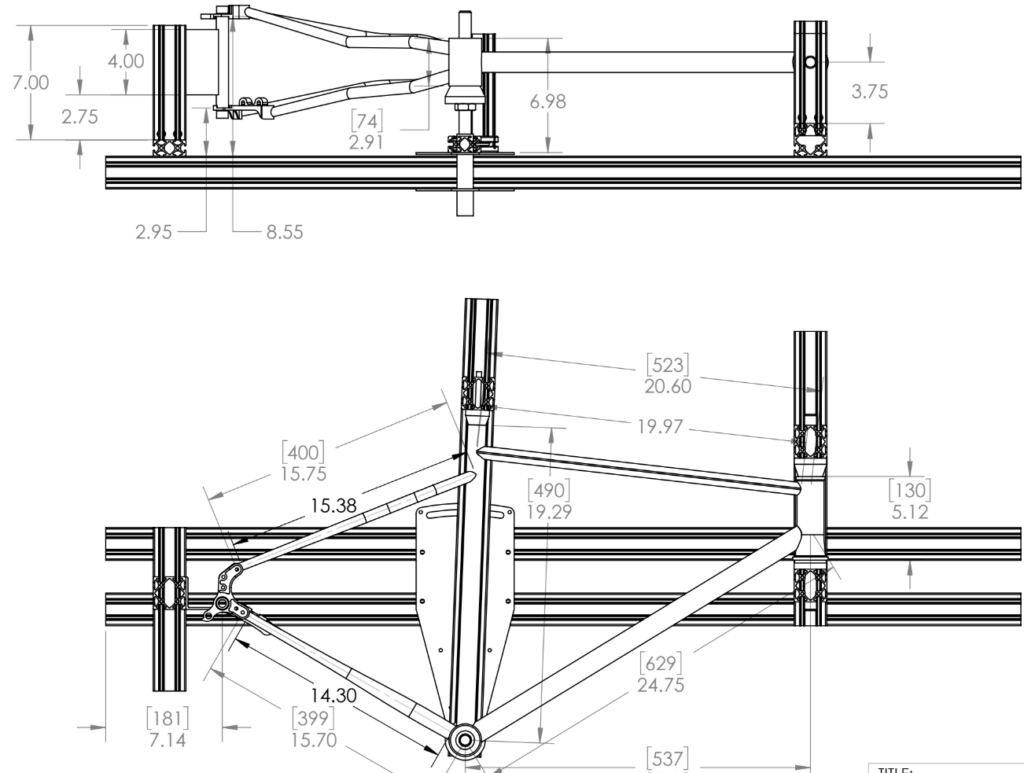
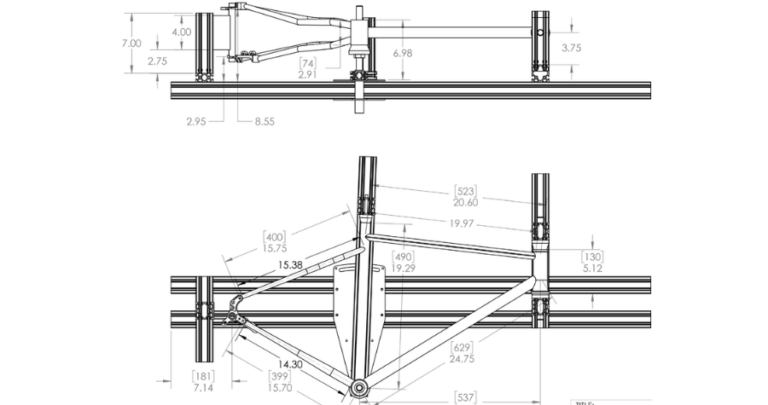
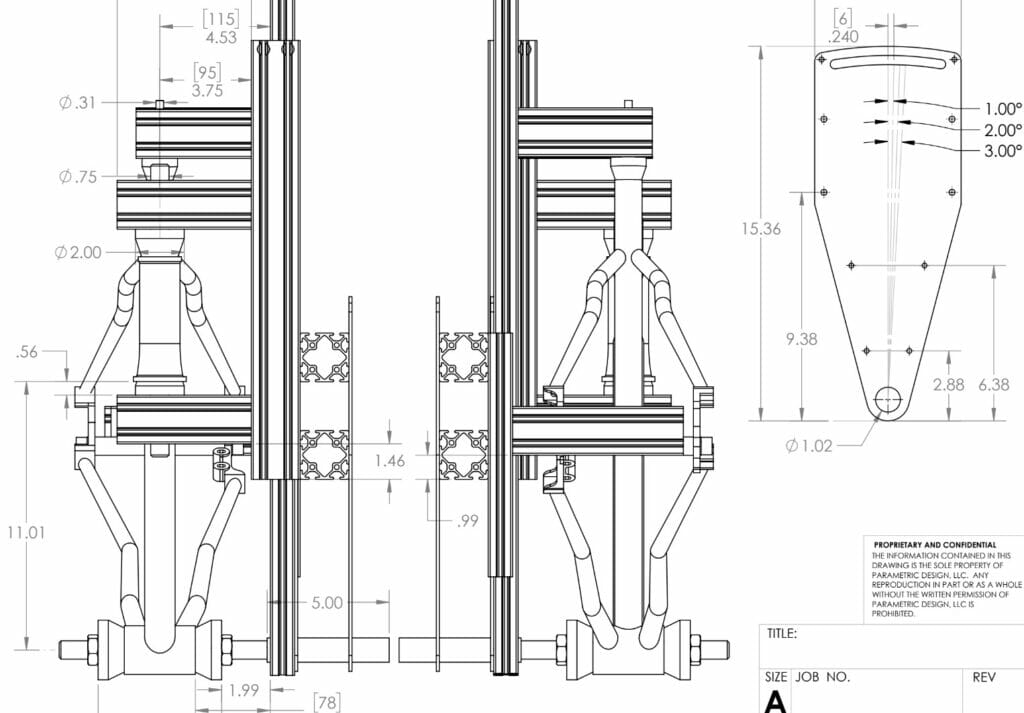
Frame Fixture
Like the foundation beneath a house keeps the walls and roof stable during a storm, a frame fixture (or frame jig) keeps the tubing from coming out of alignment during welding or brazing. This step is incredibly important because having a bike frame that is out of alignment can feel like riding a soft pretzel: unsafe and generally in poor taste.
Unfortunately, unless you plan to go into production, a professional frame fixture is out of the question. But never fear the team here at SendCutSend can cut and bend your frame fixture parts all the with accuracy and rigidity necessary to keep your bike frame straight and true through the fabrication process.
Cardboard to CAD
How do you determine the size or location of your laser cut parts? There are several ways, but let’s assume you don’t want to spend hours modeling the entire frame in CAD just to locate and size your frame jig. Using almost any bike and some cardboard, you can get a good idea of the range of sizes and angles that will be needed to build the frame, and then move that information over into your CAD software of choice for upload into our app.
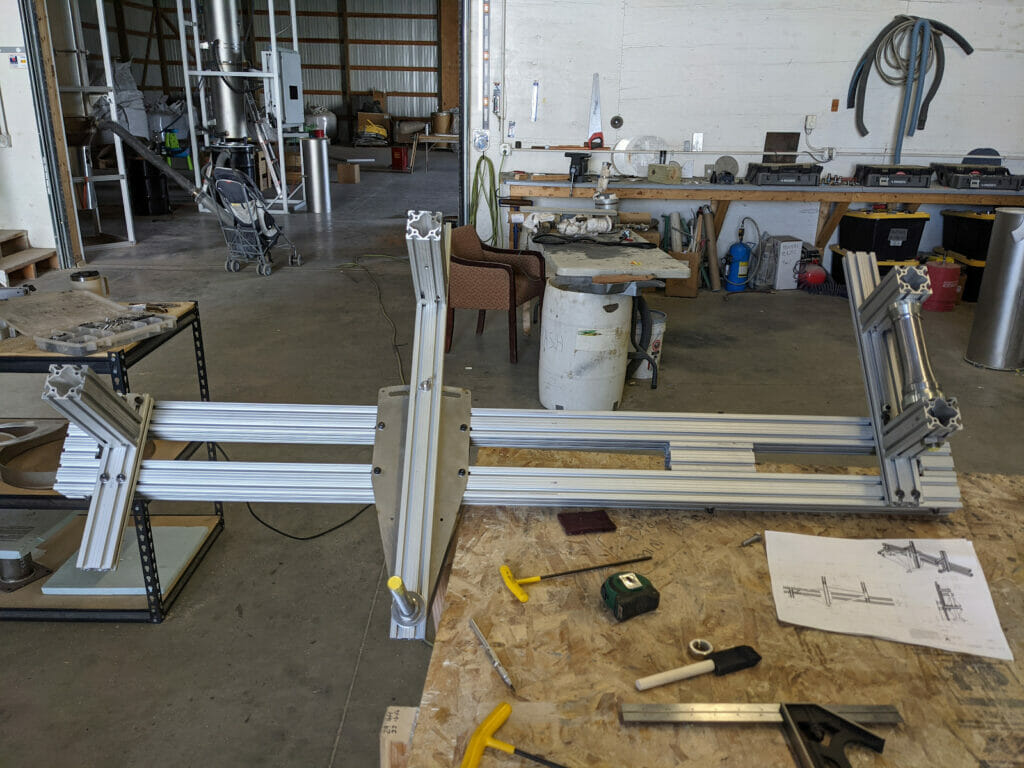
While the fixture above makes use of aluminum extrusions for the main members, using a tab and slot design would make a fully laser cut and bent frame jig a snap to assemble.
Fitment & Fabrication
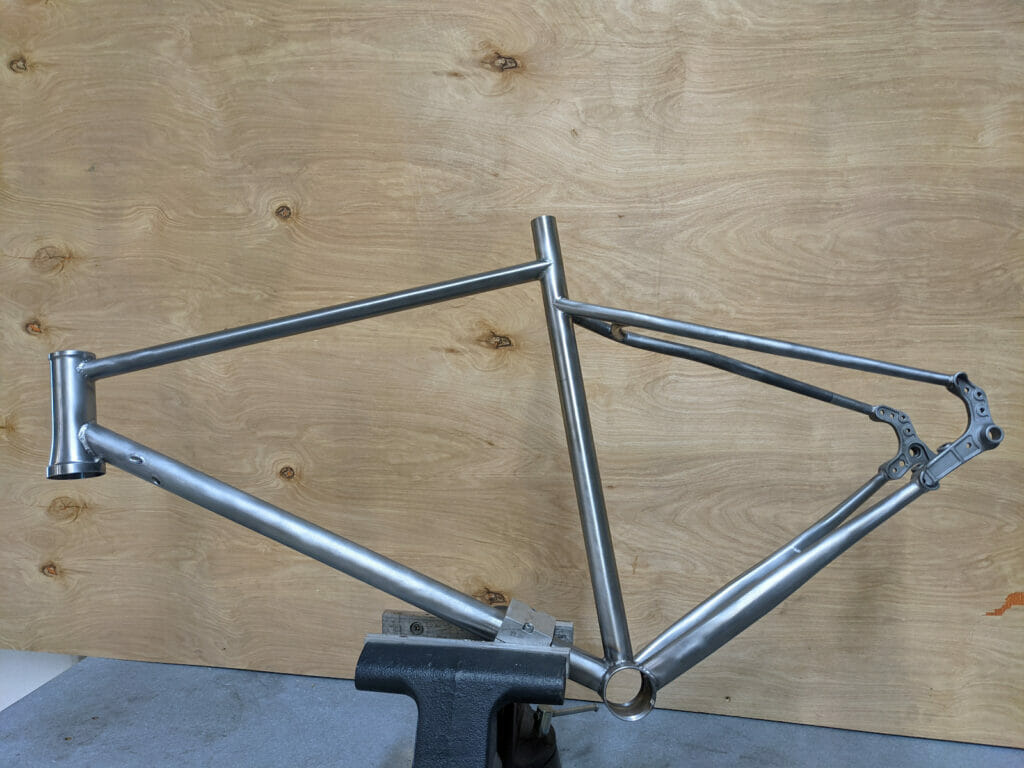
Now that you have a good foundation in the form of a solid frame jig, it’s time to cut and miter the tubing and either weld or braze it together.
In general, remember to keep your cutting tools sharp and clean, measure angles twice and remember that it’s easier to re-cut a long tube than stretch a short one.
Whether you fillet braze using bronze or TIG weld using stainless filler, it’s best to cut and fit all the tubing before putting any individual parts together.
Benefits and Challenges of Building a Custom Bike
In this article we’ve given you the basic building blocks necessary to successfully build a complete bike from scratch. Here are a few other considerations to keep in mind.
How Much Does It Cost?
In general, you’ll end up saving a significant amount of money on a frameset if you build it yourself. Plan to spend around $300-400 for quality steel bicycle-specific butted tubing and that much again for a carbon fiber fork. To get fully custom geometry from a framebuilder with the same quality costs upwards of $2,000.
Get a fully unique bike, high quality bike
Want to go fully titanium? Need a carbon seatmast rather than a conventional seat tube? How about an eccentric bottom bracket or internal transmission gearing? The choice is yours, and the value proposition goes up as the customization gets crazier.
Enhance your mechanical skills
It goes without saying that there are a number of unique skills that can be learned–or improved–by building your own bike. For instance, TIG welding conventional pipe is nothing like welding 0.060 wall bicycle tubing in close quarters. You’ll come out of this project with great experience that can be applied to other interests and projects down the road. If you’re looking for more inspiration, check out our examples page.
Get Started Building Your Own Bike with SendCutSend
If, like us, taking a pile of metal tubing and a bin of parts, adding some skill and love to make something amazing sounds like your idea of fun, you’ve come to the right place. With dozens of different materials, we here at SendCutSend have your back when it comes to bikes, boats, cars, robots, or really ANY project you can dream up.
With fast, free shipping, 11 (and counting!) different services that add real value and save real time, and best of all, easy ordering starting at just $39, let us help you laser cut your next great DIY project.


