Metal fabrication often requires precise alignment and efficient assembly methods to save time and ensure quality. One such technique gaining popularity is the tab and slot design, a simple yet powerful feature that facilitates self-fixturing, fast assembly, and accurate part positioning. This post explores the fundamentals of tab and slot joints, their applications, design considerations, and tips to optimize your metalworking projects.
Video Guide: Top Tips for Tab and Slot Design for Sheet Metal Part Assembly
What is tab and slot design?
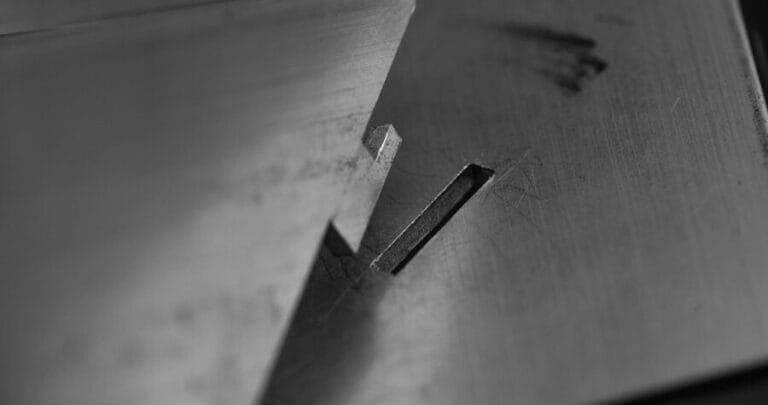
At its core, a tab and slot design involves a protruding tab on one part that fits into a corresponding slot on another. When assembled, this joint can act as:
- A fixture to hold components in position
- A locator for precise layout
- A support to stabilize parts during welding or bolting
You may already be familiar with this concept from SendCutSend’s captive nut designs or DIY weld-it-yourself kits. But tab and slot goes far beyond novelty—it’s an essential tool in the modern digital fabrication toolbox.
Why Use Tab and Slot in Metal Fabrication?
1. Self-Fixturing and Fast Assembly
Holding non-magnetic materials square on a welding table is no easy feat. Tab and slot joints drastically reduce the need for clamps, helpers, or jigs. Once inserted, the parts hold themselves in place, allowing for quicker welding without additional setup.
2. Accurate Layout Without Measuring
Precision layout can be time-consuming. By designing your tabs and slots into the CAD model, you eliminate manual measuring on the shop floor. Instead of measuring 4-3/16″ across a beam, drop in a tab—it’s already where it needs to be.
Best Practices for Tab and Slot Design
1. Fit Tolerances Matter
Tab and slot joints are only as good as the fit between them. Here’s a quick reference for typical tolerances:
| Material Thickness | Tolerance Per Side | Total Allowance |
|---|---|---|
| Thin sheet (.060″) | .003″ | .006″ |
| Mid-thickness (.125″) | .005″ | .010″ |
| Thick plate (.250″+) | .010″–.020″ | .020″–.040″ |
These tolerances account for cutting taper, material kerf, and bend allowances. For most applications, .005″ per side is a great starting point, increasing for thicker materials or post-processing like powder coating.
Pro tip: If you’re planning to powder coat, remember to account for the coating thickness in your tab and slot clearance—typically 2-3 thousandths per side.
2. Dog Bone Reliefs for CNC Routing
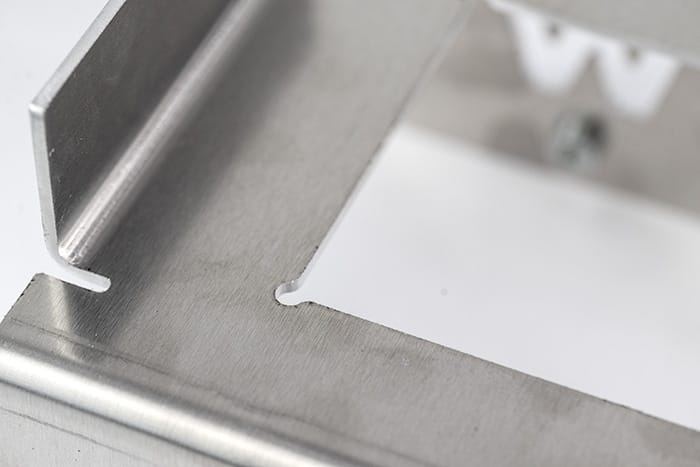
If your parts are cut on a CNC router (not laser), you’ll need to use dog bone reliefs. Since routers can’t cut perfect 90° interior corners, small radius cutouts (i.e., dog bones) allow square tabs to fit in properly.
On routers, we typically use an 1/8″ end mill, resulting in a 0.063″ radius. Without dog bones, square tabs will hit the radius and won’t seat fully.
3. Avoiding Stress Risers
Sharp internal corners in slots can lead to stress risers and potential cracking under load. You can reduce this risk by:
- Adding a radius to internal corners
- Chamfering or dog-earing tab edges to match bend radii
- Avoiding unnecessary sharp transitions in load-bearing joints
If the tab and slot joint won’t be welded, these stress mitigation techniques are especially important.
Design Limitations and When to Avoid Tab and Slot
While incredibly useful, tab and slot design has a few caveats:
- Thin material in a single plane can flex too much to reliably self-fixture
- Powder coating can cause tight fits—leave room!
- Post-weld finishing may require grinding flush or filling gaps, depending on your tolerance setup
- Non-welded joints may require bolting or bonding—plan accordingly
For critical structural assemblies, consider adding additional fastening methods like bolts, rivets, or even machining from solid billet (if you’re feeling fancy).
Real-World Example: Amber the Ambulance
In the tab and slot Cutting Corners episode, Jim and Jake share an example of modifying a vehicle roof using 0.187″ mild steel gussets and a combo of open and closed slot designs. The parts slotted together, resisted twisting, and needed no clamps or helpers to hold position—just quick welds.
This real-world use shows how tab and slot can streamline even complex jobs involving multiple planes and thick stock.
Wrapping Up
When implemented well, tab and slot design can transform your workflow—reducing clamps, improving accuracy, and making welding a breeze. Whether you’re building prototypes, custom brackets, or full assemblies, using tabs and slots is a surefire way to level up your fabrication game.
Ready to Design Smarter?
If you’re ready to incorporate tab and slot design into your next laser cutting or CNC routing project, check out our Design Guidelines to get started. For even faster results, upload your file today and get instant pricing.


