Laser cutting is a quick and easy way to make your designs a reality. With the right considerations, many simple two-dimensional parts can be assembled to make an intricate three-dimensional object. However, joining with fasteners, such as screws, bolts, adhesives, or even welds, can add serious time and cost to your project. This article will show you several ways to assemble your parts without fasteners, from tab and slot designs to hooks, simplifying assembly while saving time and money.
This article will cover:
- Tab and Slot Essentials
- Bent Tabs
- Hooks
- Key and Tab
Tab and Slot Essentials
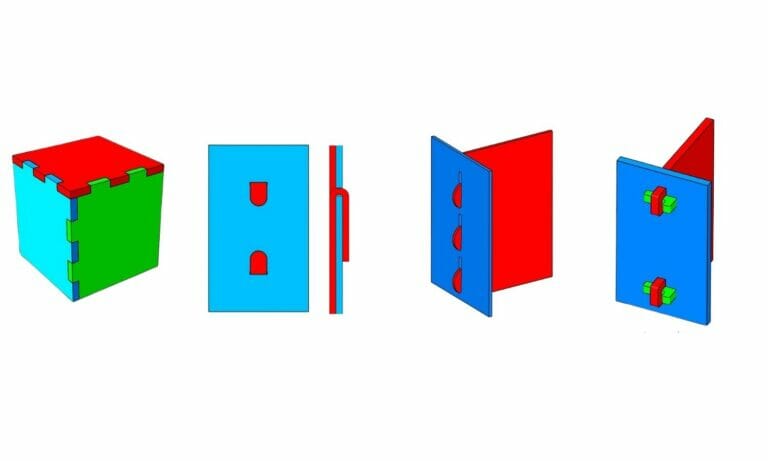
Tab and slot designs are one of the most common, and simplest, ways of joining two or more parts. A tab acts as the male part of a joint, while the slot acts as the female. A slot can either be on the edge or middle of a part, while a tab is always along the edge. The more tabs and slots, the stronger the joint. When joining two parts along their edges, tabs and slots are often placed next to one another to create “fingers” that hold the parts together. The figure below shows examples for joining parts on end, in the middle, and on multiple ends.

Let’s talk tolerances! The length of a tab always equals the thickness of the material. This ensures an assembled tab does not protrude through the slot, leaving a flush surface. To avoid interference, a slot is always (slightly) larger than the tab. For a slip fit, an additional 0.010” of the tab’s width is needed for the slot’s width, and an additional 0.010” of the tab’s thickness is needed for the slot’s thickness. If you have further questions about the tolerances for tab and slot fits, check out our video guide to designing a successful tab and slot part!
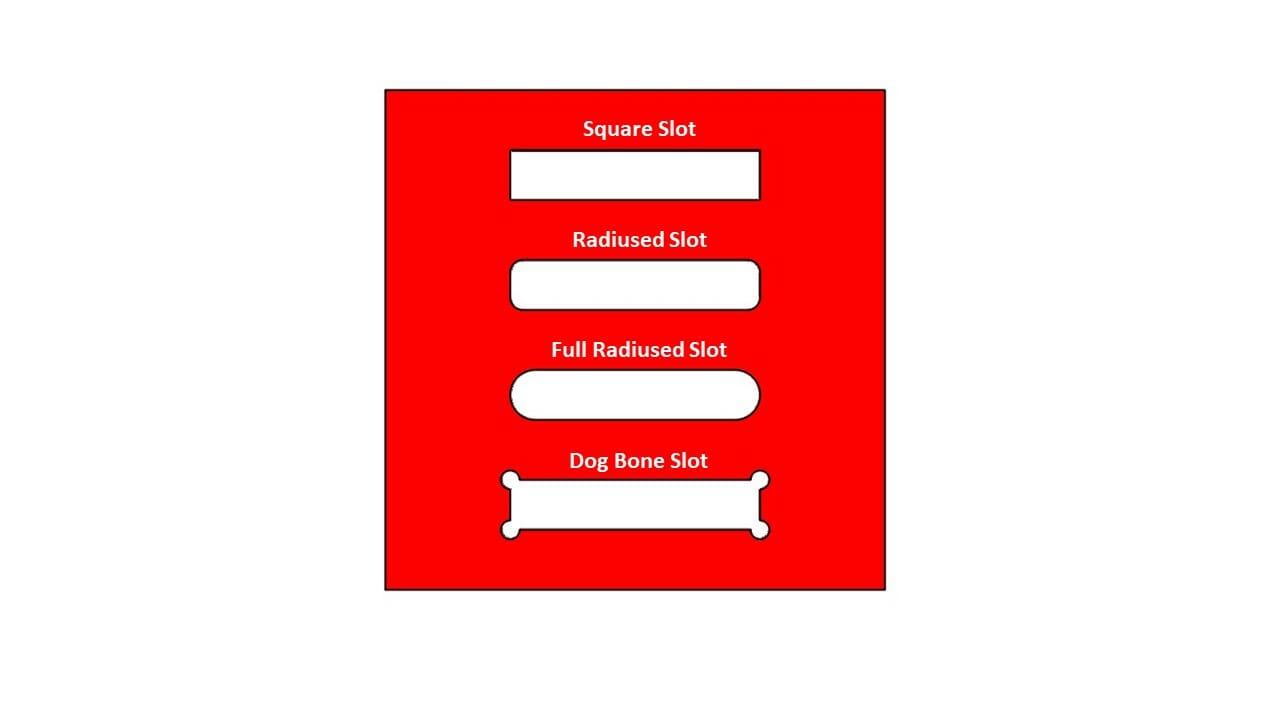
Square corners on a slot creates stress concentrations. This in turn causes cracking which can eventually lead to fracturing, which is especially true for assemblies that undergo high stress or vibration. By adding a small radius to the corner, the stress is drastically reduced, and cracking is much less likely. A full radius along the ends of a slot gives the most strength. However, the width of the tab needs to be smaller to accommodate for the radius in the slot, resulting in a somewhat sloppier fit. The larger the radius added to the slot, the looser the fit.
If high precision is needed but cracking is a concern, a dog bone slot should be used. A dog bone slot features a hole on each corner of the slot to better distribute stress while still allowing a snug fit for the tab. The edges of the holes should be radiused as well to ensure no sharp ends are present for stresses to concentrate. The figure below illustrates several slot designs.
Like slots, a tab can be radiused or chamfered to minimize stress concentrations. Likewise, the slot size will need to adjust to accommodate the additional feature, resulting in a looser fit.
Tabs and slots are the simplest joints to implement in your designs, but the strength of the joint is only as strong as the press fit. Simply adding a drop or two of glue can go a long way in stiffening the joint. However, this joint is great if your design needs to be frequently disassembled or has interchangeable parts.
Tab and Slot Summary:
- Pros: Simplest and easiest to assemble
- Con: Not effective for thin and flexible materials
Bent Tabs
Standard tab and slot joints are ideal for sheet metal and other materials that are 0.080” thick or greater. If you are utilizing material thinner than that, consider adding bent tabs to your design instead. By elongating the length of the tab, it can be easily folded over after exiting a slot to make a permanent or semi-permanent joint. Simply bend the tab by hand or with pliers, insert into the corresponding slot, and fold over to fasten.
Thin 2024 and 5052 aluminum is the lightest and easiest to bend. However, this technique can also be used for other thin metals with a little more effort and consideration. Other materials that work well for this technique are:
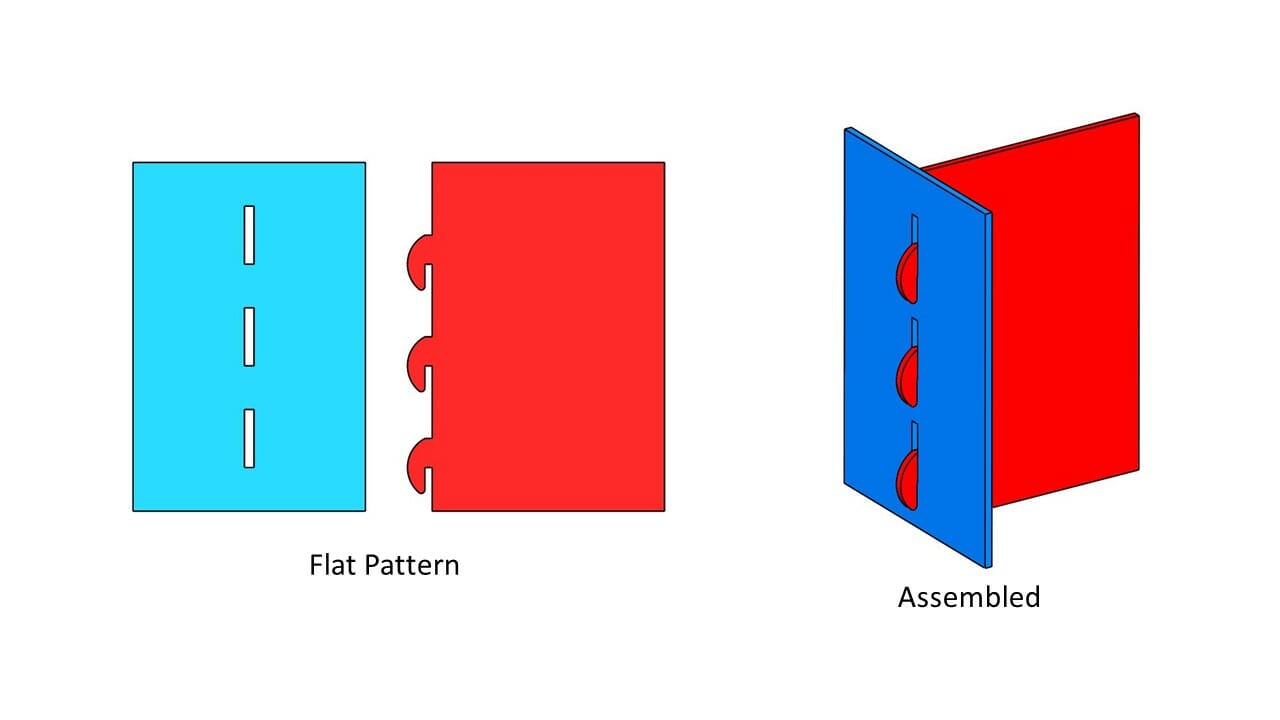
The figure below shows a simple bent tab and slot in the flat pattern and assembled.
Tip: Adding small holes at the two ends of a tab can ease folding and provide a cleaner bend line.
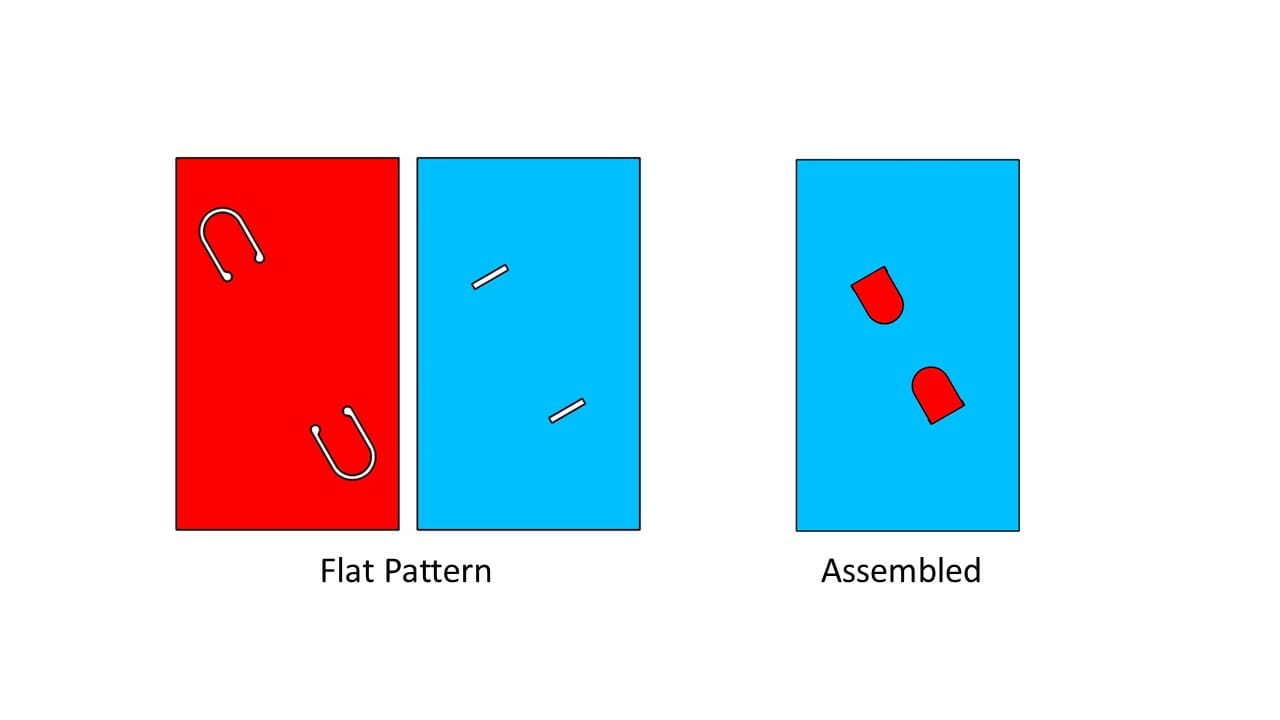
This joint is stronger perpendicular to the folded tabs. If a strong force is applied parallel to the tabs, there is a risk that the tab will deform and slip from the slot. Making the tabs and slots at an angle and folding in opposite directions increases the strength. As always, the more tabs and slots, the stronger the joint.
Bent tabs and slots can be used in many other ways. A long tab can be used to hold a stack-up of parts together. Bent tabs can even be used to clamp other thicker materials, like transparent acrylic over metal. Parts can be fastened perpendicular to one another as well as parallel. If space is limited, two tabs can fit in one slot and fold in opposite directions. Below are a few examples to illustrate.

But what if the material is slightly thicker? The thicker the material, the harder it is to bend. Unless you are a bodybuilder, you’ll need a little help to make the bends. By making the holes at the end of the tab larger, the cross section to bend is smaller and less force is needed. Pliers certainly help as well. Note: this style of sheet metal bending will need to be done after you receive your parts from SendCutSend as it’s not compatible with standard CNC bending tooling.
Another way to assist folding is to make small cuts across the bend line. This too decreases the amount of material that needs to bend, and thus requires less force. However, removing too much material can possibly cause the tab to break during bending. Make sure to look at our guidelines on laser cutting to ensure the cuts are appropriately sized. The figure below shows an example of a perforated tab.
For a closer look at hand bending metal, check out our blog post on the subject.
Bent Tabs Summary:
- Pros: Ideal for sheet metal parts; versatile in its application
- Cons: Lower strength when stress is applied parallel to tab’s bending direction
Hooks
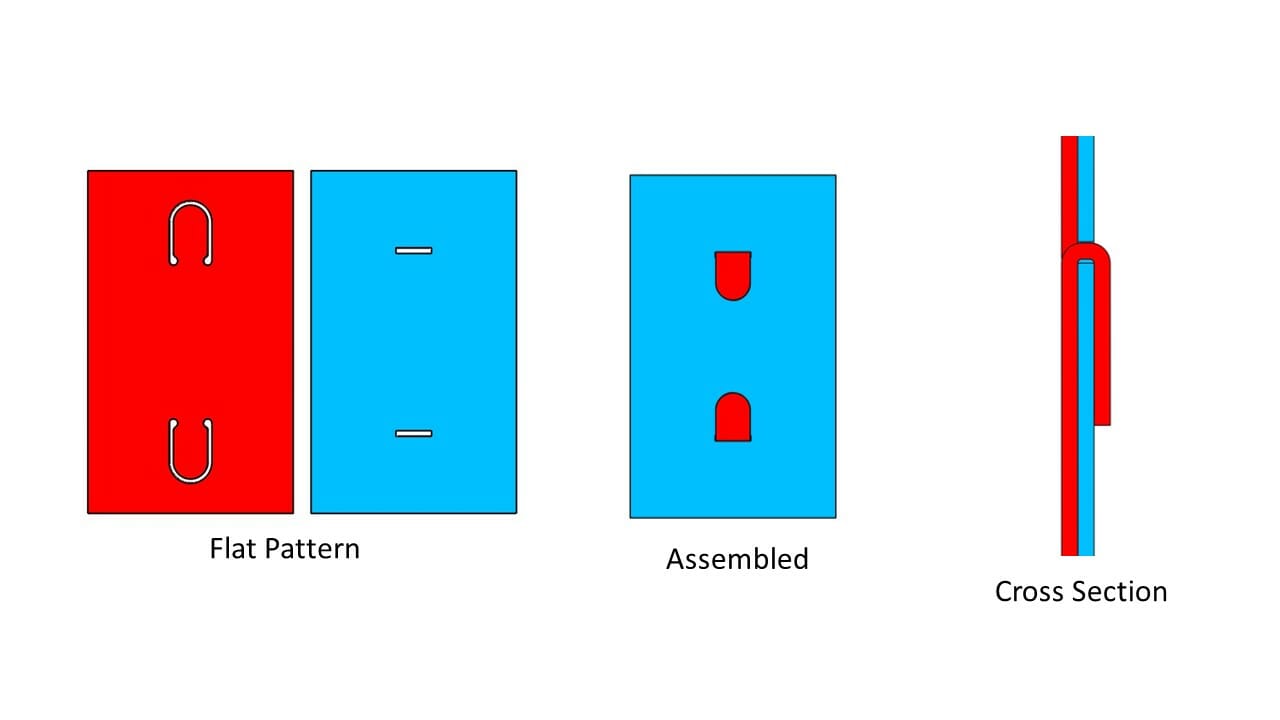
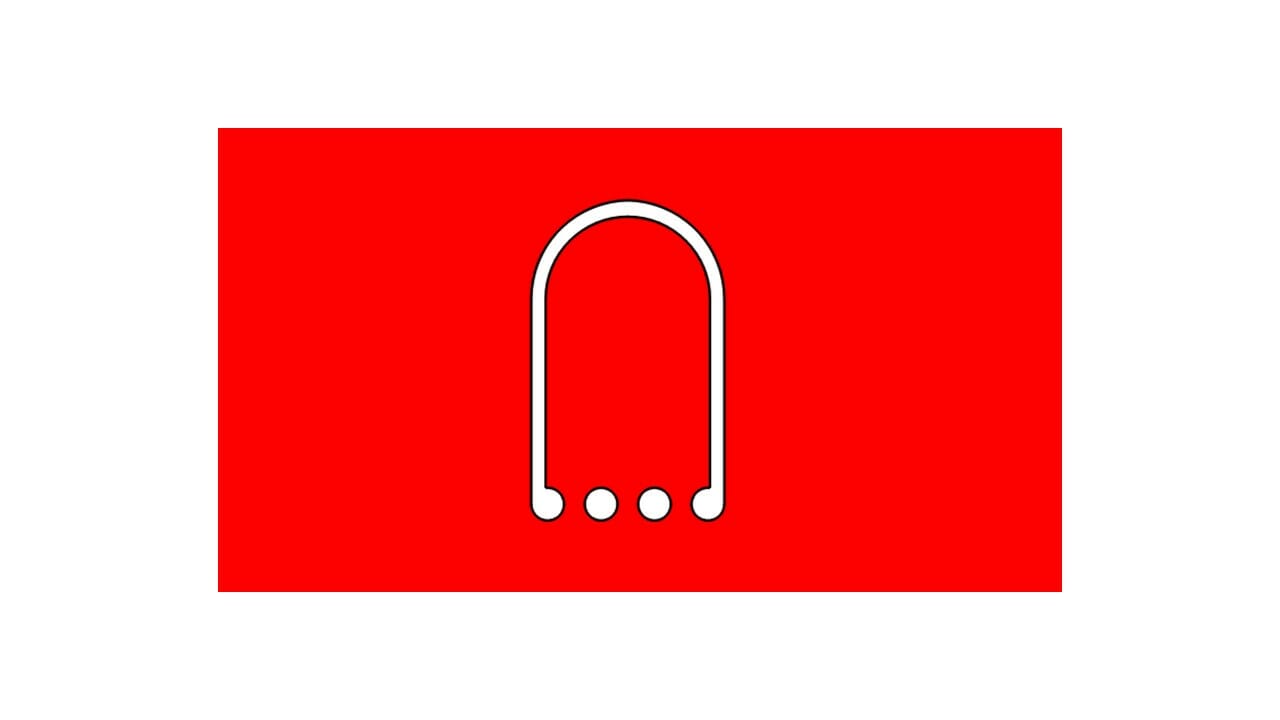
Hooks can make your design assemble in a snap. A hook is a simple variation of a tab. A hook enters through a slot and protrudes through on the other side. The hook has a notch in it that is equal to the thickness of the material. The hook is then pushed down, fitting the notch into the side of the slot. The figure below shows a flat pattern and assembly of a simple hook and slot.
Tip for designing hook assemblies: Round the exterior side of the hooks to avoid sharp edges that could lead to accidental injuries.
Because the hook slides down into the slot, the top of the notch must match the bottom of the slot in the design to obtain the desired assembly positioning. The slot must have clearance for the length of the entire hook, not just the notch. A single joint can have several hooks. With enough force, hooks can be undone, and the assembly disassembled. Hooks are effective for thin and thick material alike. Once again, the more hooks, the stronger the joint.
Hooks Summary:
- Pros: Can be used on thick and thin material alike; easy assembly
- Cons: Weak against loads opposite of hooking direction
Key and Tab
A key, tab, and slot design, known in woodworking as a tusk tenon mortise and tenon joint, uses three unique parts. Like other joints, the tab is on the edge of a part. However, this tab features an interior hole. The tab protrudes through the corresponding slot on the part that is to be joined. A third and much smaller component, known as a key, fits the hole on the tab. The key fits perpendicular to the tab and holds against the mating part with the slot, keeping the tab from moving. The figure below shows the flat pattern as well as the assembly for a simple key, tab, and slot joint.
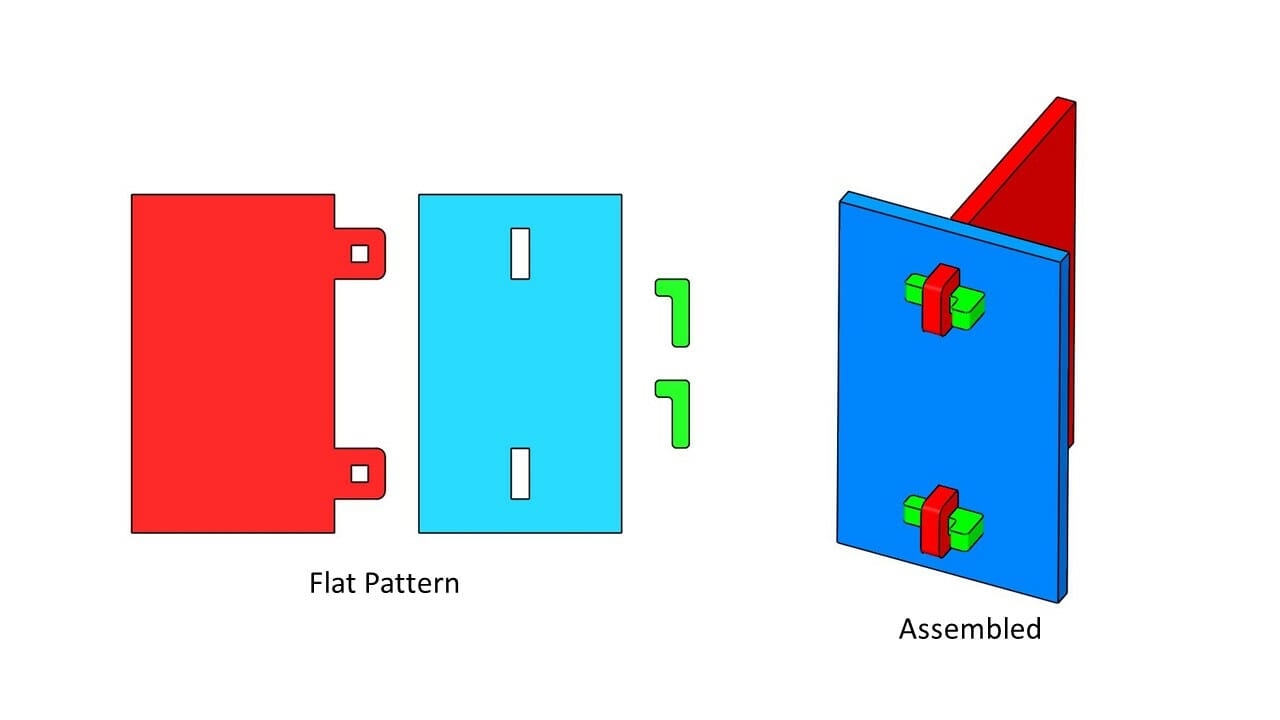
This joint tends to do better with thicker materials. The result is a unique handmade look that is popular with wooden furniture. The key can be removed, and the assembly easily disassembled. Key, tab, and slot joints are incredibly strong and come in a variety of forms.
As illustrated in the figure above, a key can be even thickness, making for an easy and simple slip fit. Small pad ups on the ends can assist grip and provide a larger surface area to gently tap in place with a mallet, but a key can come in a variety of shapes to match aesthetics or functionality.
A common application is to use the key as a wedge. The further the wedge is tapped into place, the more clamping force is provided. A key can have a large hole on end for gripping or tying off to the mating piece. If the material is flexible enough, a key can even be designed to snap into place, much like a buckle to a backpack. The figure below shows a few different key designs to give some ideas:
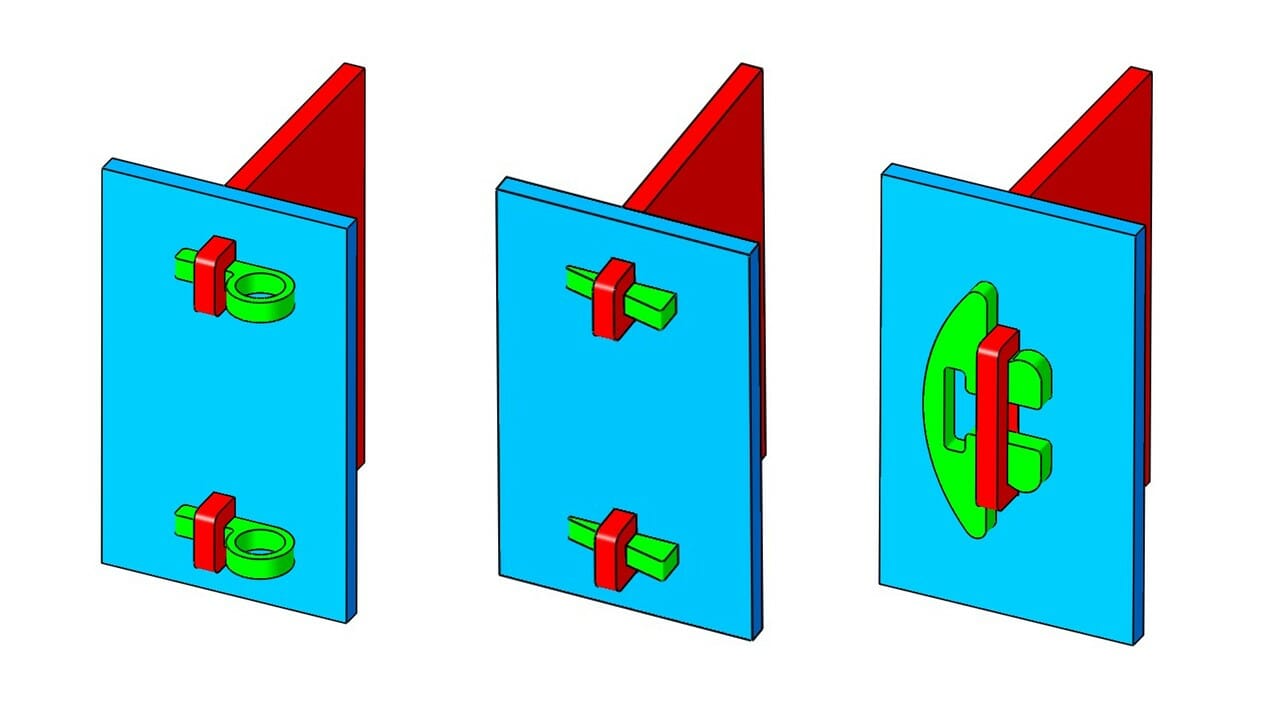
This joint is exceptionally strong and can be designed several ways to match a decorative look to your project, or match strength needs. However, this joint requires an extra part which can be cumbersome and add a little bit more time to assemble.
Key and Tab Summary:
- Pros: Strongest joint; adaptable key design
- Cons: Bulky with more parts to make the joint
Joining It All Together
There are several ways to join your parts together without the need for nuts and bolts. The methods presented in this article showcase a variety of fastenerless joints that work for a variety of materials and applications, with easy customization to best suit your projects. Mixing and matching the joints shown here can leverage the best aspects of each joint where best appropriate.
After incorporating these methods into your designs and preparing your files, upload it to our instant quoting tool to get your custom fastener-free project started!
