Laser cutting is a great way to show off your logo, a quote for the wall, or your daughter’s name on a necklace. Before you send us all those beautiful typography pieces, there’s some things you’ll want to keep in mind.
Text must be converted to a vector shape
Before you export your file, be sure to convert all your text to vector. This will be called different things depending on what program you’re using. In Illustrator they call it Create Outlines, In Corel it’s called Convert to Curves, in Inkscape it’s called Object to Path. Same function, different names. The idea is that it’s changing your text from an editable font to a bunch of shapes. With that in mind, you’ll want to do this as one of the last steps before exporting your file. Once your text is converted you will no longer be able to edit it as text.

Once your font has been converted you’ll now need to consider how it’s being used. You can think of this in terms of positive versus negative. Stand alone letters versus letters reversed out of a shape.
Create bridges for reversed text
Stand alone letters (positive) are fine as they are. The outer shape is the shape of the letter itself, which means holes can be cut from that shape.
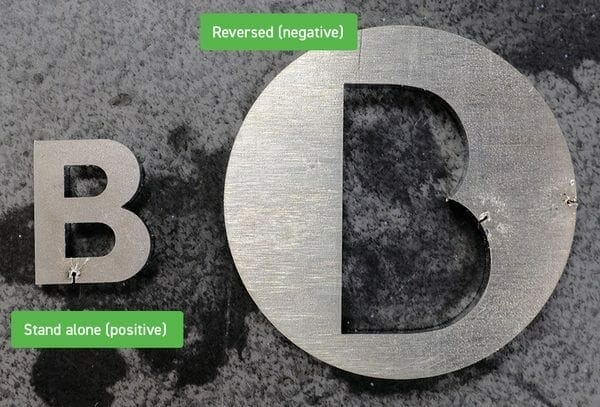
When you’re reversing your letters (negative), or cutting them from a shape, your letter now becomes the hole. You can’t cut a hole from a hole. Think about that donut you love so much. Once the hole is cut out, there’s nothing more to cut.
Mmmmm, donuts.
Okay, back on point.
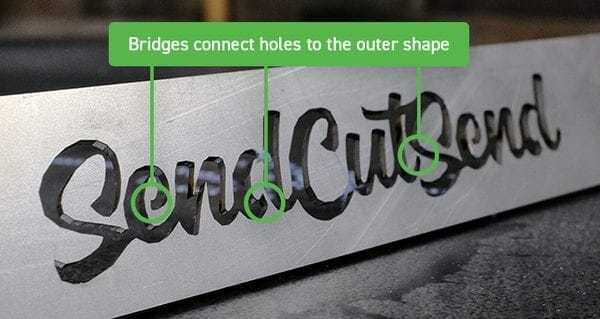
To remedy this, you will need to create bridges for all those “holy” letters: R, B, O, D, the list goes on. Basically you will be turning your font into a stencil. We’ve all seen stencil letters. They all have bridges that connect the holes in the letters to the space around them. You can either find a stencil font to use, or you can create your own bridges.
We provide font download packages as well!
Text bridge width considerations
When creating or editing bridges in your text design, ensure they meet the minimum bridging width for the material thickness you plan to order.

Learn how to confirm minimum cutout and bridging requirements for any material in our catalog.
Design software text tutorials
We provide software-specific instructions for popular CAD programs:
- Preparing Text for Laser Cutting in Autodesk Fusion
- How to Create Text in SolidWorks
- Preparing Text for Laser Cutting in Adobe Illustrator
- Preparing Text for Laser Cutting in Inkscape
Text preparation design recap
When preparing text elements for cutting with SendCutSend, follow these tips:
- Convert text to vector paths
- Choose a stencil font or “stencilize” letters to retain center shapes if desired
- When adding or editing bridges in text, ensure bridging meets the minimum width required for the material thickness
Once your design meets our guidelines, upload your file for instant pricing!


