Corrosion is one of the most common ways that designs fail. Exposure to chemicals, weather, salt water, or even dissimilar metals can all cause a part to rapidly deteriorate and lose structural integrity. For this reason it is critical to consider corrosion prevention in any designs that are in anything short of pristine conditions. Many designers believe that stainless steel is corrosion proof. It is the “nuclear option” and will resist all corrosion for eternity. Unfortunately, this is simply not the case, and many situations can cause stainless to corrode. Passivation is a great way to improve corrosion resistance of stainless steels, and it will be discussed in this article. While SendCutSend doesn’t offer passivation at this time, we do offer many solutions to combat corrosion in our products. From anodizing and powder coating, to zinc or nickel plating; all of these provide varying levels of corrosion resistance while also increasing durability of your parts.
Six-Step Passivation Process: How to Passivate Your Stainless Steel Parts
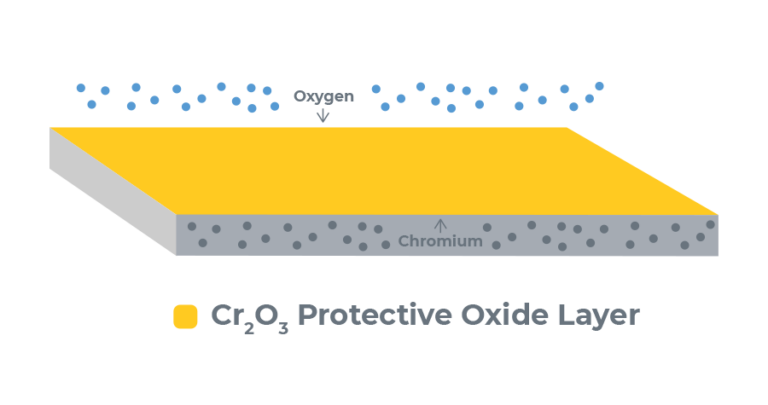
The passivation of stainless steel is a process that removes contaminants, reactive elements from the surface of the alloy, and creates a passive layer that protects the underlying stainless steel from corrosion. This protective layer is composed of chromium oxide, which unlike iron oxide (rust), is a protective layer to the underlying stainless steel. The passivation process is very similar to anodization in that it cleans off contaminants and encourages the buildup of a protective oxide layer. Below are the steps on how to passivate stainless steel.
1. Degrease parts
The first step in the passivation process is to thoroughly remove any contaminants from the parts. This might be dust, metal chips, cutting oils, etc. Using a degreaser such as Simple Green will effectively remove contaminants.
2. Water rinse
Use good quality water that is free of chlorides. Chlorides can cause a chemical reaction that will attack the underlying stainless steel. While most tap water in the US has a low enough chloride level, distilled water can be used to be certain.
3. Acid immersion bath
There are two types of passivation, citric acid passivation and nitric acid passivation (sometimes with additional additives added to the nitric acid). Generally for newer production and for DIY passivation, citric acid is preferred due to being a less hazardous chemical and being much easier to dispose of.
For most common stainless steels (304/304L and 316/316L) a 10% by weight solution of citric acid should be used. The solution should be heated to 150°F, and the parts submerged for 30 minutes.
4. Water rinse (twice)
After the parts have been immersed in the acid bath for a sufficient duration, rinse the parts thoroughly. Ideally two baths should be used, the first bath will slowly raise in acidity level from the excess acid on the parts being washed into it, so the second bath will very thoroughly remove any slight excess from the slightly acidic water of the first bath.
5. Dry parts
Thoroughly dry parts before moving on to the final step. This ensures the testing is accurate.
6. Test sample
Multiple testing procedures can be used to verify the passivation of stainless. The water immersion test is the easiest to accomplish for DIYers, simply submerge the water in distilled water for one hour, then remove from the water for one hour, repeat for a total of 24 hours of testing. It is important that the water be clean of all contaminants and chemicals. The stainless steel passes the test if there is no evidence of corrosion after the time has elapsed.
A faster option for anything other than food contact surfaces would be a copper sulfate test, where a solution of copper sulfate and sulfuric acid is applied to the passivated surface for 6 minutes. The stainless steel passes the test if there is no evidence of copper plating after the time has elapsed.
How Does It Help Prevent Corrosion?
Passivation removes free iron on the surface of the stainless steel while leaving the inert chromium intact. This iron on the surface is very reactive and is a foothold for corrosion to start on the part. The free iron on the surface might have been in the chemical composition of the stainless, or might have been introduced via various machining/fabrication processes such as using high speed steel tooling or grinding wheels which contain mild steel (mild steel has a high iron content). The higher chromium content left behind by the passivation process reacts with air and creates chromium oxide, which acts as a protective layer over the underlying stainless steel. The reaction of chromium with air to form a protective oxide layer is actually the same phenomenon that makes anodizing such an effective process on aluminum.
Do’s and Don’ts to Help You Passivate Correctly
While passivation is a fairly simple process to perform at home, there are several do’s and don’ts that can help ensure a successful passivation process. Below is a simple table outlining some tips and tricks that will help your passivation efforts be as successful as possible.
| Do’s | Don’ts |
| ✅ Clean/degrease before passivation ✅ Use good quality water (like distilled) ✅ Maintain proper acid bath temperatureReplace acid baths regularly | ❌ Use tools with iron content (HSS drills/mills) ❌ Allow acid concentration to be out of tolerance (high or low) ❌ Mix alloys of stainless steel |
Applications of Steel Passivation
Clean Rooms
Clean rooms are a perfect example, such as those used for electronics or aerospace components. These controlled environments require a very high level of cleanliness and corrosion resistance in order to satisfy their high standards.
Surgical Instruments
Surgical instruments are another area where corrosion resistance is extremely important, while also maintaining a very inert and surgically safe chemical composition that many conventional coatings cannot attain.
Medical Products and Food Production/Handling
Medical manufacturing and food handling both have similar levels of cleanliness and corrosion resistance requirements to that of surgical instruments in order to maintain safety of their products. Both industries are heavily regulated and limited in the treatments available for their equipment.
Ball Bearings
Ball bearings require a high level of precision. Many conventional coatings or even a slight amount of rust would change the tolerances enough to destroy proper function.
Fasteners
Fasteners are another area where being inert is of critical importance. An often overlooked interaction is that of dissimilar metal corrosion. For instance, mild steel and aluminum will both react poorly with standard stainless steel fasteners. By passivating these fasteners, the parts fastened together will not corrode under normal conditions, whereas a non-passivated stainless fastener would rapidly corrode an aluminum or mild steel part if exposed to moisture.
Increasing Rust Prevention, Wear Resistance, and Strength
Passivation is a very useful tool for ensuring stainless steel parts are well protected from corrosion. Rust is a demoralizing thing to have crop up on a material that is supposed to be rust resistant. The removal of contaminants while also building up a protective oxide layer ensures a long service life if the oxide layer is left intact. SendCutSend offers other alternative processes that will accomplish the same corrosion resistance, while also increasing both wear resistance and strength of parts. Anodizing for example will actually increase the surface hardness of aluminum, plating will act as a sacrificial protection against corrosion regardless of if the coating is intact, and powder coating is extremely durable and protects parts from both abrasion and corrosion.
If you have any questions, feel free to reach out to our support team. When you’re ready, upload your design and get instant pricing today!
If you are new to SendCutSend, here’s a handy step-by-step guide on how to order parts: How to Order Parts from SendCutSend (spoiler alert: it’s super simple and intuitive to order from us)
FAQs
- What is Passivation of Stainless Steel?
- Passivation is a cleaning and acid bath process that removes surface contaminants and facilitates the growth of a corrosion resistant oxide layer on stainless steels.
- Passivation is a cleaning and acid bath process that removes surface contaminants and facilitates the growth of a corrosion resistant oxide layer on stainless steels.
- Is passivation of stainless steel necessary?
- While passivation is not required for all parts, it is a best practice for stainless steel parts that will be exposed to harsh environments that won’t have any other coating applied to them.
- While passivation is not required for all parts, it is a best practice for stainless steel parts that will be exposed to harsh environments that won’t have any other coating applied to them.
- What is the Difference Between Stainless Passivation and Pickling?
- Pickling removes a very thin layer from the metal’s surface, while passivation builds up a very thin protective layer. Both processes use acids, and pickling can actually be done to previously corroded parts prior to passivation of those parts.
- Pickling removes a very thin layer from the metal’s surface, while passivation builds up a very thin protective layer. Both processes use acids, and pickling can actually be done to previously corroded parts prior to passivation of those parts.
- How Do You Test Stainless Steel Passivation?
- The easiest test for a DIY setup is a water immersion test where the passivated part is alternately submerged in distilled water for one hour, then removed from the water for one hour, for a total test time of 24 hours. A faster method (but involves fairly harsh/hazardous chemicals) involves using a solution of copper sulfate and sulfuric acid to test if the stainless steel allows copper plating to occur. This copper sulfate test only takes 6 minutes to complete, but has hazardous chemicals to contend with.
- The easiest test for a DIY setup is a water immersion test where the passivated part is alternately submerged in distilled water for one hour, then removed from the water for one hour, for a total test time of 24 hours. A faster method (but involves fairly harsh/hazardous chemicals) involves using a solution of copper sulfate and sulfuric acid to test if the stainless steel allows copper plating to occur. This copper sulfate test only takes 6 minutes to complete, but has hazardous chemicals to contend with.
- How can you tell if stainless steel is passivated?
- The passivation of stainless steel can be tested in various ways. See the above FAQ for the two most prevalent methods.
- The passivation of stainless steel can be tested in various ways. See the above FAQ for the two most prevalent methods.
- How long does passivation of stainless steel last?
- If the part is sitting on a shelf at room temperature with no interaction, passivation will last indefinitely, that is to say the passivation will last until it is acted upon. The service life once acted upon will vary drastically based on temperature, exposure to chemicals (especially chlorine based products like bleach), and abrasion. Unfortunately, it is hard to quantify how long the passivation layer will last due to the large number of variables. However, testing as described above can be used to ensure that the stainless steel is still sufficiently passivated.


