Like most metalworking tools, press brakes, pan brakes and sheet metal brakes can be expensive, and unless you have one in your garage, you’ll need to pay a metal fabricator to bend your parts. Here at SendCutSend, CNC bending is a pretty simple process, especially when we’re already cutting your parts for you. But sometimes, a design can be altered so you can bend sheet metal parts yourself and it’s not as difficult as it may seem.
DIY Sheet Metal Bending
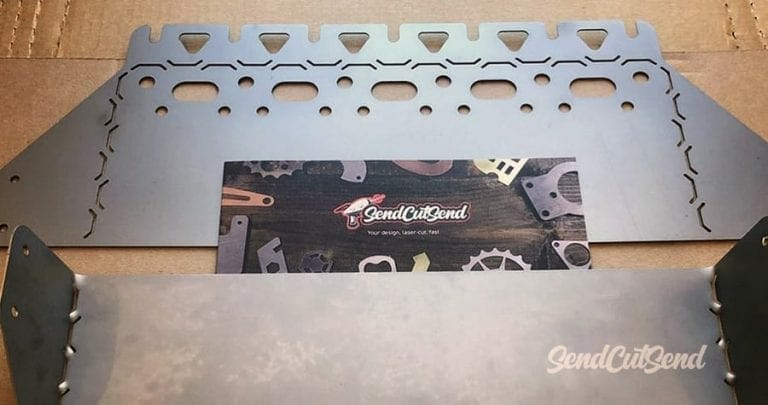
With a little ingenuity and some clever CAD work, a laser can cut bend lines in practically any sheet metal part, making it as easy to fold as a paper airplane. (Maybe not, but we can dream right?) I know, I know, you don’t have a laser cutter either, but we do—seven of them, actually—and we’re happy to share a little known method of leaping over the press brake hurdle and getting your project back on track. This doesn’t just work with thin sheet metal. You can use this method to bend material that would make a sheet metal bending brake cry.
So what is this 2-step diy bending process that can do the job of a press brake? Here’s the secret:
Step 1 – Make relief cuts in your part along the line you want to bend
Step 2 – Bend
That’s it, no joke. Sure, there’s a little more to step 1 to get good results, but it’s really not more complicated than that. Let’s look at it in a bit more detail.
How to Bend Sheet Metal At Home
So how does it work? We promise it’s not magic, though it feels pretty damn close. The key is the relief cuts. There’s no single right way to do it, but the pattern we’re showing here works pretty well. If you don’t believe us, here are some step-by-step instructions to help you visualize this process:
- Grab an old book off your bookshelf and tear off the back cover (make sure it’s not from the public library, or the one that your Mom gave you for your birthday last year that you have yet to read.)
- Using a fine marker, carefully draw a series of shapes on your pretend piece of sheet metal to look like Figure 1 below.
- Now, take an X-Acto knife and cut those shapes out. Be careful not to hurt yourself. Feel free to make humming noises while pretending to be a laser cutter. It makes you go faster. Trust us, we’re experts.
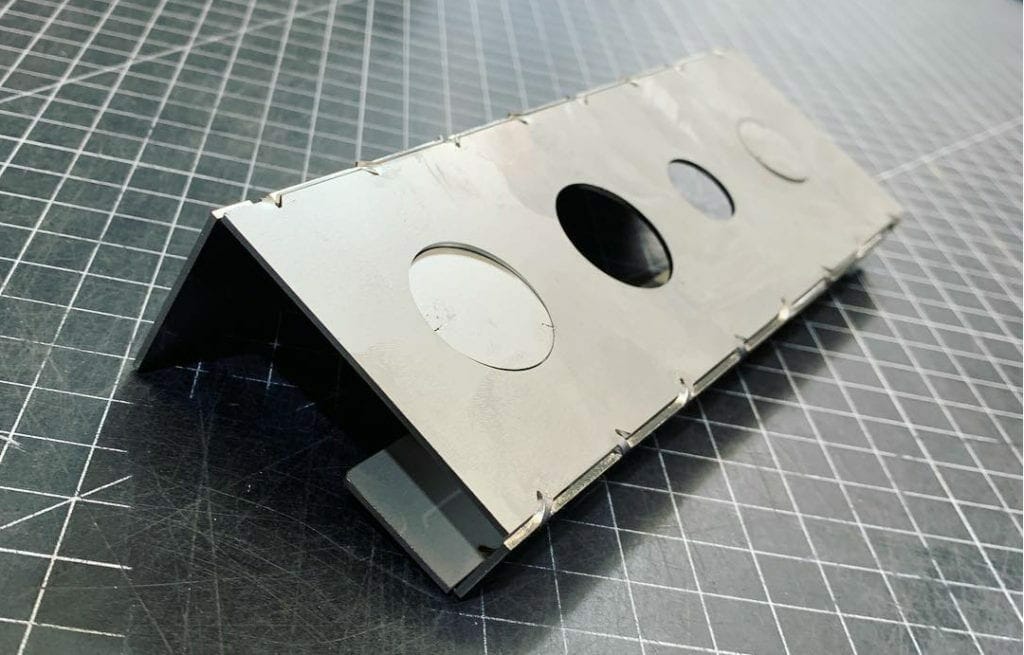
- When you’re done cutting along those lines, pick up your masterpiece and bend it along the line. See how easy it was, and how cleanly it folded? Problem solved, no press brake needed.

Metal Sheet Hand Bending Guidelines
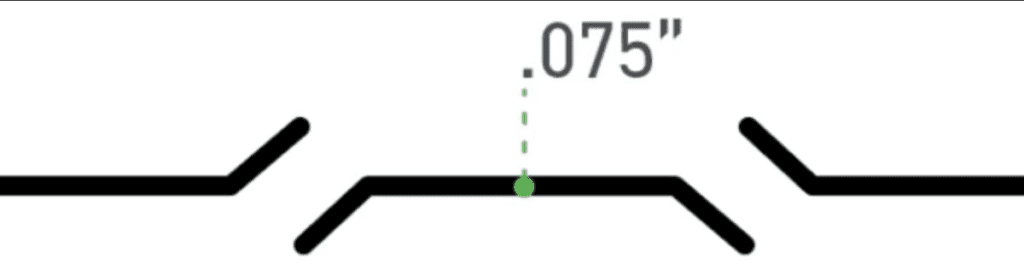
- The Gap: in our book cover example, the width of the white line is 0.075” (1.905mm). The cuts you design should be 0.5 times that of the material thickness and a bit more than that in heavier or harder metals. For example, 0.125″ aluminum would need a gap of 0.075″ (1.905mm), while 0.187″ mild or stainless steel should be 0.130″ (3.302mm) or so.
- The Tab: the little angled section between each slot is called the tab. Measured as the crow flies, it should be at least the width of the material thickness across. Make it too wide and you’ll need arms like Arnold Schwarzenegger to bend the part; too narrow, and the part will be weak.
- The Length: Similarly, it’s up to you to determine how long each slot should be and therefore how many of them are needed across the bend length. Again, it depends on the type of material, its thickness, and the width of the bend, but a half dozen or so would be a good starting place for a typical part.
- The Tail: If you have a two-foot long part with a fold in the middle, each “tail” will measure one-foot in length. Thanks to the huge amount of mechanical leverage in our example, it’s as easy as bending cardboard. Make that part just 6-inches long, however, and you’ll have better luck trying to bend your coffee table in half. To fix that, just add more tabs by shortening the slot length.
7 Tips for Bending Laser Cut Parts
Each part is unique, in width, material, thickness, etc. As we mentioned above, it’s important to consider each part individually before designing for hand bending. We’ve put together a few tips to help guide you.
- Understand the factors that make a hand bend more difficult so you can adjust your relief cuts accordingly. Thicker material will be harder to bend. Stronger material will be harder. A shorter flange will give you less leverage on the bend.
- If you’re struggling to make your bend by hand, all is not lost. You can increase your leverage by clamping one side down and grabbing the other side with simple hand tools (a wrench or pair of wrenches). This can give you more leverage. If your part is short enough a bench vise can work great. For wider bends you can use a length of angle iron and the edge of a bench or table to clamp down.
- Try to sneak up on your final bend angle from one direction. You don’t want to overshoot and need to bend back the other direction as this can stretch the material affecting your measurements. It can also cause the material to fatigue and crack.
- Some materials bend better than others. It’s worth looking up the details of the materials you’re thinking of using before you cut. Carbon steel typically bends well. 5052 aluminum is better for forming than many other aluminum alloys.
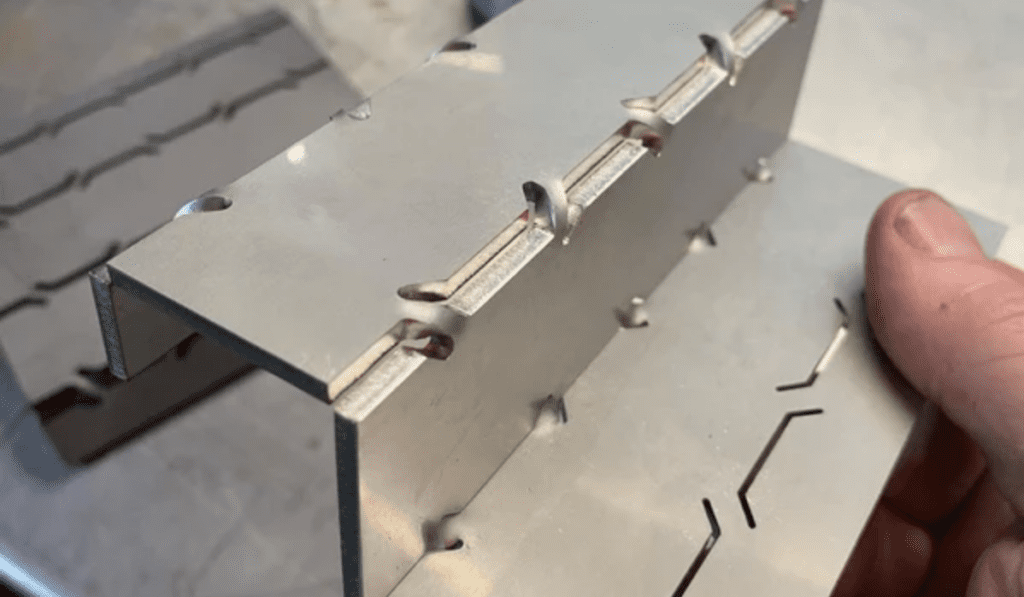
- Relief cuts make the part easy to bend, that’s the point, but they also weaken the part at the bend compared to a similar bend without relief cuts. You can overcome this by having flanges in different directions interlock together to support each other. Tabs and slots are perfect for this. Check out our guide on designing sheet metal parts with tabs and slots more information. If you have access to a welder, welding the seam is also a great way to strengthen a bend by filling in the missing material.
- For thinner materials warping can be an issue. If you can clamp the flanges flat as you bend it will help make a clean bend. Hand seamers work great, as does a simple flat piece of wood. You can clamp one side to the edge of a bench or table and the other to a simple 2×4. This will allow you to bend the entire long thin flange evenly in one go.
- Most of the design considerations we provide for designing for SendCutSend to bend can apply to hand bending also. Things like distortion of features near bendlines and support material. Take a look through our bending deformation guidelines.
If you’d want to see hand bending in action, we’ve got a video for you.
You Are Ready to Go
Confused? It’s actually easier than it sounds. If you’re a CAD person, we have some .dxf templates you can use. You should also be aware of something that press brake operators know intimately: when you bend metal, you lose a little bit of material to the radiused section. Our sheet metal bending calculator is also helpful for knowing how your parts will look after they’re bent and what you need to do to get your desired shape. It can calculate bend allowance and bend deduction. Just like different tooling can produce different bend radii, so can the relief cut geometry for hand bending. You may want to measure a test bend for your reliefs.
If doing the bends yourself isn’t your cup of tea, no problem. SendCutSend can both laser cut and CNC bend your parts for you. That’s just a few of the many services we offer that you can use to bring your designs to life.
Get your free quote today!


