Bolted joints are extremely common in every industry and for good reason; they offer a quick and simple way to connect multiple parts including joining laser cut parts. However, a bolted joint is only useful if both pieces have the same threads. Even if a fastener is the same diameter, there are multiple thread types and sizes that could make the two incompatible. This article will explain the basics of screw threads; how to measure thread size, the different styles, and some useful tools to make identifying them easier.
What is a Screw Thread?
Screw threads are a feature on nuts, bolts, screws, and parts that intertwine to hold two or more pieces together. Threads are spiral shaped, like a spring, and the precise shape of that spiral is what allows the two pieces to mesh together in a repeatable way. The threads have a ridge and valley, and the ridge of one threaded part fits into the valley of the matching part to prevent the pieces from separating without the fastener spinning.
Threads have three critical dimensions: diameter, thread spacing, and the length of the threads. There are multiple standards that define screw threads, some standards are more common in some countries, while others are specific to a particular industry or use type.
Imperial and Metric Threads: Definition and Differences
Imperial and metric are two different units of measurement that accomplish the same thing. One inch is 25.4 millimeters, and is roughly the width of an adult thumb. Imperial is most commonly used in the U.S., whereas metric is the most common system worldwide. Both systems are known by multiple names, which are listed in the table below. Fasteners can be either imperial or metric, and how they are referenced is slightly different depending on the system.
| ImperialEnglishSAE (Standard American English) | MetricSI (Système international/International System of Units) |
Besides units used to measure sizes, the thread spacing is measured differently between imperial and metric. Threads per inch (TPI) and pitch are inverse of each other, but accomplish the same thing which is measuring the spacing of threads/how dense they are. Threads per inch is threadsdistance whereas pitch is distancethread. Threads per inch is only used for imperial fasteners whereas thread pitch is only used for metric fasteners, and pitch must be measured in mm.
How to Read Screw Sizes
If you’re a builder, it’s important to understand how to read screw sizes. There is a standard format that is followed for both imperial and metric sizes. See below for an annotated example of each style.
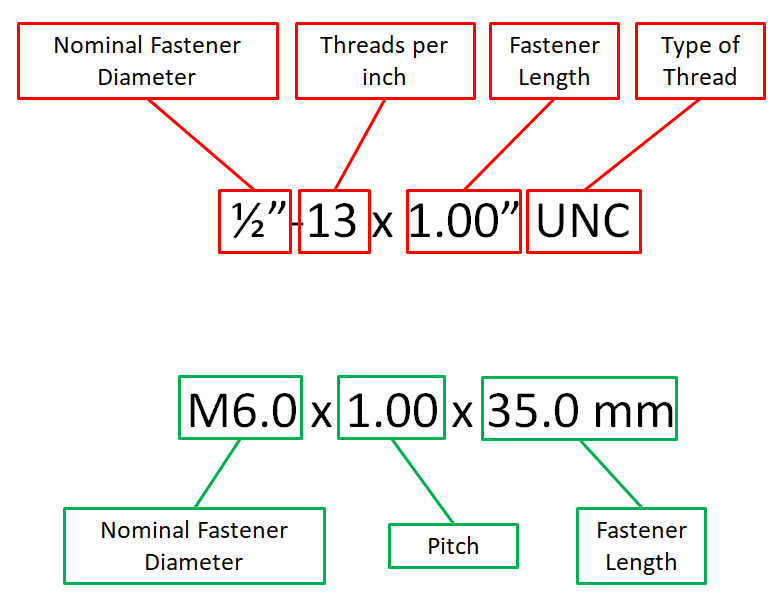
Also important is properly referring to fasteners verbally. In the example above, the imperial fastener is called a “half thirteen bolt, one inch long” and the metric fastener is “M six bolt, one millimeter pitch, thirty five millimeters long.”
How to Measure Threads in Four Steps
1. Determine the type of thread
External threads, known as male threads, are visible on the outside of a bolt, screw, or threaded post. Male threads are the easiest to measure and identify. Internal threads are threads inside of a part such as a tapped hole or a nut. These are known as female threads, and are harder to measure than male threads. If the threads being identified are not all the same size, but instead are tapered threads, then this is an indication it is a pipe thread. Pipe threads are most often used for containing liquids or gasses, and have their own set of standard threads. Worth noting is that pipe thread measured diameter doesn’t match the thread callout i.e. a ½”-14 NPT thread has a measured outer diameter of 0.84” in this case, referencing a chart specific to pipe threads is useful as it will list both the size and the physical/measured size.
2. Measure the thread diameter
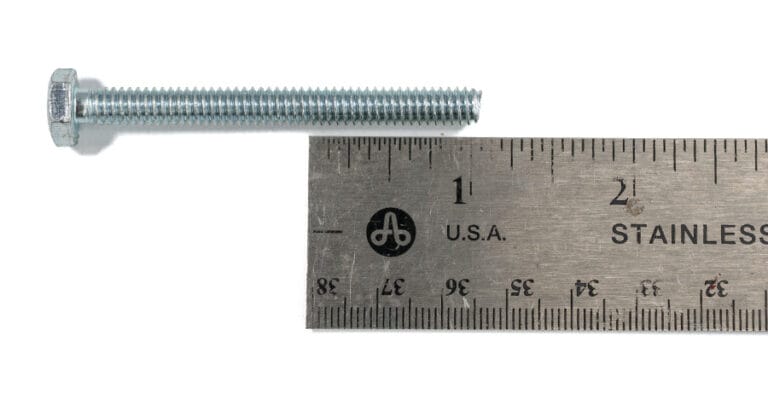
The outer diameter of a bolt is referred to as the nominal or major diameter of the bolt. This is what should be measured when determining the thread size. Hold the fastener in question against a ruler, and measure from one side of the thread crest to the other thread crest. It is important to try to keep the head of the fastener parallel with the ruler for the most accurate measurement.
3. Identify the number of threads per inch (TPI) or pitch
As explained above, threads per inch and pitch are the inverse of each other. So measuring one way or the other can yield the either TPI or pitch by simply dividing one by the measured size and converting to the proper units i.e. (1/TPI) x 25.4 = pitch in mm and 1pitch x 25.4 = TPI. Below it is explained how to measure either one directly.
Threads per inch
Put the bottom of the head of the fastener at the start of the ruler, measure and mark one inch from the end of the fastener, and count the number of threads between the end of the fastener and the mark. It is important to note that only the peaks or the valleys are measured, not both. Also, if the fastener is less than one inch in length, simply multiply the threads counted to get to one inch. I.e. if 1/4” of threads is counted, multiply the count by 4 times to get threads per inch.
Pitch
Pitch is determined by measuring the distance between adjacent peaks or valleys of the thread in millimeters. Align the head of the fastener to the start of the ruler, and find a thread that is in alignment with a measurement mark. Next determine how far it is to the next peak or valley. This distance tends to be very small, less than 2 mm on most fasteners, so it is often beneficial to count off multiple threads and average it. For example, count off 10 threads from the starting thread, and divide the distance by the number of threads counted.
4. Compare the information into a standard measurement
Once both diameter and TPI or pitch are known, compare the information against a thread chart. In the U.S., imperial fasteners are most common. However, if the fastener dimensions don’t match up well, compare it to a metric thread chart, pipe thread chart, or consider if the fastener is worn. Older fasteners will sometimes wear down with time, resulting in a slightly smaller diameter than when they were new, so consider the next size up if the fastener might be an older one.
Four Other Accurate Ways to Measure Threads
Measuring thread using a thread pitch gauge
A thread pitch gauge will make short work of measuring the TPI or pitch of a thread. At the time of writing these range from $10 for an intro level, to $50+ for a professional grade set. To use, simply choose a leaf of the gauge and hold the teeth of the pitch gauge against the fastener to see if they match. Holding the fastener over a white backdrop, like paper, helps. Try different leaves until there is no visible gap and the teeth of the gauge fall perfectly into the threads.
Measuring thread using a caliper
While a tape measure will suffice, measuring with a caliper is much faster and more accurate. For external threads, simply place the jaws of the calipers along the length of the fastener. It helps to hold the calipers at a slight angle, measuring across multiple thread peaks to ensure the jaws aren’t falling into any valleys. For internal threads, it is important to center the calipers in the hole, trying to keep them as straight as possible to ensure an accurate measurement.
Measuring thread using a Caliper and a Pitch Gauge
A very quick and simple option to identify fasteners is to have both a set of calipers and a pitch gauge handy. Simply measure the diameter of the fastener with the caliper, then measure the pitch or TPI with the pitch gauge. Then simply compare this to a standard reference for fastener sizes to find the proper size.
Nut/Bolt Gauge
Quite possibly the fastest option is to use a nut/bolt gauge. This option works for both nuts and bolts, however it is a specialty tool with no other uses. There are three types of these gauges; a flat card style, a wood or metal wall hanging with threaded posts protruding from it, or a series of headless fasteners usually attached together via a piece of wire. The card style is used by sliding the fastener into place to get a rough measurement that is compared to a fastener reference. The wall hanging style has a series of nuts and threaded posts mounted to a piece of metal or wood the user simply threads the bolt or nut onto different sizes of fasteners and reads the size indicated from the gauge. The last version is similar to the second, however it is smaller. It has a series of labeled metal pieces attached together, with each of the metal pieces having a male threaded and female threaded end for identifying bolts and nuts. When identifying a fastener thread with another threaded piece it is very important to gently thread the fastener on. If it isn’t a perfect fit, and excess force is used, the fastener, gauge, or both could be damaged.
How to Measure Male and Female Thread Size?
Female screw threads are more difficult to identify than male. The threads are internal to the part, thus making it difficult to determine the TPI or pitch. There are still several approaches to consider. Measure the mating fastener for the female threads (if it has one), use a nut gauge, or guess and check. If a fastener is already installed in the nut or threaded part, simply use the steps above to determine the screw thread. Otherwise, if no fastener is installed, try using a nut gauge, which has a series of threaded pieces that are labeled with their thread size. Make sure to carefully thread the two pieces together or else damage can occur if excess force is used. The final technique is to guess and check with a series of fasteners, ideally of a known size. Measuring the internal diameter of the nut or internally threaded part can narrow down the search to only a few candidate fastener sizes.
Find Out More Ways to Use Your Favorite Tools
Understanding and being able to measure screw threads are a vital tool in any designer’s toolbox. They allow for simple connections, complex bearing surfaces, adjustability in designs, and much more. Determining the screw thread can be done with tools as simple as a ruler, or as specialized as a dedicated bolt gauge. When measuring, keep in mind the various types of threads such as imperial, metric, and pipe thread. One final reminder to always test thread fits carefully, and never forcefully thread two pieces together; keeping this in mind will help to avoid damaging mismatched or cross threaded fasteners.
Once you’ve figured out the thread size you need, let us help make your next project easier! Our industry experts and attention to detail will ensure your next project is a success. SendCutSend offers several services to make fasteners easier to work with including:
- Countersinking: allows fasteners to sit flush
- Tapping: cutting threads directly into a part
- Hardware insertion: adding PEM nuts, studs, and stand-offs
- Waterjet and laser cutting: adding fastener thru holes and slots
When you’re ready, upload your design and get instant pricing today!
If you are new to SendCutSend, here’s a handy step-by-step guide on how to order parts from us: How to Order Parts from SendCutSend (spoiler alert: it’s super simple and intuitive to order from us)


