In this article we’ll discuss a variety of common methods for joining your laser cut and waterjet parts. Whether it’s as common as a nut and bolt, or something more specialized, like an integrated fastener from our hardware insertion service, we’ll hit the high points for each method, and give recommendations on when it’s a good idea to use it, or not. Let’s go!
Nuts and Bolts
The Basics
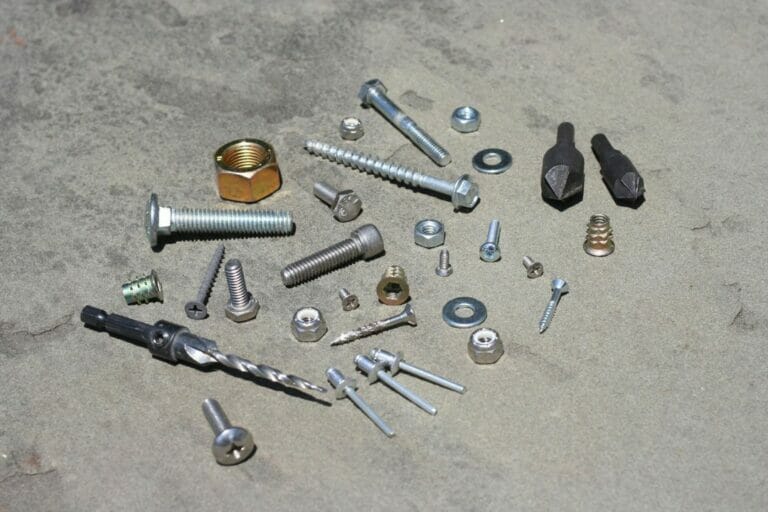
When most people hear the term “fasteners”, nuts and bolts are probably what come to mind. First, you’ll need two laser cut parts with similarly-sized holes. Next, get yourself a bolt or screw; at one end is the head. The threads at the opposite end will receive the nut, if we’re talking a bolt or machine screw. What’s the difference? If the female threads are cut or formed directly into the material being clamped together, the male threaded part is called a screw.
Nuts and bolts are readily available in a large variety of materials and sizes, can be assembled and disassembled without damaging any part of the assembly, and can be torqued to an appropriate spec very easily, avoiding damage to delicate parts.
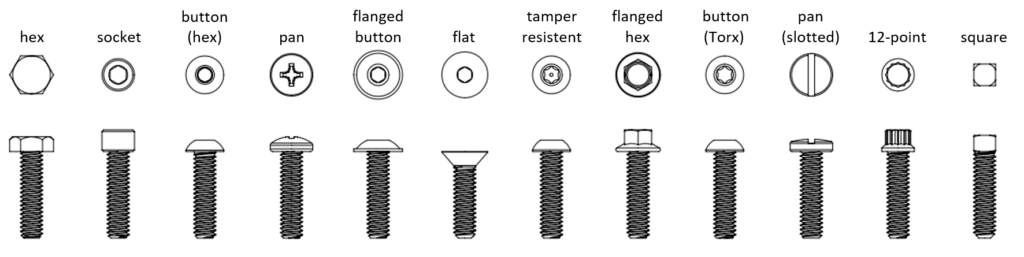
Let’s take a quick look at a few of the different bolts and machine screws available:
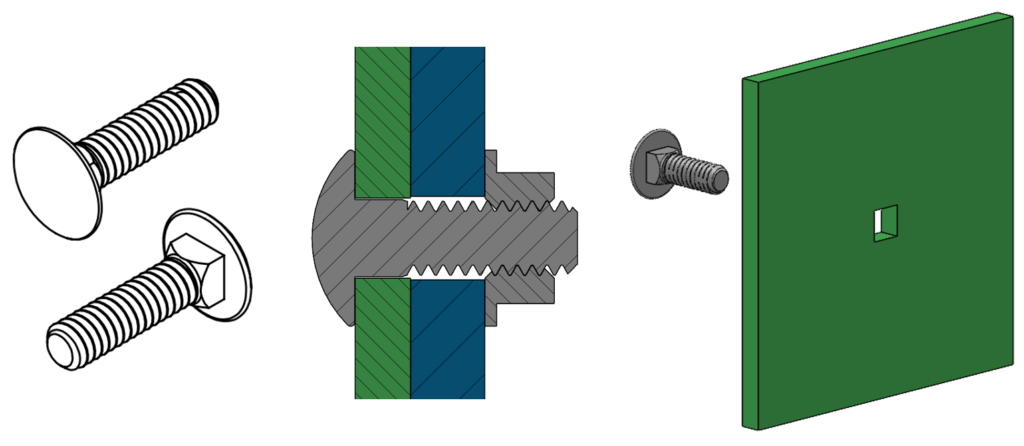
A carriage bolt has a unique head where there is a square shape under the domed head that can resist the tightening torque from the nut. By cutting the right sized square hole into your part, a carriage bolt can be used and leave a smoother appearance.
Where the style of the head of the bolt determines the tool you use to tighten it, the body of the bolt can be just as important to your application.
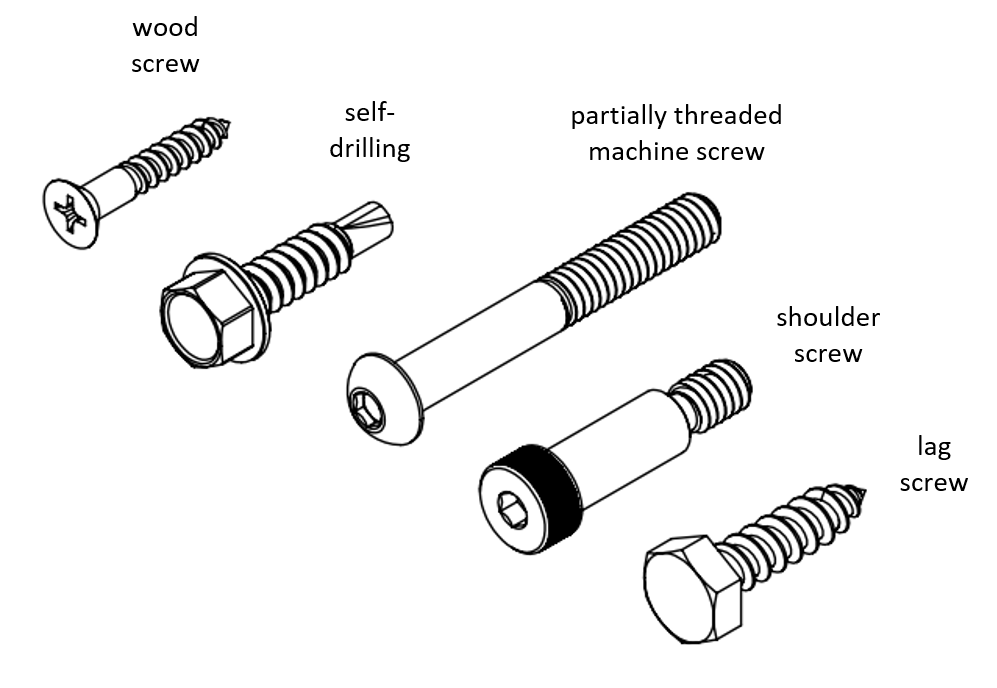
Some bolts have fully threaded bodies, others are only partially threaded. A shoulder bolt has an unthreaded portion with a shoulder at the base of the threads. This allows the nut to tighten up against the shoulder rather than your part which can be great for moving parts like wheels or linkages since the parts aren’t clamped together tightly, but the nut/bolt combination is.
Some screws, like those for wood and drywall, are designed to cut threads in the workpiece as they’re installed, while sheet metal screws include a metal drilling tip, eliminating the need to drill a hole first.
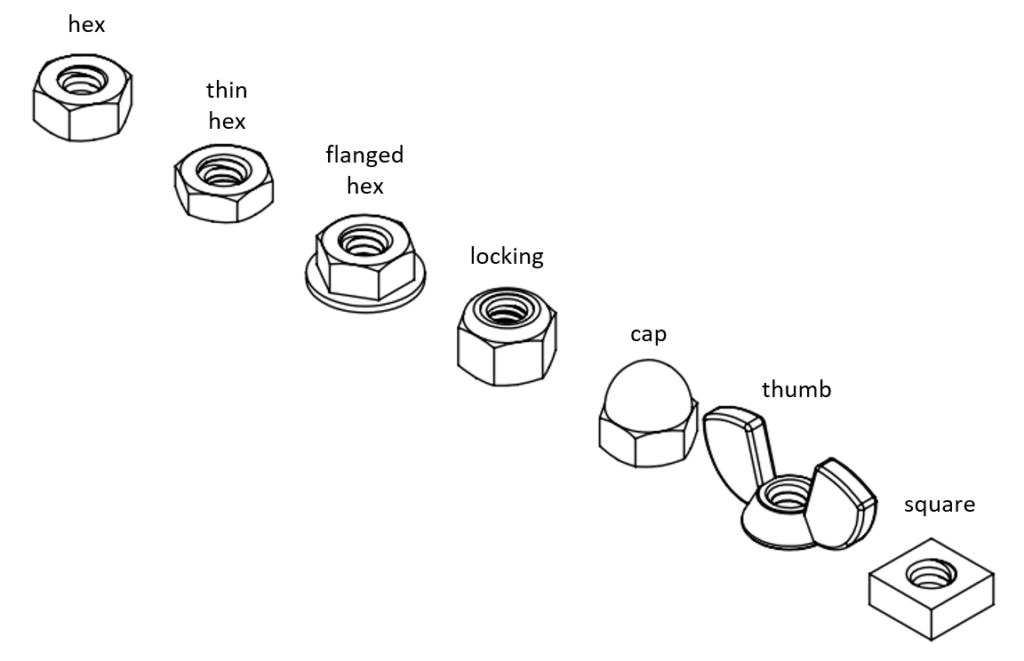
Each bolt in your assembly must have a nut, and there are plenty of options out there, but basically it comes down to whether you want a locking nut or something that is easily removable. If the assembly will see vibration (think, vehicle), you’ll want a locknut, lockwasher, or threadlocker to ensure things stay together as they should.
Materials
Bolts are suitable to use with nearly all the materials we offer. If you’re using a delicate material like cork, it’s best to use it as a gasket, between firmer materials, when bolting.
Using SendCutSend’s tapping service is a great way to save yourself time with the final assembly.
When using bolts painted, anodized, plated, or powder coated surfaces, it’s best to use a washer under the head of the bolt or under the nut, to reduce the chances of damaging finish.
Skills/tools required/part preparation
The tools required here are simple; likely a wrench or two, or a screwdriver. Part preparation for using bolts to join your parts can be as simple as an appropriately sized laser cut hole.
If you plan to use smaller sized bolts/screws in thicker material, you’ll want to pay attention to the tolerances laser and waterjet cutting can achieve. You may need to use a slightly larger hole to be sure the fastener will fit.
Clearance Hole Chart (Inch) inches per ASME 18.2.8
| Screw Size | Close Fit | Normal Fit | Loose Fit |
| #0 | #51 | #48 | 3/32 |
| #1 | #46 | #43 | #37 |
| #2 | 3/32 | #38 | #32 |
| #3 | #36 | #32 | #30 |
| #4 | #31 | #30 | #27 |
| #5 | 9/64 | 5/32 | 11/64 |
| #6 | #23 | #18 | #13 |
| #8 | #15 | #9 | #3 |
| #10 | #5 | #2 | B |
| 1/4 | 17/64 | 9/32 | 19/64 |
| 5/16 | 21/64 | 11/32 | 23/64 |
| 3/8 | 25/64 | 13/32 | 27/64 |
| 7/16 | 29/64 | 15/32 | 31/64 |
| 1/2 | 17/32 | 9/16 | 39/64 |
| 5/8 | 21/32 | 11/16 | 47/64 |
| 3/4 | 25/32 | 13/16 | 29/32 |
| 7/8 | 29/32 | 15/16 | 1-1/32 |
| 1 | 1-1/32 | 1-3/32 | 1-5/32 |
Clearance Hole Chart (Metric) mm per ASME 18.2.8
| Screw Size | Close Fit | Normal Fit | Loose Fit |
| M1.6 | 1.7 | 1.8 | 2 |
| M2 | 2.2 | 2.4 | 2.6 |
| M2.5 | 2.7 | 2.9 | 3.1 |
| M3 | 3.2 | 3.4 | 3.6 |
| M4 | 4.3 | 4.5 | 4.8 |
| M5 | 5.3 | 5.5 | 5.8 |
| M6 | 6.4 | 6.6 | 7 |
| M8 | 8.4 | 9 | 10 |
| M10 | 10.5 | 11 | 12 |
| M12 | 13 | 13.5 | 14.5 |
| M14 | 15 | 15.5 | 16.5 |
| M16 | 17 | 17.5 | 18.5 |
| M20 | 21 | 22 | 24 |
| M24 | 25 | 26 | 28 |
| M30 | 31 | 33 | 35 |
Other Considerations
- Some bolts are made to secure lightweight decorative parts together. Some bolts are specifically graded to have a minimum strength. If you need your bolts to be structural, be sure to choose them appropriately.
- Bolts are made in all sorts of materials and finishes including steel, stainless steel, brass, even plastic. Some materials require special considerations. Stainless for example, is great for corrosion resistance, but is typically not as strong as a steel bolt. Stainless also suffers from galling, which can be reduced by lubricating the threads before installation.
- Depending on the environment where your parts will be used, you’ll want to select a suitable protective finish for any steel bolts to avoid rust. Parts kept indoors don’t need as much protection as parts outdoors that are exposed to the weather. Common finishes include zinc plating, galvanizing, black oxide, black phosphate. There are nearly unlimited options when it comes to finishes.
- When designing your parts to use bolts/screws, you’ll want to pay attention to the amount of clamping force a bolt can apply. It’s possible to use bolts that are too small or too few bolts and have the joint come apart. On the other hand, it’s possible to over-tighten a bolt to the point of snapping the head right off or stripping the threads out.
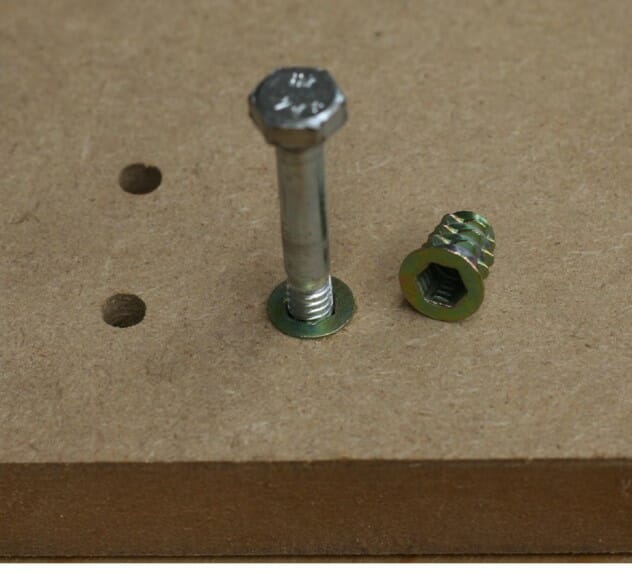
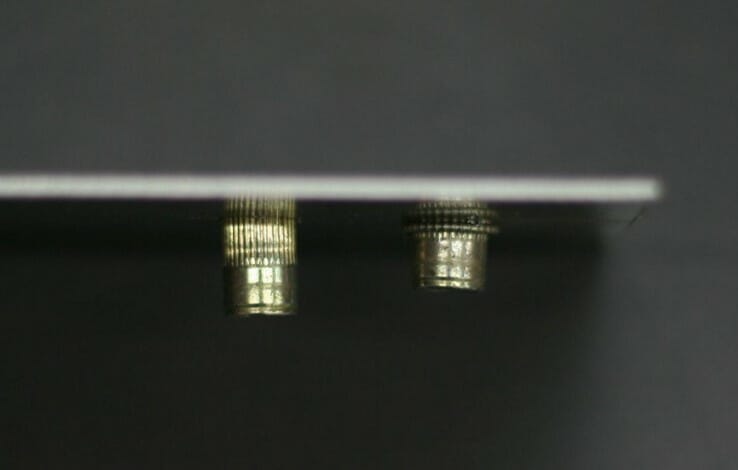
Threaded & Press Fit Inserts
The Basics
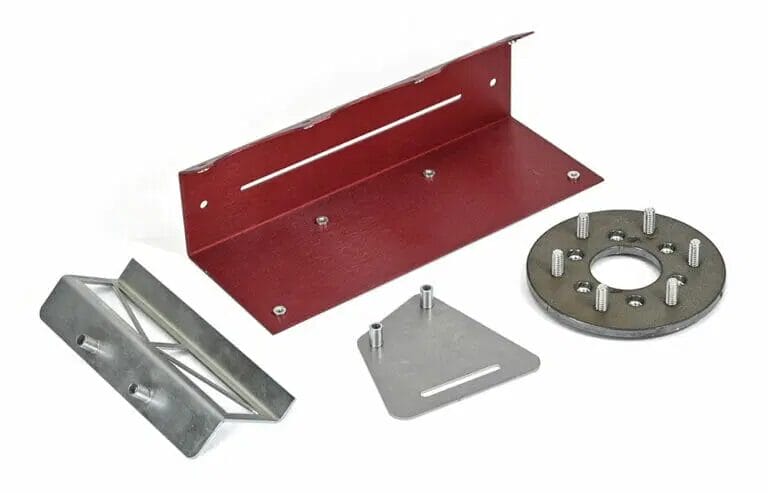
Threaded inserts and press-fit hardware, like those we offer in our Hardware Insertion Service, are permanently installed in the material using a handheld tool or press. Press fit hardware can be used in sheet metal that is too thin to be tapped, while threaded inserts can be used to repair threaded holes that have been damaged. For all about threaded holes, check this article out.
One advantage to using these inserts is that they are typically more durable than the base material they are installed in. While some materials like aluminum and wood can be threaded, they may not be durable enough to hold up to repeated installing/uninstalling of a bolt/screw.
Inserted hardware comes in a variety of styles, from the PEM studs, nuts and standoffs that we offer for use in metal, to those designed for wood or plastic, that only require a pilot hole in the base material and the insert cuts its own threads as it’s installed.
Materials
Threaded inserts are more common for softer materials like woods and plastics, and while inserts exist for use in steel and aluminum, press fit hardware is more common for these materials.
Skills/tools required/part preparation
Some threaded inserts can be installed with nothing more than a drill and screwdriver or hex key. Inserts designed for steel and aluminum typically require special tools to install them.
Other Considerations
Threaded inserts and press fit hardware are designed for specific materials, so when purchasing your inserts be sure to get the appropriate type. You’ll also want to pay attention to the size of the hole you’re installing the insert into, or either damage will be done to the material, the fastener won’t be secure.
Similar to tapping a hole, an insert should be installed perpendicular to the surface. An insert installed at an angle will still take a screw, but the screw won’t be straight. Our hardware insertion service takes care of hole sizing and proper installation, you simply select the desired fastener, and we’ll resize the hole, if necessary, to fit. See this article to get the scoop on selecting and ordering the right hardware for your project.
Rivets
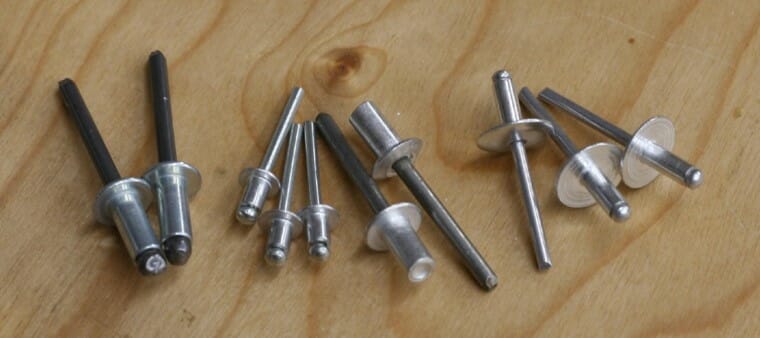
The Basics
Rivets are another common way to join parts, especially thinner materials. When inserted through a hole in both pieces of material, the body of the rivet is deformed towards the head, clamping the parts together.
The biggest advantage to rivets is their per-piece cost, and while a single rivet typically isn’t as strong as a bolt, a large number of rivets can be installed relatively quickly. Because they are lightweight and vibration resistant, rivets are used extensively in the aerospace industry, and because they are cheap to manufacture, are still in budget for any DIY project.
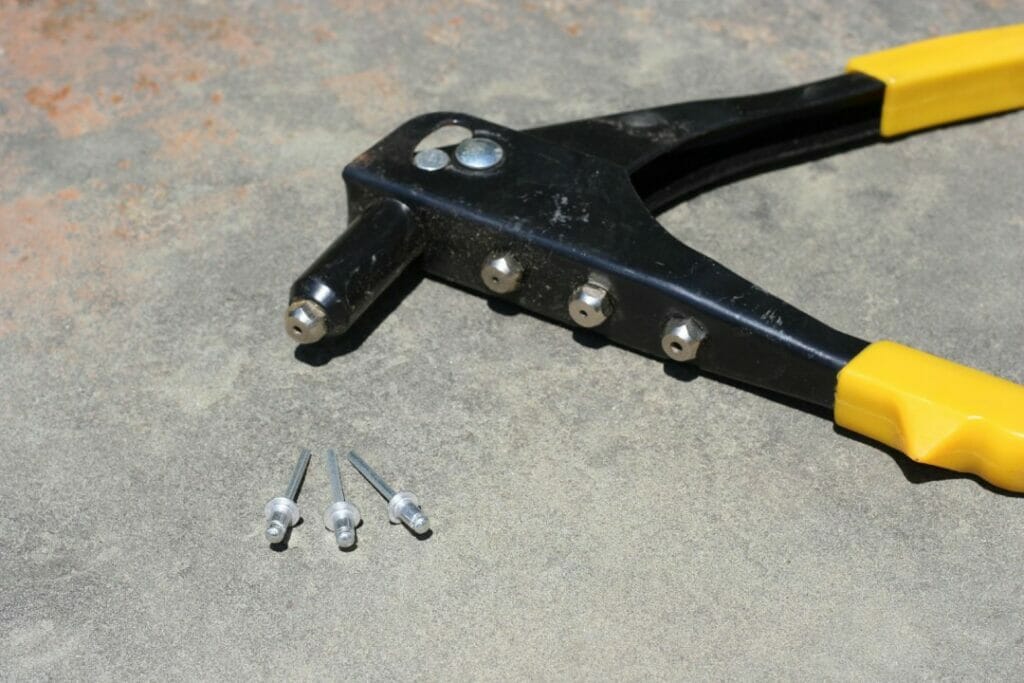
Rivets are available in many materials including steel, aluminum, stainless, and plastic. While there are multiple different types of rivets, we’ll discuss blind (POP) rivets and solid rivets here.
POP rivets are installed using a special tool to pull the center mandrel of the rivet through the head. As the mandrel is pulled it deforms the bottom of the rivet against the material. Once the bottom is deformed the mandrel breaks off leaving just the head of the rivet. The mandrel popping off during installation is what gives the pop rivet its name.
Solid rivets have been in active use for thousands of years. A solid rivet is simply a solid piece of material with a head on one end of the shaft. A solid rivet is installed through the parts to be clamped, and instead of a mandrel crushing the base of the rivet against the material, the base of the rivet is peened (deformed using a hammer) against the material, clamping the parts tightly against the head.
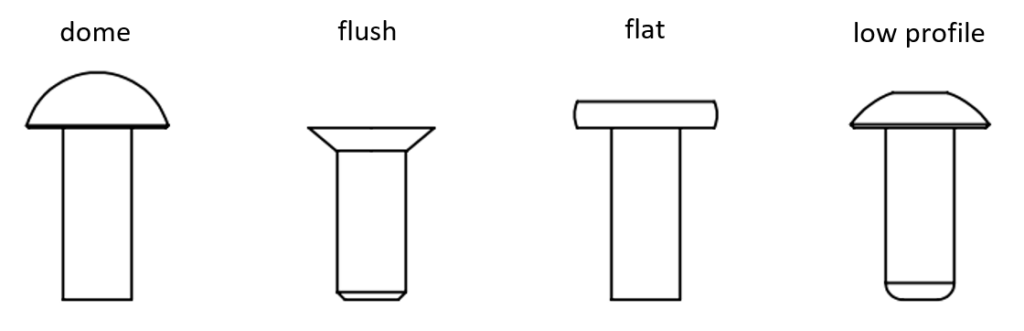
Similar to bolts, rivets are available with different head shapes. You can choose the head shape based on your project needs.
Materials
Rivets can be used on nearly all the materials we offer, again with the exception of cork (left out again!). Rivets can join different materials, such as carbon fiber to aluminum. It’s less common to use rivets in wood as the wood surface dents easily, but you aren’t limited to two pieces of metal, as is the case when welding.
Skills/tools required/part preparation
There are no special skills required to rivet your parts together. Pop rivets will require a rivet tool, sometimes called a rivet gun, to install. A manual tool can be purchased for as little as $10 or a pneumatic rivet tool can cost hundreds of dollars. If you’re planning to install hundreds of rivets, you may want to invest in a better tool to make it easier.
Solid rivets require a little more skill to get just right, but can be installed with a pair of hammers. A pneumatic tool to help hammer down on the rivet makes it easier, but isn’t completely necessary.
Part preparation only requires an appropriate sized hole. Because rivets require a tighter sized hole than a bolt, rivets are a little less forgiving if holes aren’t aligned. Often parts are temporarily clamped together and a hole match drilled through both parts for the rivet to be installed. Check out this article for a deep dive into several of the most common rivets and their alternatives.
Other Considerations
As mentioned above, rivets require a relatively tight hole. Because our fiber lasers have industry leading tolerancing, your laser cut parts will always fit as drawn. Rivets also have a specific range for the thickness of parts being clamped together. When buying rivets for your project, be sure to choose the right diameter and length.
Adhesives
The Basics
Adhesives are chemical compounds used to bond two parts together, either temporarily or permanently. Adhesive bonding can be a great way to join materials too thin to be secured with typical fasteners.
One advantage of adhesives is that they can be used to secure thin or delicate parts. Adhesives can also be used as a temporary option to hold parts together for other operations such as match drilling holes or grinding/cutting the same profile into two separate parts. Adhesives, such as silicone, can also serve several purposes at once, acting as protection, bonding agent, and flexible joint material.
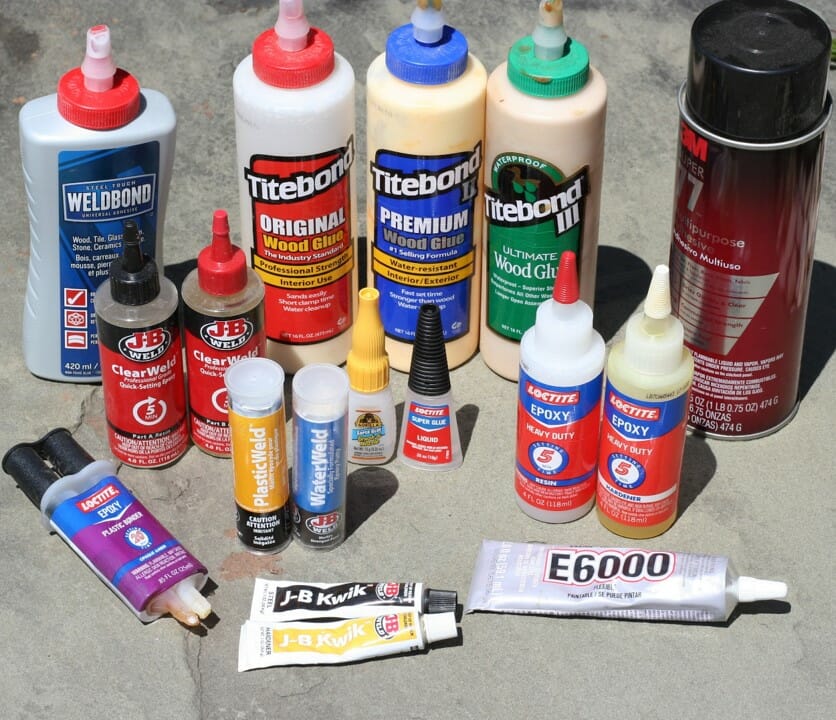
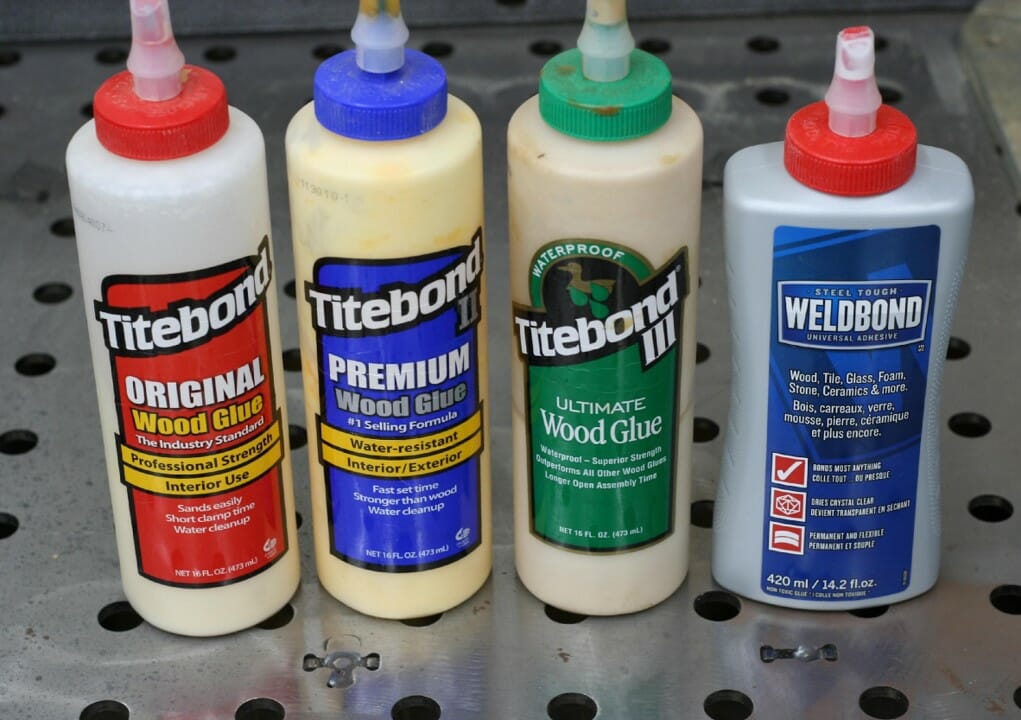
Adhesive selection is often dictated by the material you’re bonding: wood glue used to join two pieces of plywood will be stronger than the wood layer itself, but that same glue is useless between two sheets of aluminum.
There are those adhesives which are designed to bond about anything relatively well: Super glue and many epoxy adhesives fall into this category. If joining metal is on your list of to-do’s a metal epoxy such as JB Weld is what you need; these adhesives include special chemicals to etch the surfaces, and are able to bond metal together reliably enough to be used in car manufacture.
Contact cement, because of the application and pre-cure process, is also effective on many materials, and is excellent for bonding such delicate materials as our cork to a substrate.
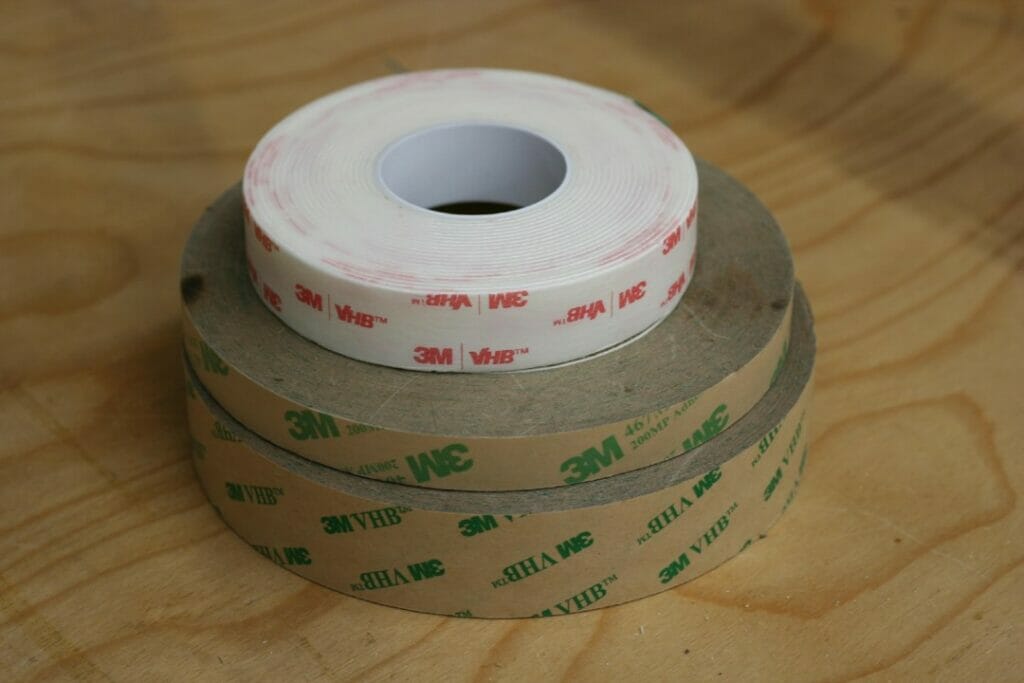
Tape. That’s right, tape. We’re not talking masking tape or even duct tape here. Those aren’t suitable to permanently attach your parts together. We’re talking the strong stuff, typically found with an acrylic adhesive on both sides. Double sided tape can be used to join just about every material we offer to any other material we offer. Some double sided tapes, like those with quality polyurethane adhesive, are strong enough to permanently join light structural components. They can also be used to join delicate or decorative pieces. The trim and badges on a lot of production vehicles are held on using double sided tape.
And finally, specialty adhesives exist for several of the materials we offer. Acrylic for example can be welded together using acrylic cement. Delrin and UHMW are especially resistant to adhesives, but there are specialty adhesives designed to work with them.
Materials
We discussed a lot of materials above. With adhesives, the options vary so widely that the materials you’re joining play a very important part in choosing the right adhesive. If you need to join different materials together, adhesives can be a great option. Follow the manufacturer’s instructions and you should get the results you expect. The good news is that there is likely an adhesive out there to join any of the materials we offer.
Skills/tools required/part preparation
There aren’t really any skills required to use adhesives other than figuring out how much to apply and getting an even layer when appropriate. Depending on the adhesive, you may need some extra equipment. Glues like cyanoacrylate and wood glue typically don’t require any special equipment, but you may want a roller to help evenly press down parts joined using contact cement. Some epoxies can be mixed together without any special equipment, some require very precise mixing ratios which might necessitate a special mixing gun or even a scale to measure out amounts.
Part preparation for adhesives will depend on the adhesive. Most will require a clean surface. Some will require the surface be roughed up with sandpaper so the adhesive has something to mechanically hold on to. With most adhesives, the more surface area you can adhere, the stronger the bond will be. So plan the shape of your parts accordingly.
Unlike bolts and rivets, adhesives may require some cleanup. Wood glues can typically be cleaned with water. Stronger adhesives might require a stronger solvent for clean up, like mineral spirits or acetone. CA glue isn’t the strongest adhesive, but it is stronger than skin, so if you end up gluing your fingers together you might want to have a debonding agent on hand (no pun intended!).
Some other special equipment we didn’t mention with bolts or rivets, personal protective equipment. Adhesives are chemicals, so you’ll probably want to protect yourself appropriately, whether that’s your eyes, hands, clothes, lungs, etc.
Other Considerations
Adhesives are available in a lot of variations. Pay close attention to the instructions for your particular adhesive. Adhesives can also be more susceptible to environmental factors like moisture and temperature than other types of fastening methods. We discussed equipment above, but keep in mind that adhesives are chemicals, so use them appropriately and take the necessary precautions.
Adhesives are basically a one shot method for fastening. Once the adhesive is applied, you’re not likely to get the chance to change your mind. You’ll want to have things ready before you apply the adhesive.
Soldering/Brazing/Welding
The Basics
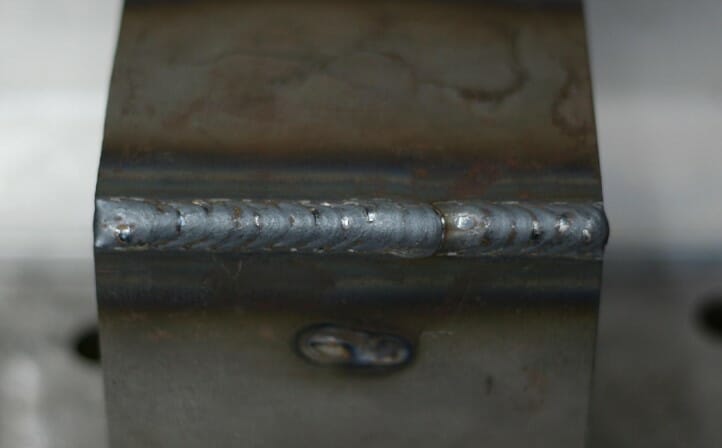
The primary difference between these three methods of joining metal is temperature: Soldering and brazing both involve melting a filler metal with a lower melting point than the two parts to be joined, and rely on capillary action to draw that filler into the seam, creating a strong bond. When welding, the filler metal and the base metal from both parts should melt, to form a bond with strength characteristics as good or better than the original parts.
The advantages to soldering/brazing/welding are that they form extremely strong, permanent joints. In many cases welded joints are ground flush, leaving a seam that is indistinguishable from the rest of the part. If high temperatures are expected, no joining method is better than welding.
Materials
The most common materials involved in these processes are metals, although plastics can also be effectively welded. Silver solder is a great way to join brass and copper parts. Because soldering and brazing don’t involve melting the base materials, two different metals can be joined together easily. Braze aluminum to brass, steel to copper, etc.
Nearly all metals CAN be welded, but not necessarily all metals SHOULD be welded. Heat treated/tempered materials for example can be welded, but the temper will be affected. AR400/AR500 can be welded, but to get the best results special care should be taken. Highly alloyed metals like 4130 Chromoly can be welded, but again the right filler material and welding process should be used. Improper welding on certain materials can lead to cracking and joint failure as the joint cools.
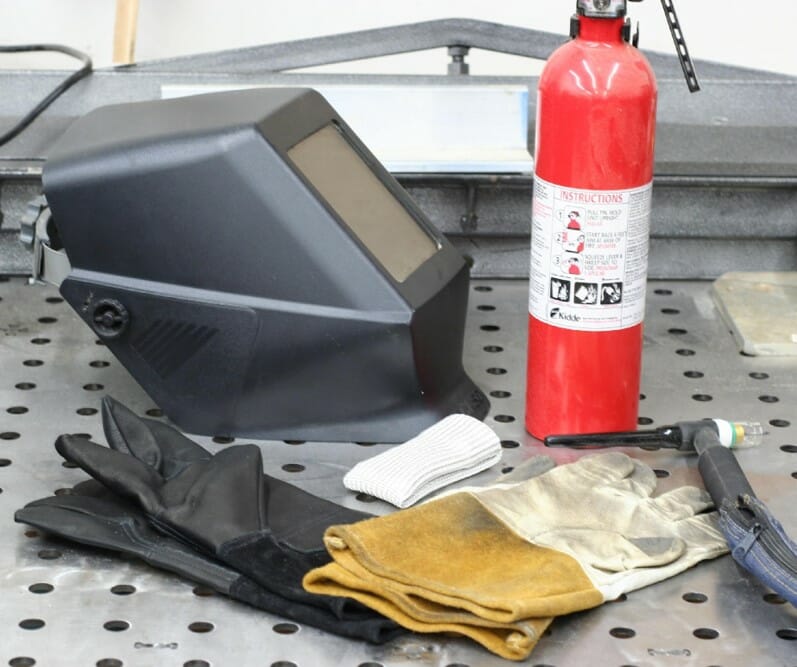
Skills/tools required/part preparation
Of all the methods we’ve discussed so far, soldering/brazing/welding all require the highest level of skill and equipment. Soldering can be done with some silver solder or other appropriate filler and a propane torch.
Brazing can similarly be done with an oxy/acetylene torch and brazing filler material. The TIG brazing method, wherein bronze filler rod is used in place of a normal weld rod, is also a great method of joining dissimilar metals.
Welding will require the most equipment by far. Welding can be done in multiple ways with all sorts of equipment, from oxy-acetylene kits, to stick, MIG and TIG welders. For a deeper dive into these methods, see this article.
Other Considerations
These processes are permanent, so let’s look at a few pointers:
- Material Thickness: Special care should be taken when joining thin material to a thicker piece. The thin material will tend to “blow out” before the thicker one is warm enough to flow the filler. Make sure the heat the larger piece accordingly.
- Warpage: because heat is being applied unevenly, the metal will tend to distort and shrink close to the heat affected zone (HAZ) so minimize the amount of heat, and preheat parts when possible.
- Care and cleaning: With all three methods, a joint can look good on the surface but not be fully bonded. This can happen because of corroded metal surfaces, gaps between parts that are too large, incorrect filler material/flux or insufficient heat.
- Weld joints will shrink slightly as they cool, so take care to plan for that. Don’t be surprised if you clamp down parts with a perfectly sized gap before welding and after welding that gap is slightly smaller.
Combinations of Methods
Now that we’ve discussed a handful of options for assembling your laser cut parts, let’s look at some examples of combining those methods.
Example 1
You may want the ability to bolt your parts together, but don’t have access to get a wrench to hold the nut on the back side of the part. If you can’t tap the base materials directly, another option is to weld a nut to the back side. The nut will be permanently held in place and you can tighten the bolt without needing access to hold the nut. Done correctly, the weld can be just as strong as the nut. Be careful not to apply too much heat to the nut using this method, the threads can be warped making it nearly impossible to install (or remove) your bolt.
Example 2
Similar to Example 1, adhesives can be used to bond threaded fasteners to non-metal (or metal if you want to avoid welding). A nut can be glued into a hole in a plastic or wood part. Threaded studs or bolts can be installed into tapped holes along with adhesive to make it more permanent or prevent it from backing out during use. While there are adhesives that can add a significant amount of resistance to twisting the fastener out, you should be careful when applying torque..
Example 3
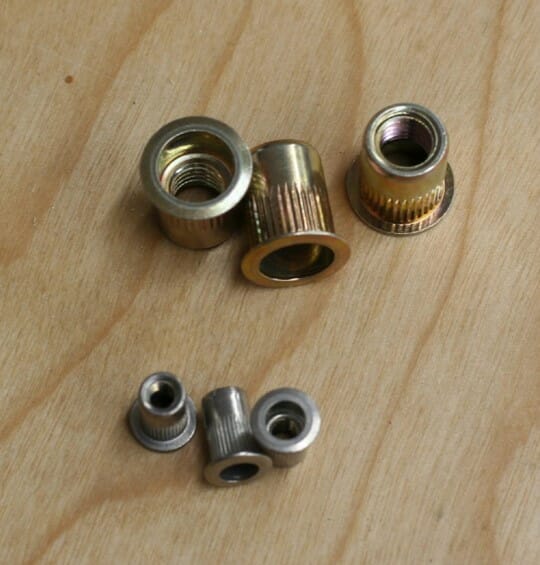

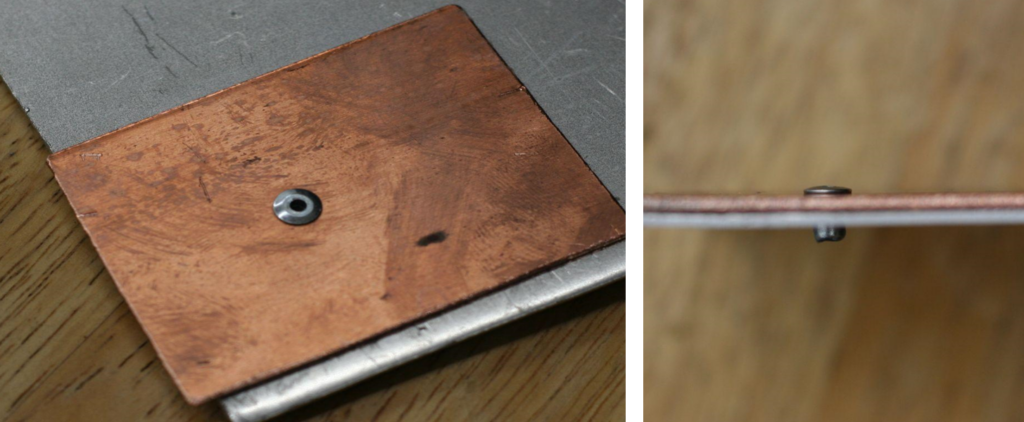
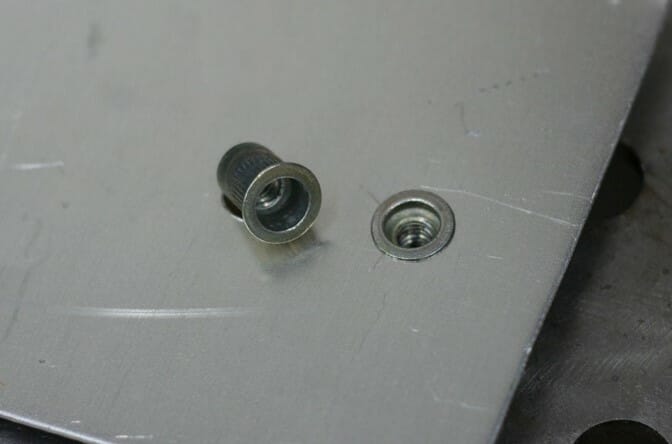
The last example we’ll discuss is a combination of threaded insert and rivet, called a rivet nut or rivet stud. These work similar to pop rivets, the back of the rivet is deformed through a hole to grab onto the material. The difference is that in addition to the head of the rivet, there is a threaded hole or stud that can be used with machine screws/nuts. These are useful when you need a threaded hole, but the material is too thin to tap directly, or when you don’t have access to the back side to use a regular nut. Because there is a small lip on the top side of the material to clamp down, they do protrude slightly from the surface, so you’ll want to keep that in mind.
Conclusion
We’ve covered some of the more common methods for assembling your laser cut parts whether they’re decorative or structural (or both!). We’ve really only scratched the surface for the amount of information available on any of these methods, but armed with this information, and our ever-growing list of Services, your next project is off to a great start. When you’re ready, our instant pricing app will walk you through the process to get that project started.


