A flat pattern design can be used to make things from an assortment of different materials. Many of the products around us start out as a flat object and then are shaped with bending, molding, and the removal of material.
You have your soft goods such as: clothes, bags, wallets; which all start from a flat piece of material such as a cotton blend, canvas, leather, and more. You have thermoplastics (a plastic that can be heated to take form and then reheated over and over to take a new shape, ex: polystyrene) that can come as a flat sheet and can be molded into all sorts of shapes. Wood often starts out flat and is then shaped for objects such as furniture. The list goes on and on including metal, composites, plastics, and more, which are some of the primary materials available from SendCutSend.
How Do You Make A Flat Patten?
When working on a new laser cut project you are not always going to use flat patterns. However it is important to remember that the majority of the time there is more than one way to create a shape or meet the requirements for a custom piece. I always like to begin with the objective that the item can be made from a flat pattern. If you have a complex final piece a great way to start is to draw out your idea in its final 3D perspective, so you can wrap your mind around what your end goal is.
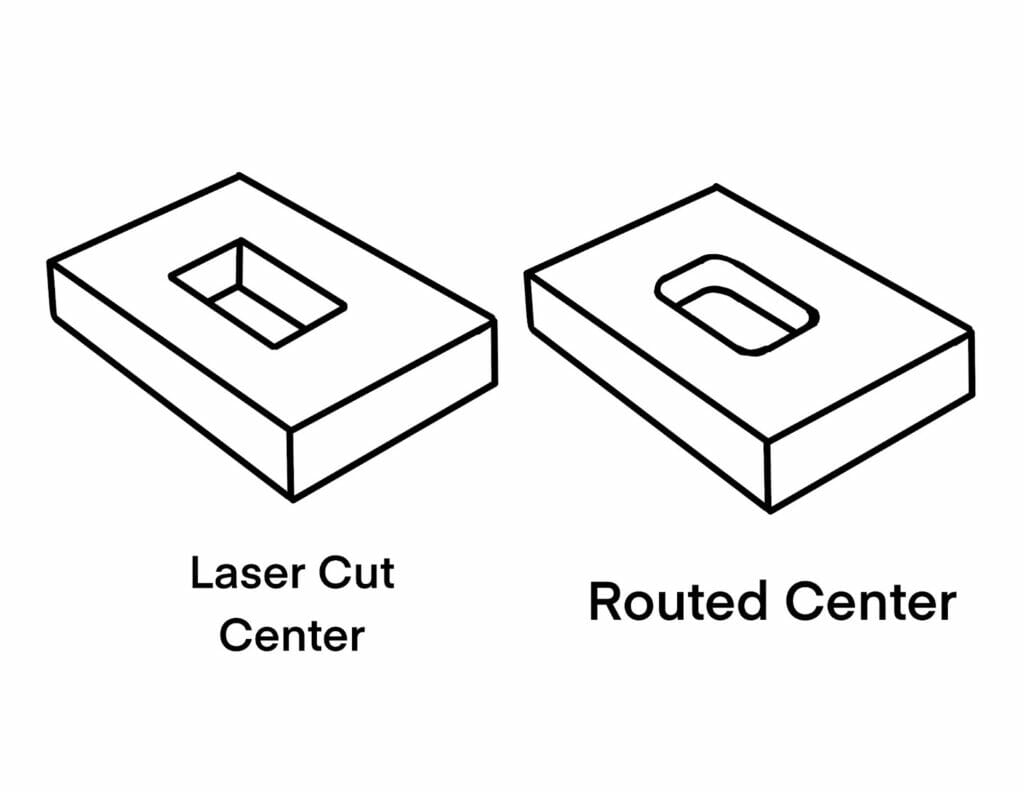
If you are good at drawing go ahead and try to include what the shape will look like with the process you are working with. For example, if you are routing a piece of Micarta (LE Phenolic) include that in your drawing by adding the curve on inside corners that will inevitably be there from the diameter of the router bit.
This will help ensure that you don’t skip or forget future steps for the project. A big part of the process from there is to reverse engineer the piece from the end model to the beginning pieces. You need to ask yourself, ‘how does this piece look flat?’ If you are bending a piece of metal you need to ask yourself if you have enough of a flange from the base to accommodate the distance needed for the application. Is your material thickness going to hold the weight your piece may need to bear?
This process can be made easier with CADD(Computer Aided Design & Drafting), drawing, prototyping, and envisioning. Through trial and error you will find yourself getting better at guessing the correct parameters for your parts. Be sure to check out SendCutSend’s design guidelines and material info pages to find their required specifications for each cut method and service.
Apply The Resources at Your Disposal
In the making of a flat pattern you have to think outside the box to what is possible, because as stated before there are many ways you can change a piece that starts flat to cater to your project. For example, I was recently working on a project for my truck, which was a mounting system for a roof top tent. I could have ordered a mounting system that was premade but I wanted a mounting system that fit my needs. I ended up spending the same amount of money, if not less, for my original custom piece.
Here is what was required of my project:
– I wanted the height of my tent to align with the height of my truck to eliminate extra drag created by wind.
– I needed the height of the mounting system itself to allow for larger objects to slide into my truck bed, such as a cooler and large boxes.
– I wanted my mounting system to be able to adapt to a system that would allow for dry storage in the bed of the truck.
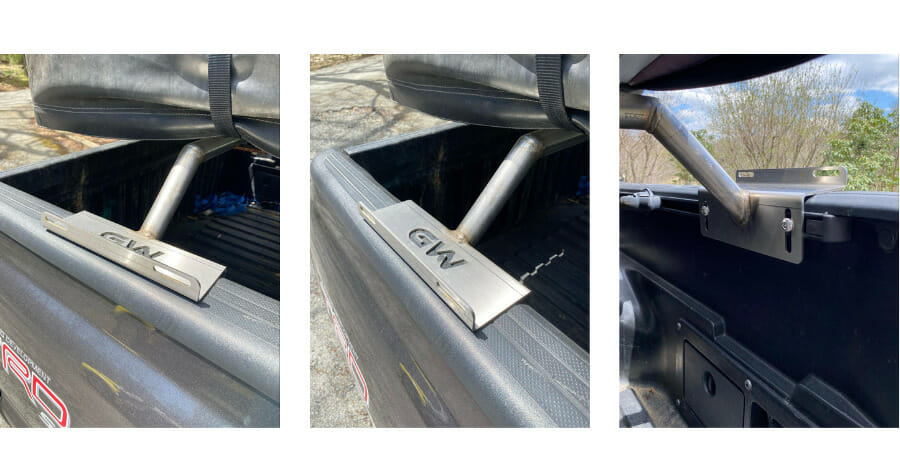
– I needed a way for my mounting system to adapt to the rail system that comes standard on Toyota Tacomas.
After I nailed down what I wanted out of this project, I thought, how can I make it happen? My mind immediately shot to SendCutSend, as it usually does for many of my projects. I fortunately have a C02 laser cutter so this helped me with my prototyping process before I made it with the final material.
I made the file and cut the pieces out of cardboard so I could easily bend the pieces as they would be bent for the metal piece. I often use this process for prototyping. Simply find a piece of plastic or paper laying around that is ideally around the same thickness as my planned final material and start cutting. The cool thing about this is that you don’t even need a laser cutter to accomplish this. You can get some graph paper and draw it out, or you can draw the piece in CAD, and print it out on a piece of paper for more precise prototyping, then use some scissors or an Exacto knife to cut it out. This will also save you a lot of time and money.
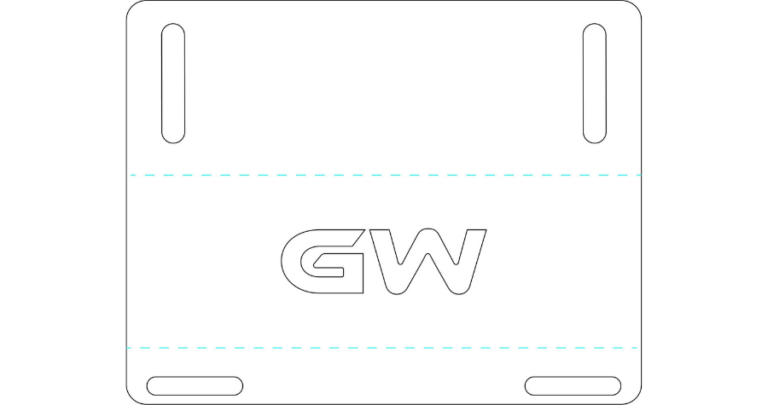
Once I had the pattern to my liking, I sent it off to SendCutSend to be cut. In the example below the blue lines on the file represent the lines in which I needed to be bent. Check out SendCutSend’s bend file setup guide here: Designing for Online Sheet Metal Bending Services
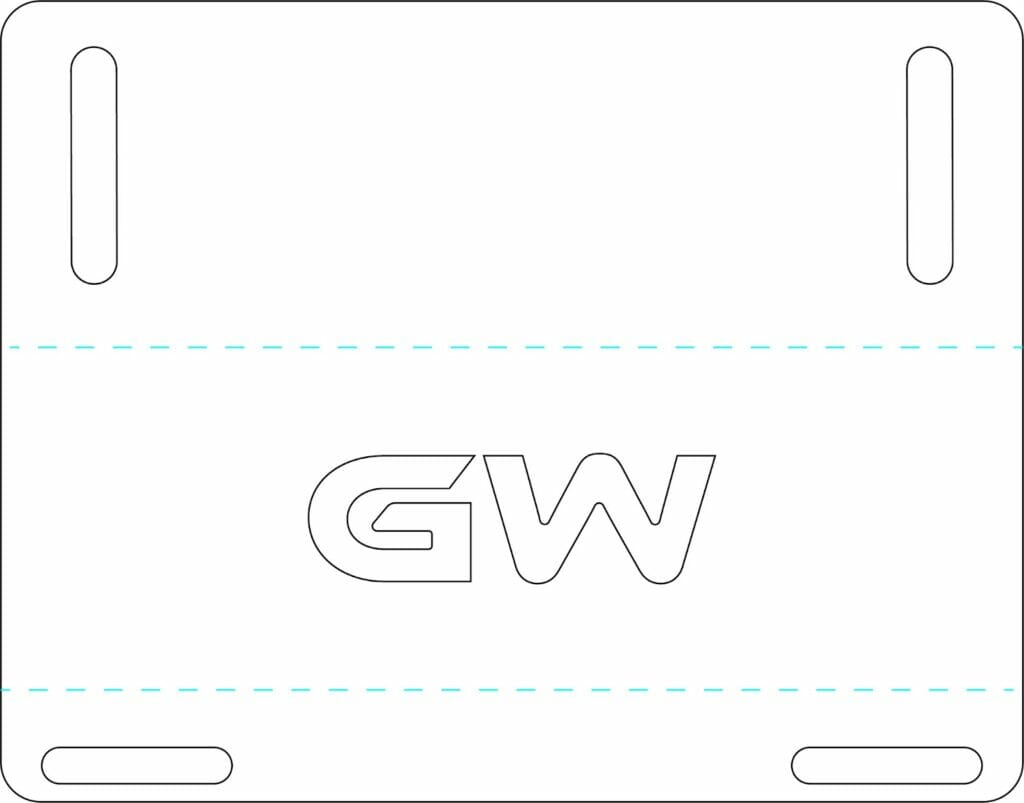
The power of laser cutting allowed me to add even more of a personal touch and I added a cut out of my business logo to the center of the piece. I then made a simple drawing for a local fabricator to read for welding it up to some round stock.
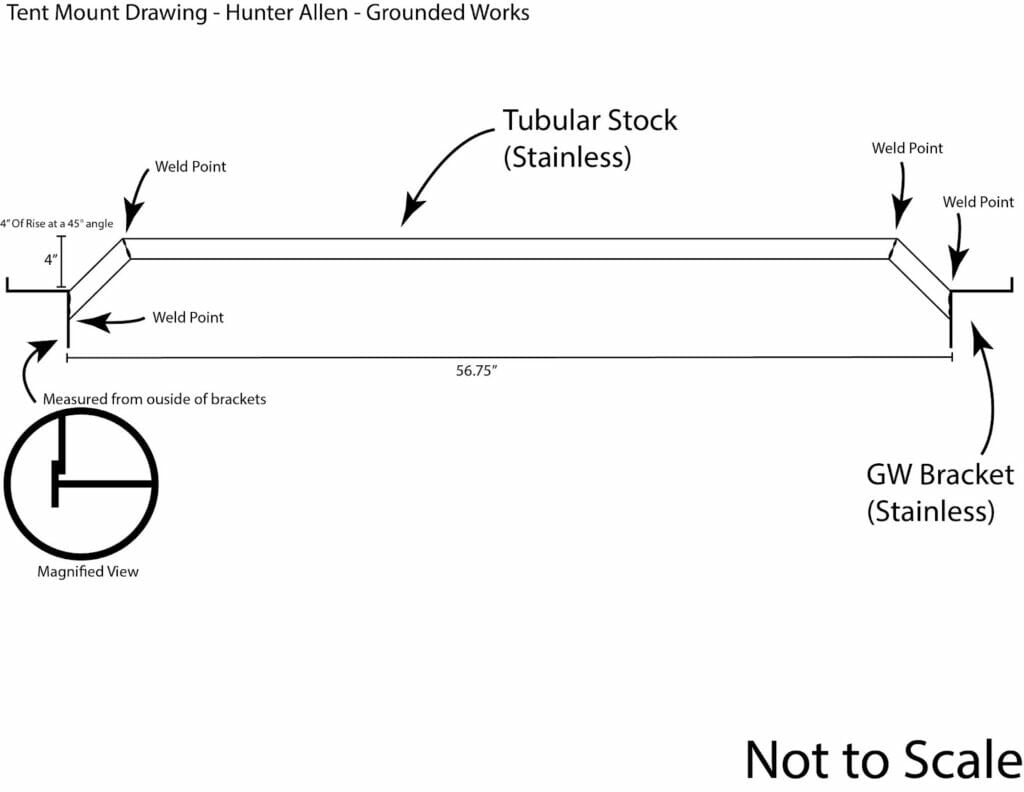
The final piece was made completely out of stainless steel. The flange facing up towards the outside of the truck and directly in front of the GW logo, was my solution for a system that would make the truck bed dry space optional.
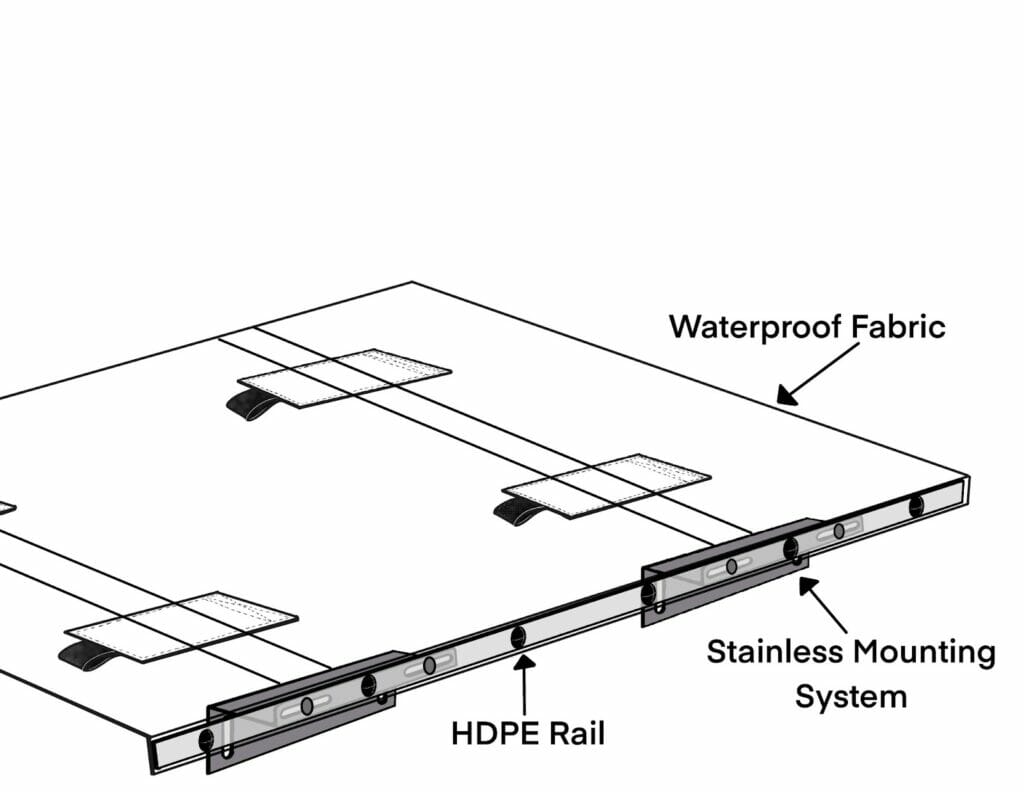
I plan to eventually route out a piece of HDPE plastic that will act as a rail that travels the distance of the truck bed and is attached to the two stainless steel mounting bars. This piece will secure a piece of waterproof fabric that will be snapped to the HDPE. Every piece of this project, other than the round stock, will have started from a piece of flat material!
Keep It Simple
Keeping it simple is always ideal, there is no need to over complicate things, (usually where you will find flat patterns getting complex is in sewing where you have crazy shapes that make an item stand out.) On the other hand a rather simple design can go a long way, as shown in the tent mounting system. A lot of the time people presume that my laser cut parts were CNC routed, but much of the time a piece doesn’t need to be routed unless it has a complex 3D geometry or the material for your project doesn’t suit a process such as laser cutting or water jetting.
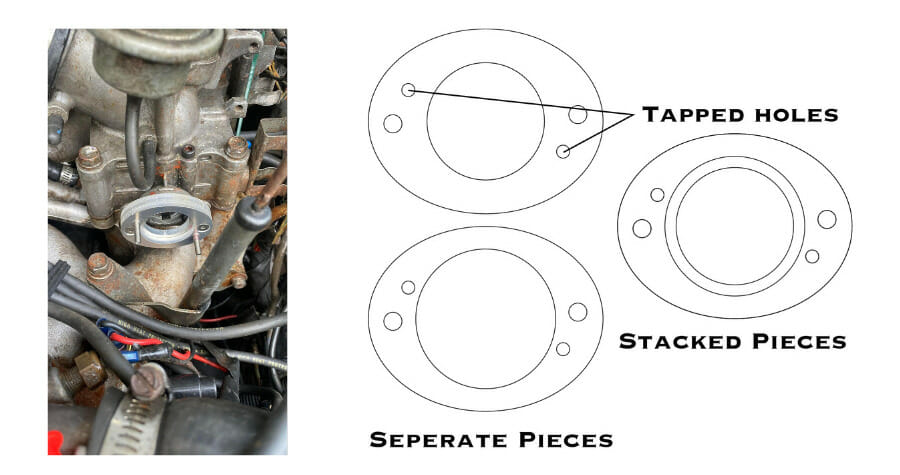
I did a car part for a client who thought that SendCutSend was going to be able to do a partial cut out of some metal for him, I informed him that SendCutSend does not offer partial cuts. We quickly thought up a solution for the problem, and that was to stack two pieces of metal to accomplish the shape needed for the car part. He would tap the holes and screw the parts together for a great fit.
Laser cutting made this process way faster than it would have taken to route the piece from a singular piece of metal.
Where Can You Apply Flat Patterns?
When it comes to flat patterns, I have helped people with artwork for their home, custom signs for a business, car parts, gussets for a custom poker table, mounting systems for cameras, as well as a system designed for a heavy, solid wood, and a piece of artwork that required a custom mount.
Think about where flat patterns be used in your endeavors. How about an RC Car, a dirt bike, a surfboard, or knife making. Who knows? The opportunities are endless when you apply the ‘Art of The Flat Pattern.’
Setting Up A Flat Pattern For SendCutSend
If you are going to have your pattern cut out by machine you need it in a format that a computer can read, if you don’t know how to do this, there is a list of design partners with SendCutSend that will help you start to finish with the making of files and more! SendCutSend accepts vector files such as: .ai, DXF, EPS, and DWG. You can check out their list of recommended software programs here and all their file export advice here.


