Design for Manufacturing and Assembly (DfMA) is a method that focuses on designing parts and assemblies to be easier to fabricate and assemble, which reduces costs, improves accuracy, and minimizes defects. Simplifying fabrication and assembly processes leads to faster production, higher quality, and better scalability, making it easier to transition from a one-off build to mass production. This blog will explore how to leverage SendCutSend to implement DfMA effectively for your projects.
Design for Manufacturing
Design for manufacturing specifically deals with the creation of a part. This is turning a chunk of material into something that will be assembled with the end product or build. The goal is to make it easier for people or machines to manufacture the parts.
Material Consideration in Design for Manufacturing
The first thing to consider when starting to design for manufacturing is your material. Is the final product going to be in chemicals? In a plane? Touching food? All these give different answers for materials. If the end product is a simple sign, there is no need to use space shuttle-grade titanium. This will help save on cost.
For chemical-resistant items, titanium and some plastics are a safe choice. For aerospace, the material needs to be lightweight, but strong at the same time. This is best for aluminum and for extra strength, titanium. For food applications, UHMW and stainless steel are great choices.
On top of this, sometimes it’s less expensive to get a chemical-resistant coating on your part to ensure its integrity. Aluminum with a chem-fil might still be cheaper than using stainless steel or titanium.
Generally speaking, the stronger the material is, the cost of your manufacturing will increase. This is because it is far easier and less intensive to cut wood compared to cutting a type of steel. For reference, take a CAD, and select different materials using SendCutSend’s app.
Understanding CNC Machining Practices
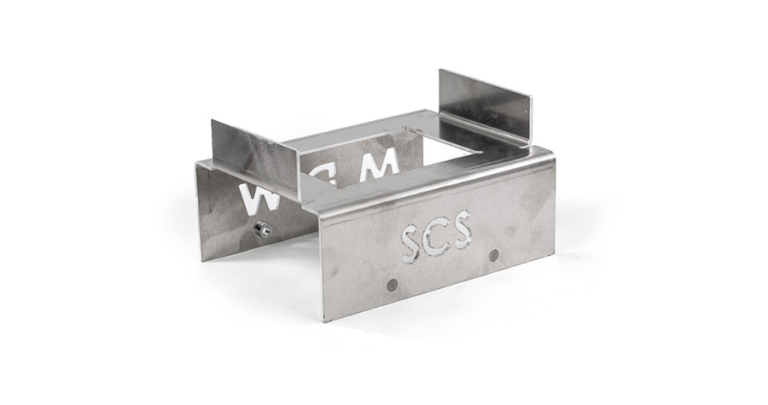
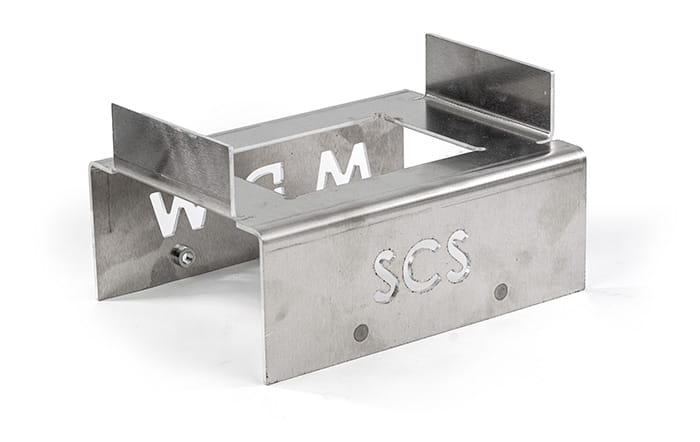
When designing for manufacturing, it is necessary to consider how the part is made. With the help of SendCutSend, laser cutting, waterjet cutting, CNC routing, and sheet metal bending are available to make the perfect part.
Each type of machining practice is best used for a different material. Waterjet cutting can cut metals, but is best for things like carbon fiber which can be difficult to do in other methods. CNC routing is best for wood and plastics. Finally, laser cutting is best for metals up to a certain thickness.
Laser cut sheet metals can be bent and formed into different shapes as well. This is a great way to turn a 2-dimensional material into a 3-dimensional part. A great example of this can be seen in desktop computer towers. Most of the inside and outside are bent sheet metal pieces.
It is best to add bend reliefs when needing bends that are flush with the edge of a part. This ensures that when the sheet metal is bent, no damage or cracks form.
SendCutSend has an in-depth guide to bend reliefs that serves as a great resource before ordering your part.
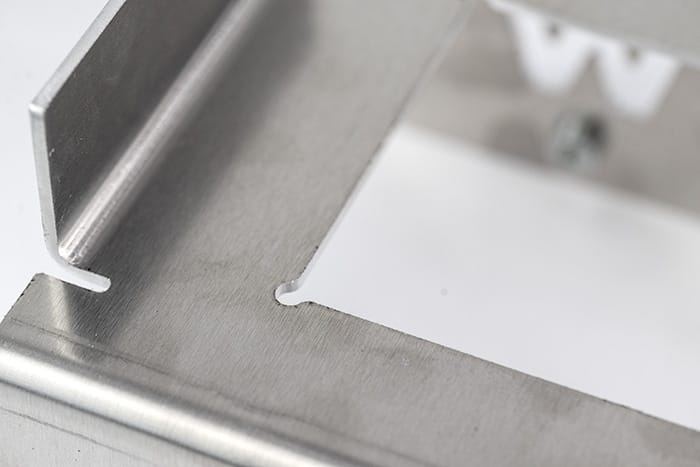
If there are key characteristics on a part, ensure that they are not too close to a bend. It’s best to keep a bending die width away from features or they will be distorted. Follow this bending deformation guide before bending your parts with SendCutSend.

Simple Designs are Easier to Manufacture
The best parts to manufacture are the easiest to manufacture. This doesn’t mean easier for the designer, but easier for the machine or tools needed to create the part.
A great example of this is to round any sharp corners. No tool exists when cutting sheets of material that can create a perfect ninety-degree corner.
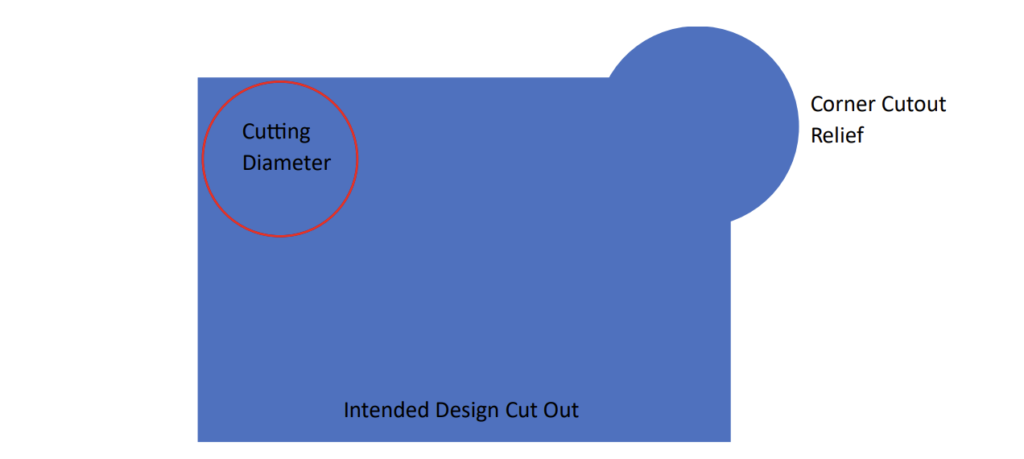
From the above diagram, the cutting diameter will never be able to cut the inside corner. Most cutting devices are circular, so it is always best to round your inside corners. If the assembly requires a part with a 90-degree corner to be placed in a cutout, it’s best to add a relief for the corner. This can be seen in the upper right-hand corner of the above figure.
Even though the cutting diameter can cut perfectly square outside corners, it’s still best to round them a little bit. This helps the machine’s accuracy and does not have to deal with backlash as the tool cuts around. Additionally, it leads to parts that are safer and are less likely to cut fingers.
How to Save Money When Ordering Sheet Metal Parts
The above recommendations will help reduce cost, and make parts to be assembled easier. Once you scale this, the cost per unit drops dramatically and allows you to build products for potential profit. SendCutSend’s instant pricing allow you to see the drop in the cost per unit for every multiple item you order. This is due to not having to reset the machine for new parts. The more that is requested, the less per unit cost,will be spent.
Design for Assembly in Sheet Metal Manufacturing
When making a project or a product, something to consider is the time it takes to assemble. Is it quick and simple? Or is it long and confusing? It comes to no surprise the easier something is to assemble; the fewer quality issues occur. This is the basis of Design for Assembly. It is to make the assembly process as easy as possible to reduce time and confusion, and improve quality at the same time.
Simplicity of Assembly
The first practice of design for assembly is reducing the number of parts. Which is easier to build, a 40- piece puzzle? Or a 4,000-piece puzzle? Designs and projects should follow the same general principle. A low-hanging fruit for this is by having permanent fasteners. It’s better to have one loose screw in a build compared to a loose screw, washer, lock washer, and nut. SendCutSend’s hardware insertion for parts is a great way to do just this. It is better to have an inserted nut into a part and never have to worry about loose hardware.
Additionally, can one part of the assembly be multipurpose? Rather having one part that is meant for structural support, and another part for a strong exterior shell, you can have one part do both. Smartwatches and smartphones do a great job on the side that does not include a screen.
Finally, remember who is assembling the project. If a person is, try and leave space for tools and fingers for part assembly. If it’s being assembled by a robot, consider the workspace of the end-effector and the type of end-effector. The easier it is for the assembler, the better the project will be.
Standardize Parts and Fasteners for Efficiency and Cost Savings
As discussed before, the more you order of one part, the cheaper it will be, but on top of that, if you use the same repeat parts, the simpler the assembly process will be. Even further, standard parts that are easily and readily available make a project much easier to assemble. A great example is an RC car. The design could call out a custom motor, or a standard off-the-shelf motor. If the standard off the shelf motor was used, standard dimensions and other parts are also readily available.
Diving into this even more, standardizing fasteners is an easy way to improve the assembly process. It’s best to have to sort through one tool and one screw rather than 30 screws and 5 tools. There is less fumbling for the right tool to get the job done.
Mistake-proofing or ‘Poke-Yoke’
There is a Japanese practice of mistake-proofing designs called Poke-Yoke. This is the practice of making the assembly impossible to assemble wrong. This can take different forms of design implementations.
The greatest example of poor poke-yoke is USB connectors. Billions of people have attempted to insert a USB cable or drive into a computer the wrong way.
There can be two schools of thought behind this. The first is to make the shape of one part only fit in the correct orientation. When a three-pronged plug needs to be plugged into an outlet, it is impossible to get the prongs in the wrong slots. When a d-shaft is inserted into a d-shaped hole, it is impossible to assemble incorrectly.
The second school is to make the assembly universal enough that orientation does not matter. When
using USB-C connectors, it does not matter which side goes up. When plugging in headphones, the way
the wire is twisted does not matter.
Using the Right Tolerance
Something that often gets overlooked in Design for Assembly is using the right tolerance. It is easy to apply tight tolerances to the entire build, and hope every part is perfect. That will never happen. It’s best to look at a design and determine where tolerances can be a bit more forgiving, and what is a key characteristic.
If designing for press-fit metal items like bearings, the tolerances must be right to achieve the given function. On the flip side, if the wheel well a car is 2 times bigger than the designed tires, there is no need to worry about a tire that is 5 thousandths of an inch too big.
It is best to always refer to key characteristics before determining tolerance. If there isn’t a list of key characteristic, its highly recommended to make one and review designs on what impacts those key characteristics.
Achieving Balance Between Design for Manufacturing and Assembly
There is a balance between both optimizations. In some cases, it is easy case where you can achieve both. In some cases, there are going to be some hard choices that need to be made.
A design can be assembled in 3 extremely complex parts, or 10 simple parts. There is a reason for both, but it all comes down to budget.
If parts become so complicated that they are too expensive to buy, then prepare for a more laborious assembly process. However, if there are 10,000 units being made, and every second of a production process has massive monetary implications, then the more complex and expensive parts are better. In most cases, it will take a pro-cons list for both.
The best thing is to make those multi-functional parts. Always go back to the end goal of the project and get creative on how to achieve that with the design. Try and keep everything simple and the complications will show themselves in time.


