When planning a bent part in Autodesk Fusion, the first thing to do is create a sheet metal rule for your material of choice if you have not done so already.
What are sheet metal rules?
In 3D programs, sheet metal rules will include the information needed for the program to automatically calculate the correct formed versus flat dimensions for a part. Programs will have default rules and they may not match the properties for the actual material you will be using, or a fabricator’s process.
Creating sheet metal rules in Autodesk Fusion
1. Navigate to the Sheet Metal tab, click MODIFY, and then click Sheet Metal Rules.

This will open the Sheet Metal Rules window.
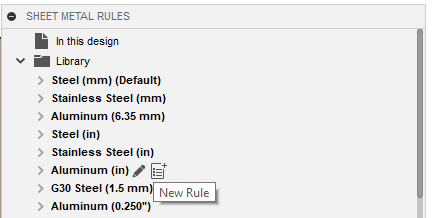
2. Hover over any existing rule to reveal the New Rule icon. Click the New Rule icon to start creating a new rule. Please note: it’s easiest to hover over a rule that already uses the units (inches or mm) that you intend to set up the new rule with.
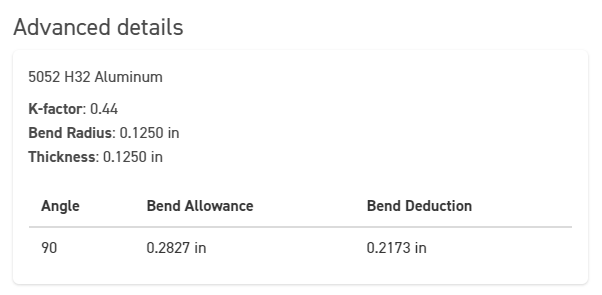
3. Name the rule and update the material Thickness, K Factor, and Bend radius information to match the Advanced Details provided for each bendable material on the Bending Calculator page. To see the Advanced Details, select your chosen material from the dropdown menu at the top of the page and then scroll down to find the specs.
For this example, we’ve selected 0.125” 5052 aluminum. You can also find these specifications for each material and thickness on the individual material pages if you scroll down to find the Material Details and Design Considerations (for example, 5052 Aluminum Laser Cutting).
Units are specified as either in (inches) or mm (millimeters) in sheet metal rules. Make sure all the units are consistent. This should be easy if you clicked New Rule from an existing rule in your intended units.
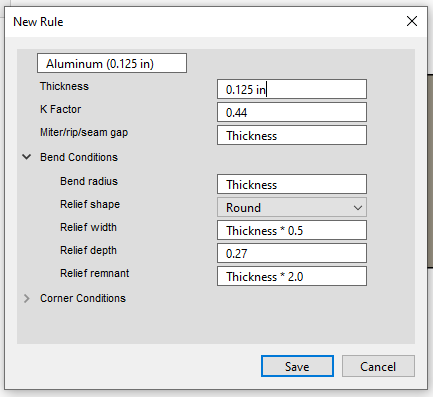
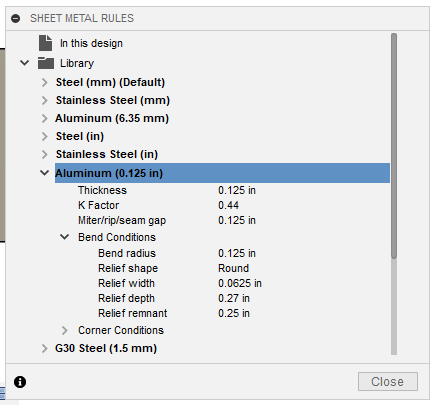
4. When the rule settings are updated, click Save. The rule will be added to your Library!
For pointers on adjusting rules for flanges and creating reliefs in Autodesk Fusion, see our Guide to Designing Bend Reliefs.
When your design is ready, export either a 3D STEP file or a 2D DXF!
How To Export a STEP File from Autodesk Fusion
How To Export a DXF File from Autodesk Fusion
In Summary
1. Navigate to the Sheet Metal tab, click MODIFY, then click Sheet Metal Rules.
2. Hover over any existing rule to reveal the New Rule icon. Click the New Rule icon to start creating a new rule.
3. Name the rule. Update the material Thickness, K Factor, and Bend radius to match the Advanced Details on the Bending Calculator page.
4. When the rule settings are updated, click Save. The sheet metal rule will be added to your Library!